Looking for the absolute best electric build Sodaman has to offer? Stop wasting your time with slow Bleed loadouts and unreliable Toxic DOTs. If you want to melt through alien insectoids without breaking a sweat, you need to go all-in on lightning. By combining high-reload weapons with Deploy sodas like Purple Pain and BZZT, you can create a screen-wiping Chain Lightning engine that practically plays itself. In this guide, we will break down the exact weapons, cybernetic augments, and fizzy concoctions required to electrocute every bug on the map and breeze through Risk 3 difficulty.
Forget what you’ve read on shallow Fandom wikis or scattered Reddit threads. If you are struggling to clear the late-game stages in Tape Corps’ breakout bullet-heaven roguelike, it is not because the game is mathematically broken—it is because your build lacks synergy. The meta has settled since the game hit Early Access in February 2025, and the verdict is absolute: lightning is king.
Why the Best Electric Build Sodaman Offers Dominates the Meta
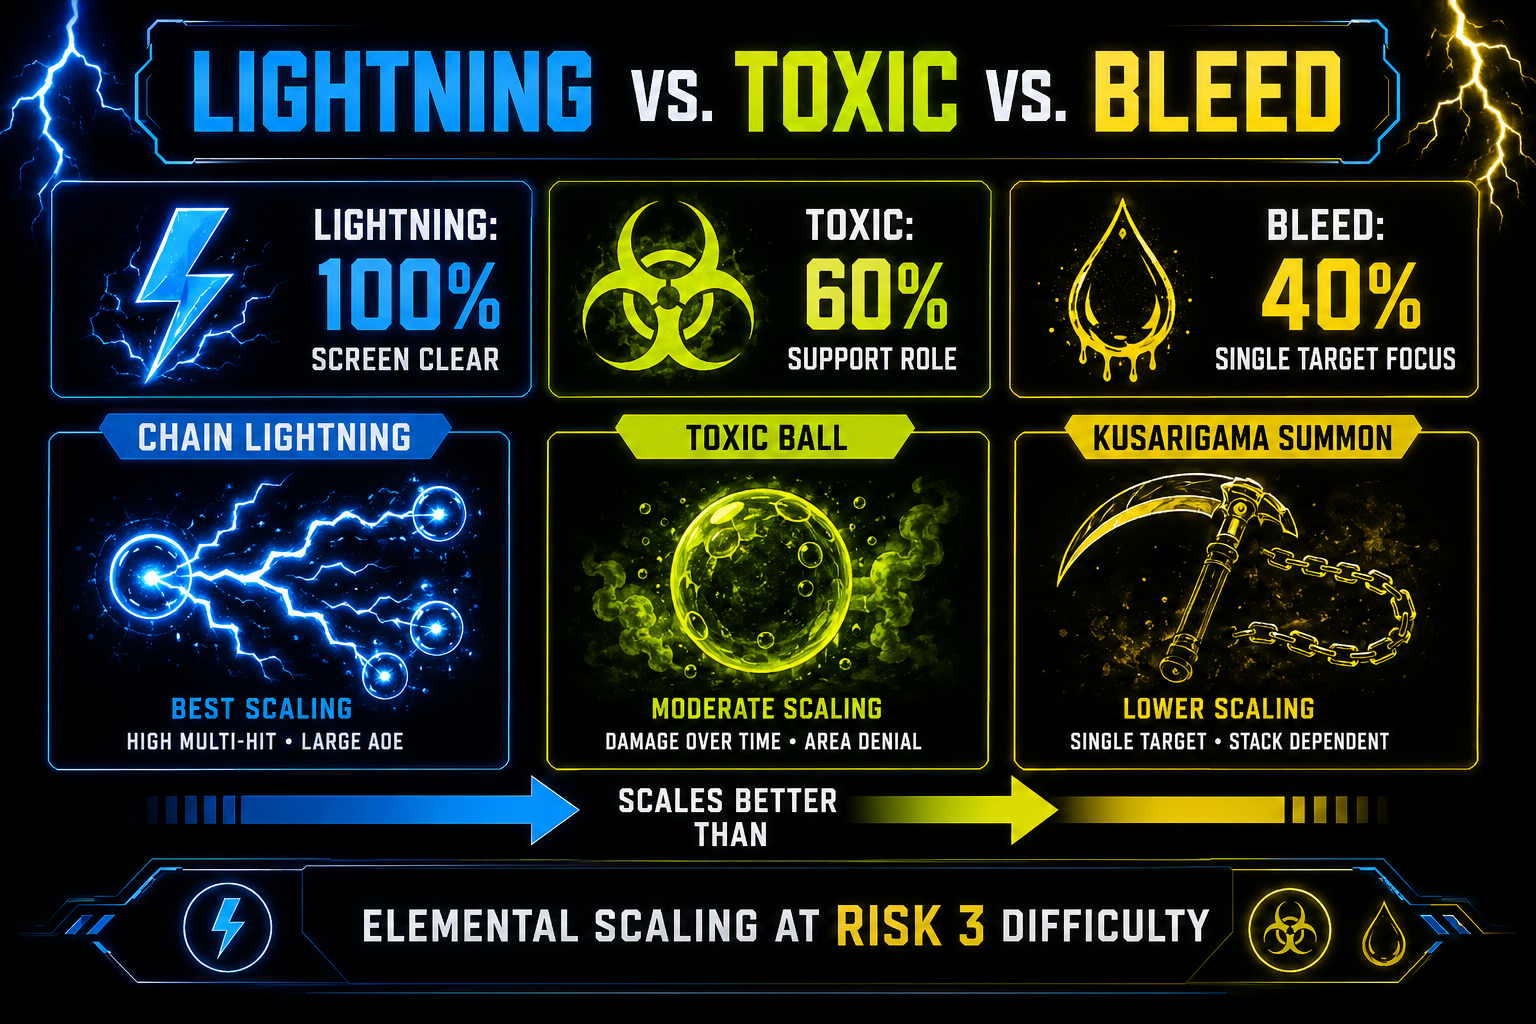
When evaluating the meta, Lightning vs. Toxic vs. Bleed isn't even a contest. In the early stages of Sodaman, almost any build feels viable. You can summon slimes with Slurn or rely on the Hattori soda to spawn Kunais that apply Bleed stacks. But once you push into Risk 3 and face the overwhelming density of the Shocan boss and its endless waves of Crystaloid Golems, single-target damage completely falls off.
Lightning dominates because of its exponential scaling and built-in crowd control. The Electrocute status effect immobilizes enemies while simultaneously dealing burst damage. Unlike Toxic, which requires time to tick down an enemy's health bar, Chain Lightning arcs instantly across the map. When you trigger a lightning effect, it doesn't just hit the enemy in front of you; it seeks out the entire horde. This means your time-to-kill (TTK) drops to zero, allowing you to wipe out waves of enemies before they even fully render on the screen.
Furthermore, the developer’s specific tuning of Spark and Strike slots heavily favors reload-based elemental triggers. Because you can manipulate your weapon's reload speed and magazine size through cybernetic augments, you can artificially inflate how often your electric sodas trigger, creating an infinite loop of map-wide destruction.
Core Sodas for the Best Electric Build Sodaman Players Run
To construct this loadout, you need to aggressively hunt for specific sodas during your run. Do not dilute your pool with off-element picks. If it doesn't say "Electric" or "Lightning," re-roll it.
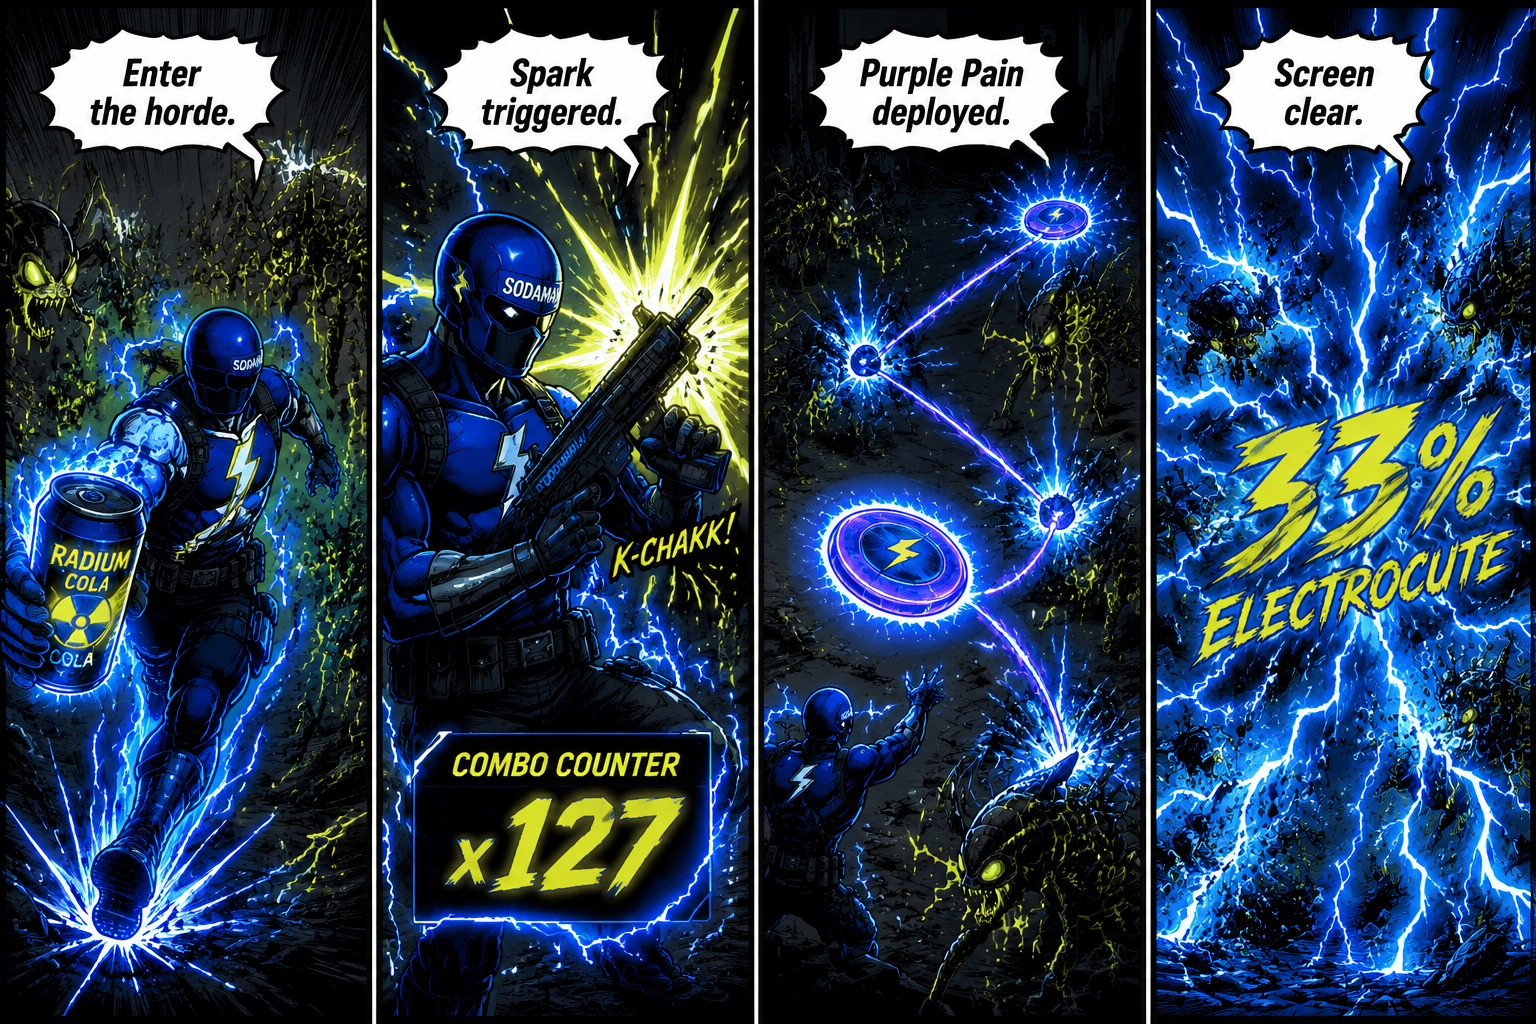
Purple Pain (Deploy Category) Aside from paying clear homage to the legendary Prince, the Purple Pain soda is the cornerstone of any Risk 3 loadout. When deployed, it unleashes a Disc of Electric that locks onto the nearest enemy and bounces aggressively between targets for six seconds. More importantly, every hit creates a Chain Lightning effect that damages surrounding enemies for an extended duration, carrying a massive 33% Electrocute chance. This single soda provides enough crowd control to lock down an entire quadrant of the map.

Blitz (Attack Category) If you want your primary weapon to pull its weight, Blitz is mandatory. This soda buffs your base attack to deal 20% more damage than usual, but its real value lies in its secondary effect: every shot triggers Chain Lightning. This adds an extra 10% damage on top of your regular attack and introduces yet another layer of Electrocute probability. When paired with a high fire-rate weapon, Blitz turns your standard bullets into a localized thunderstorm.
BZZT (Passive/Synergy) BZZT is the glue that holds the electric build together. This soda ensures that the Chain Lightning created by your attacks has a significantly higher chance to Electrocute enemies. When stacked with Purple Pain and Blitz, BZZT guarantees that any bug caught in your crosshairs is instantly paralyzed, giving you the breathing room necessary to navigate late-game bullet hells.
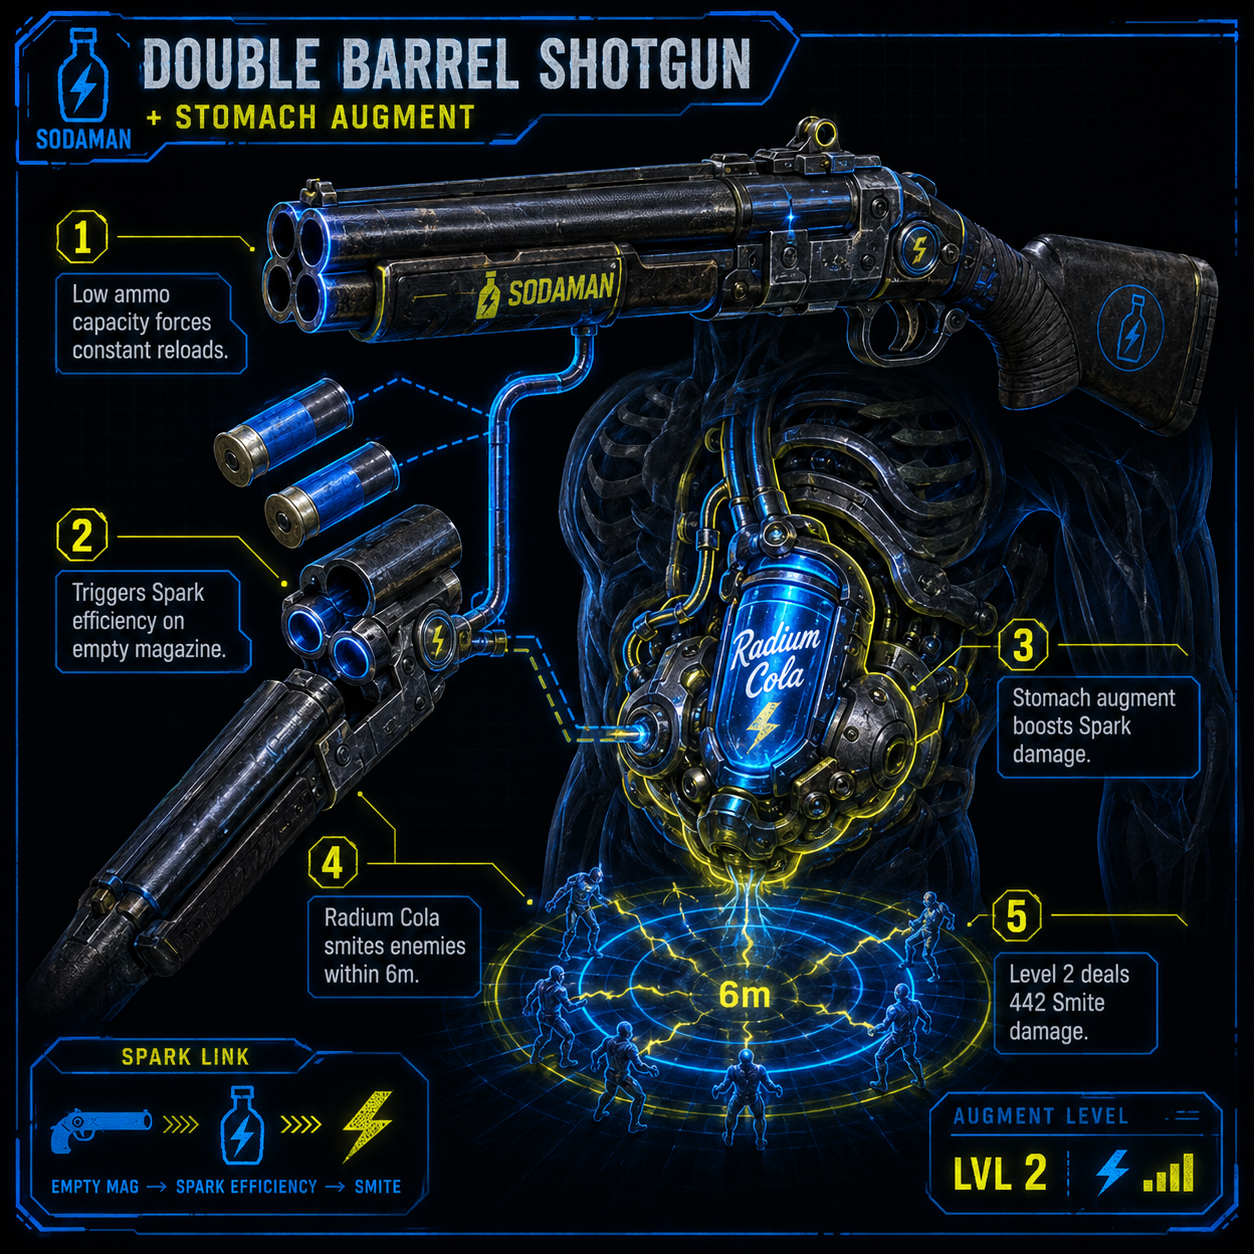
Radium Cola (Spark Category) While technically a Smite effect rather than pure lightning, Radium Cola is an essential pickup for reload-heavy electric builds. Whenever you reload your gun, this cola smites the enemies closest to you. At level one, it deals 260 Smite damage within a 6-meter radius. If you manage to stack two of these, the damage jumps to a staggering 442. Because the electric build relies heavily on emptying your magazine to trigger Spark effects, Radium Cola acts as your close-range defensive perimeter, instantly vaporizing anything that slips past your Chain Lightning.
Meltdown (Passive) Do not ignore raw damage scaling. Meltdown increases all your attack damage by a flat 21% at level one. This acts as a global multiplier for every single Chain Lightning arc and Electrocute tick that procs off your primary attacks.
Weapons and Cybernetics for the Best Electric Build Sodaman Has Right Now
Your sodas are only half the equation. To truly break the game, you must optimize your physical loadout to trigger your soda effects as frequently as possible.
In Sodaman, weapons feature six different color-coded augment slots. The Strike slot is red, and the Spark slot is yellow. The number next to these slots dictates how many corresponding sodas you can attach to the weapon. For the electric build, you want to prioritize Spark slots, as the most devastating lightning effects are triggered on reload.
The Double Barrel Shotgun vs. The SMG While the SMG offers fantastic synergy with Combo counter and dodge bonuses, the Double Barrel Shotgun is the undisputed king of the electric build. If you are running the Double Barrel Shotgun for your electric build, you are playing a reload-heavy Spark engine. The shotgun’s naturally low ammo capacity forces constant reloads, which is exactly what you want when you have Radium Cola and lightning-on-reload Sparks equipped.
Cybernetic Augments To push this build over the edge, you need to invest in the right cybernetics.
- The Stomach Augment: Seek out the specific Stomach augment that boosts Spark damage and Spark efficiency. Efficiency is a hidden multiplier in Sodaman that dictates the raw output of your elemental effects. By juicing your Spark efficiency, your reload-triggered lightning bolts will instantly one-shot mid-tier enemies.
- The Blue Soda Line: Invest your meta-progression crystals into the Blue Soda tech tree. This line specifically enhances Spark efficiency across the board.
- Magazine Size and Reload Speed: Counterintuitively, you want to keep your magazine size relatively low while pushing your reload speed to the absolute maximum. The faster you empty the gun and reload, the faster you trigger your screen-wiping Spark effects.
Step-by-Step Guide to the Best Electric Build Sodaman Loadout
The gameplay loop of a fully realized electric build is a chaotic ballet. Sodaman enters the horde, reloads his weapon to trigger a Spark effect, and watches as Purple Pain is deployed. In seconds, a massive web of Chain Lightning results in a total screen clear, backed by a staggering 33% Electrocute rate. But getting to that point requires careful early-game management.
Early Game (Minutes 1–10): Establishing the Engine Your primary goal in the first ten minutes is survival and targeted re-rolling. Equip the Double Barrel Shotgun and prioritize any upgrades that increase your reload speed. When the first soda chests drop, aggressively roll for Radium Cola or Blitz. You need an immediate source of automated damage so you can focus on dodging the early waves of alien insectoids. Do not waste money on Slurn or Hattori—stick strictly to the electric plan.
Mid Game (Minutes 10–20): The Purple Pain Spike This is where the build comes online. As elite enemies start spawning, you must secure Purple Pain. Once the Disc of Electric is in your loadout, your crowd control capabilities skyrocket. Begin investing heavily in the Stomach augment to scale your Spark efficiency. At this stage, your reloads should be triggering massive bursts of Smite damage, while your deployed disc bounces through the horde, applying Electrocute to everything on screen.
Late Game (Minutes 20+): The Infinite Loop By the time you reach the Shocan boss, you should have BZZT and Meltdown fully leveled. Your screen will be an unreadable mess of neon blue lightning—and that is exactly what you want. Because Crystaloid Golems have spikes that bypass standard hit-pause mechanics, you cannot afford to let them get close. Stand near the center of the map, hold down the fire button to continuously empty your shotgun, and let the automated lightning-on-reload Sparks melt the boss before it can even spawn its secondary minions.
FAQ: Mastering the Best Electric Build Sodaman Meta
Is the electric build better than toxic or bleed in Sodaman? Yes. While Toxic provides decent damage-over-time and Bleed is effective against isolated single targets, Lightning is universally considered the strongest element in the game. It provides immediate, map-wide burst damage and applies the Electrocute status effect, which completely immobilizes enemy hordes. At Risk 3, crowd control is mandatory for survival.
How do I increase my Electrocute chance? Your base Electrocute chance is tied to specific sodas like Purple Pain, which offers a 33% chance on hit. To maximize this, you need to acquire the BZZT soda, which significantly buffs the Electrocute probability of all Chain Lightning effects generated by your attacks.
What is the best weapon for lightning sodas? The Double Barrel Shotgun is the optimal choice. Because the strongest electric abilities (Sparks) trigger when you reload, you want a weapon with a naturally low magazine capacity and a high reload speed. The shotgun forces you to reload constantly, turning your character into an automated lightning generator.
How does Efficiency work in Sodaman? Efficiency acts as a hidden multiplier for your elemental sub-stats. Weapons have red Strike slots and yellow Spark slots. By equipping cybernetics like the Stomach augment and upgrading the Blue Soda line, you increase your Spark Efficiency, which drastically amplifies the damage and radius of your reload-triggered lightning attacks.
Sources
- Tape Corps Official Patch Notes & Developer Updates (Sodaman v1.0)
- GameGrin: Useful Sodas to Pick For Your Sodaman Run
- TheGamer: Best Sodas In Sodaman
- Steam Community Forums: Sodaman General Discussions & Meta Analysis