What are the best upgrades Starforged Legacy has to offer? To survive the endless bullet-hell swarms and defeat the colossal flagships of The Observers, you must prioritize permanent meta-progression unlocks like hull integrity and salvage yields, alongside in-run augments like Pulsing Plating and Smart Rounds. Second Shift Games has crafted a sci-fi survivors-like where your decisions matter just as much as your firepower, demanding a deep understanding of synergy to succeed. In this comprehensive guide, we break down the exact strategy-defining upgrades that turn your fragile starting frigate into an unstoppable cosmic dreadnought, allowing you to carve your legacy among the stars.
Navigating a procedurally shifting galaxy requires more than just fast reflexes. With 16 unique starcraft across three designations and over 160 augments and enhancements, the sheer volume of choices can be overwhelming for new pilots. Whether you are gambling for glory in narrative encounters or trading salvaged resources for permanent fleet-wide buffs, knowing which upgrades to prioritize will dictate whether you conquer the void or become just another piece of battlefield wreckage.
Why Your Build Matters in the Void
Starforged Legacy takes the core addictive loop of the bullet-heaven genre and propels it into deep space. Unlike traditional roguelites where you might rely solely on mechanical skill to dodge enemy fire, this game forces you to construct an automated arsenal capable of melting through swarms of cosmic combatants before they can overwhelm your shields. Your ship fires automatically, meaning your primary agency lies in movement and, crucially, your build path.
Every time you level up during an expedition, you are presented with a curated selection of augments. Early in your piloting career, the game gently introduces you to these mechanics, but once you clear your first run—successfully or not—the entire drop pool of over 160 enhancements opens up. This is where build synergy becomes the deciding factor between a narrow victory and a catastrophic defeat.
Choosing a random assortment of weapons will leave you underpowered when facing specialized threats like the "Shielder" enemies, whose base shields scale aggressively with the sector's threat level. To break through their defenses, you need focused, multiplicative damage scalars rather than flat, disparate stat boosts. Understanding the mathematical relationships between Hull augments, Subsystem tweaks, and core weapon behaviors is the key to mastering the game.
Top In-Run Augments: The Best Upgrades Starforged Legacy Offers
When evaluating the in-run augment pool, certain choices consistently outperform others due to their ability to scale into the late game. The best upgrades Starforged Legacy offers during a run are those that provide dual utility—enhancing your survivability while simultaneously boosting your damage output.
Here are the top-tier augments you should prioritize whenever they appear in your selection screen:
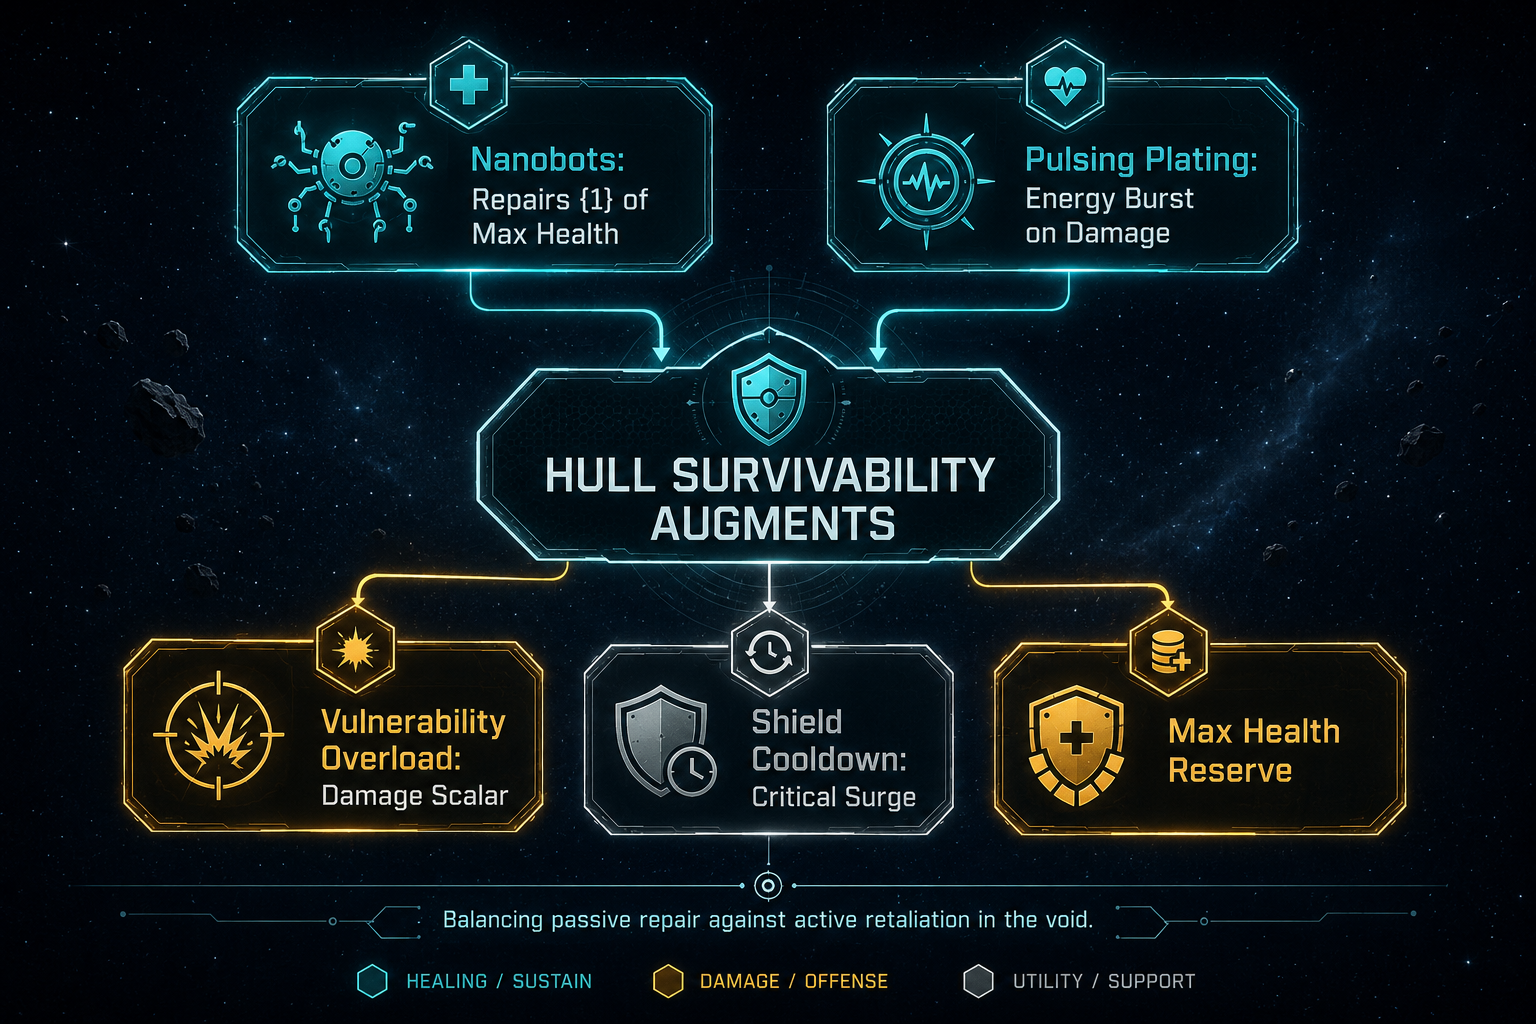
1. Pulsing Plating (Hull Augment) Survivability in Starforged Legacy isn't just about avoiding damage; it's about weaponizing the damage you inevitably take. Pulsing Plating enables your ship to release a forceful burst of energy whenever it sustains hull damage. In the chaotic later sectors where dodging every projectile is mathematically impossible, this augment transforms your hit points into an area-of-effect (AOE) weapon, clearing breathing room when you are heavily swarmed.
2. Vulnerability Overload (Subsystem Augment) For players who prefer a high-risk, high-reward playstyle, Vulnerability Overload is unparalleled. This subsystem increases your Global Damage Scalar based upon the amount of Shield that is currently missing. By intentionally keeping your shields low—or pairing this with augments that strip your shields in exchange for other buffs—you can achieve astronomical damage numbers that melt boss flagships in seconds.
3. Nanobots (Hull Augment) If Vulnerability Overload is the sword, Nanobots are the shield. This augment automatically repairs your ship by a set percentage of your Max Health every few seconds. In prolonged engagements against The Observers, passive healing is vastly superior to relying on random health drops. Stacking Nanobots with Max Health upgrades creates a self-sustaining juggernaut that can weather almost any storm.
4. Critical Surge Originally, Critical Surge removed your Shield Cooldown entirely upon activation, making it a defensive liability. However, recent balance patches have refined this augment, allowing you to maintain your shield regeneration while benefiting from massive spikes in critical hit chance. It is now a mandatory pickup for any rapid-fire build.
5. Speed Enhancement Mobility is life. The Speed Enhancement augment doesn't just increase your top speed; it now grants Movement Speed, Acceleration, and Thruster Power simultaneously. This trifecta of mobility stats allows you to weave through lethal bullet-hell bombardments with surgical precision, making it one of the most vital utility upgrades in the game.
Weapon Enhancements: Autocannons, Smart Rounds, and Nuclear Warheads
Your ship's core armaments are the foundation of your build, but it is the enhancements you apply to them that define your run. With 12 core weapons available, understanding how they interact with specific augments is critical.

The Autocannon is a staple weapon that has seen significant buffs in recent hotfixes. Its base AOE radius was increased to a massive 1000 units, making it an exceptional tool for crowd control. Furthermore, the game's engine was updated to guarantee that AOE damage applies to the initial hit target first before calculating the radius damage for surrounding enemies. This ensures that your primary target always takes the brunt of the assault, making the Autocannon highly reliable against both swarms and isolated heavy targets.
To push your weapons to the next level, you must seek out specific ammunition and payload enhancements:
- Smart Rounds: This enhancement converts your standard ammunition into projectiles that ricochet between hostile targets. When applied to high-rate-of-fire weapons, Smart Rounds can effectively clear the entire screen, as a single bullet can bounce through an entire formation of enemy fighters.
- Nuclear Warheads: For slower, heavy-hitting weapons, Nuclear Warheads are the ultimate upgrade. These radioactive payloads leave a damaging, lingering cloud in their wake after detonation. By kiting enemies through these radioactive zones, you can deal massive passive damage while focusing your active fire elsewhere.
- Proximity Mines: Often overlooked, deploying Proximity Mines from your rear exhaust ports is the perfect counter to pursuing fighters. As you evade the swarm, these mines eliminate the fastest enemies trying to close the gap, protecting your vulnerable engines.
Meta-Progression: The Best Upgrades Starforged Legacy Players Can Buy
Death in Starforged Legacy is never the end; it is merely a transaction. The battlefield wreckage, recovered data, and alien technologies you salvage from failed expeditions are the currency of your meta-progression. Knowing where to spend these resources at the hangar will drastically accelerate your success rate.
When considering the best upgrades Starforged Legacy allows you to purchase permanently, you should immediately focus on economy and baseline survivability. Upgrading your "Salvage Yield" should be your very first priority. By increasing the amount of resources you retain after a run, you compound your earning potential, allowing you to unlock subsequent upgrades much faster.
Next, invest heavily in "Hull Integrity" and "Base Shield Capacity." The early sectors of the game can be unforgiving, and having a larger health pool gives you the leniency needed to explore hazardous sectors and take on risky narrative encounters.
Finally, do not neglect unlocking new starcraft and alternate loadouts. The game features ships ranging from nimble frigates to titanic battleships, and finding the hull that matches your preferred playstyle is an upgrade in itself. Expanding your fleet provides you with distinct starting armaments and combat identities that fundamentally alter how you approach the game.
Ship-Specific Synergies: Mastering the Ironhide
To truly dominate, you must tailor your augments to the specific ship you are piloting. Let's examine the "Ironhide," one of the most popular heavy ships in the game, to understand how ship-specific synergies work.

The Ironhide is a frontline tank designed to absorb punishment. Its default loadout, appropriately named "Relentless," was recently rebalanced to start with the Vulnerability Overload subsystem instead of Nanobots. This was a massive buff that completely changed the ship's identity.
Because the Ironhide has an inherently massive shield pool, starting with Vulnerability Overload means that as soon as your shields take a hit, your Global Damage Scalar skyrockets. The strategy here is not to avoid damage, but to manage it. You want to intentionally take minor hits to keep your shields hovering around 50%, granting you a permanent, massive damage boost.
To synergize with this, you should actively avoid shield-regeneration augments and instead focus on Hull-repair augments like Nanobots (which you can pick up later in the run) and Pulsing Plating. If your shields do break, your massive hull will sustain you, and Pulsing Plating will trigger, releasing devastating energy bursts while your Vulnerability Overload damage scalar is at its absolute maximum. This turns the Ironhide from a slow, passive vessel into an aggressive berserker that thrives on the brink of destruction.
Navigating the Void: Starmap Decisions as Upgrades
Upgrades aren't just found in level-up screens or the meta-progression hangar; they are earned through the tactical decisions you make on the procedural Starmap. Charting your course through the galaxy is a delicate balancing act of risk and reward.

The Starmap is fraught with gameplay-altering environmental hazards. Choosing to navigate through a dense asteroid field or a solar flare sector might seem suicidal, but these treacherous routes often hide the most lucrative rewards.
Furthermore, the game features over 30 unique dynamic narrative encounters. You might intercept a distress beacon from a derelict ship, giving you the choice to rescue stranded scientists or strip the vessel for parts. Rescuing the scientists might reward you with a permanent crew member who provides a passive buff to your weapon cooldowns, while stripping the ship yields an immediate influx of credits to spend at the next merchant station.
Even negative encounters, such as bribing corrupt galactic enforcers, can be leveraged into an advantage if you have the economy to support it. Every choice on the Starmap is an opportunity to augment your run, and the best players treat navigation as an extension of their build crafting.
FAQ: People Also Ask About the Best Upgrades Starforged Legacy
What are the best early game upgrades in Starforged Legacy? For your first few runs, prioritize the "Salvage Yield" meta-progression upgrade to maximize your resource income. In-run, focus on the Nanobots hull augment for passive healing, and the Autocannon weapon for reliable, wide-reaching AOE damage.
How do I unlock more ships? You unlock new starcraft across the three designations (frigates, cruisers, battleships) by exchanging salvaged resources and alien technologies at the hangar between runs. Certain specialized ships may also require you to complete specific narrative encounters or defeat sector flagships.
What is the best weapon in Starforged Legacy? While "best" is subjective based on your build, the Autocannon with the Smart Rounds enhancement is widely considered the most consistent screen-clearing weapon. For boss melting, heavy weapons loaded with Nuclear Warheads provide unmatched single-target and lingering area damage.
How does Vulnerability Overload work? Vulnerability Overload is a subsystem augment that dynamically increases your Global Damage Scalar based on the percentage of your Shield that is currently depleted. The lower your shields, the harder you hit, making it perfect for high-risk tank builds like the Ironhide.
Carving Your Legacy
Surviving the endless fleets of cosmic combatants in Starforged Legacy requires a sharp mind and a willingness to experiment. By prioritizing synergistic augments like Pulsing Plating and Vulnerability Overload, maximizing the AOE potential of your core weapons, and intelligently investing your salvaged resources, you can transform any run into a masterclass of destruction. The void is unforgiving, but with the right upgrades, your legacy will endure.
Sources
- Second Shift Games, Starforged Legacy Early Access Patch Notes (Hotfix 02.25.26)
- Starforged Legacy Official Press Kit & Developer Updates
- Community Build Guides & Starmap Navigation Logs