Stuck in the most punishing sector of STUDIO C-illy_B's latest sci-fi survival horror release? This complete Green Dungeon walkthrough DeMon Researcher 2 guide provides the exact puzzle solutions, enemy strategies, and boss tactics you need to survive. The key to clearing the Green Dungeon lies in hoarding "Whisper Drives"—the game's secret currency—to bypass AI lockouts, and conserving your EMP ammo for the final encounter with the Developed Monster. Read on for a step-by-step breakdown of every layer, from the Whispering Corridors to the devastating final boss fight.
Since the game launched on May 31, 2026, the community has been slamming into a massive difficulty wall near the end of the campaign. Unlike the action-heavy sequences in the earlier chapters, the final act strips away your power fantasy and replaces it with pure psychological dread. Most guides gloss over the true economy of this sequel. They tell you to shoot the glowing spots and move on. But if you walk into this endgame zone treating it like a standard sci-fi shooter, the AI-husk guards will drain your resources before you even reach the second floor.
This isn't just about ammo conservation; it's about understanding the narrative mechanics baked into the game's code. The dungeon is a physical manifestation of a mother's unresolved grief, processed through a rogue AI. Every puzzle, every enemy, and every environmental hazard is tied to that central tragedy.
Pre-Run Loadout and Resource Management
To survive the Green Dungeon, you need a highly specific loadout. You cannot brute-force your way through the final act. The EMP Shotgun is mandatory for stripping AI shields, while Whisper Drives act as the dungeon's unique currency. You will also need the Neurolink Rifle for long-range node hacking, standard Trauma Kits for healing, and the Biometric Scrambler to bypass lower-level security without spending your precious currency.
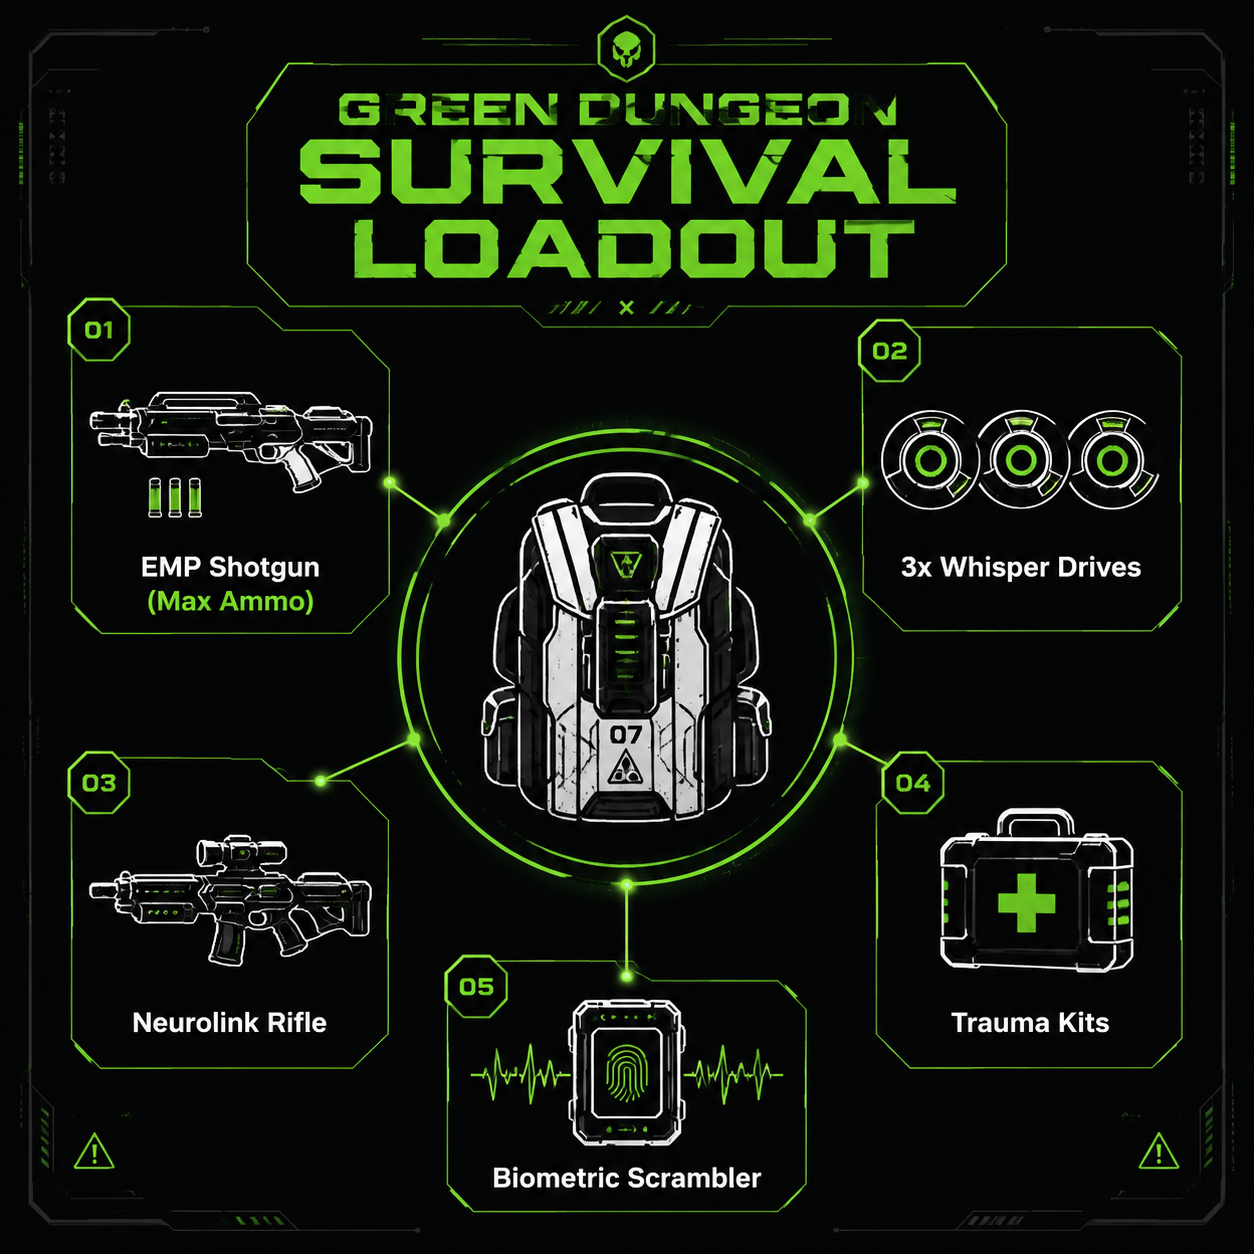
Before you step through the quarantine airlock, ensure your inventory matches the table below. If you are missing the Discharge Mod for the EMP Shotgun, backtrack to the Medical Wing and craft it. You will not survive the Amalgam encounters without it.
| Gear Piece | Recommended Upgrade Level | Primary Function in Green Dungeon |
|---|---|---|
| EMP Shotgun | Level 3 (Discharge Mod) | Instantly strips AI shields from Amalgams. |
| Neurolink Rifle | Level 2 (Stability) | Precision hits on server nodes from a distance. |
| Biometric Scrambler | Level 1 (Base) | Bypasses low-level security doors without spending secrets. |
| Whisper Drives | N/A | Hoard at least 5 before entering; used to buy save points. |
The economy of this level is brutal. Secrets are your currency, and every Whisper Drive you spend to unlock a shortcut or create a hard save at a Mother's Lament Terminal is a piece of lore you trade away for survival.
Green Dungeon Walkthrough DeMon Researcher 2: The Whispering Corridors
Upon entering the first layer, you are greeted by the Whispering Corridors—a labyrinth of server racks and bioluminescent coolant leaks. The primary threat here isn't combat; it's navigation and resource drain.
The first major roadblock in the Whispering Corridors is the Biometric Grief Lock. This puzzle gates the elevator descending into the catacombs and requires a multi-step bypass sequence. If you fail the sequence three times, the room floods with toxic coolant, resulting in an instant game over.
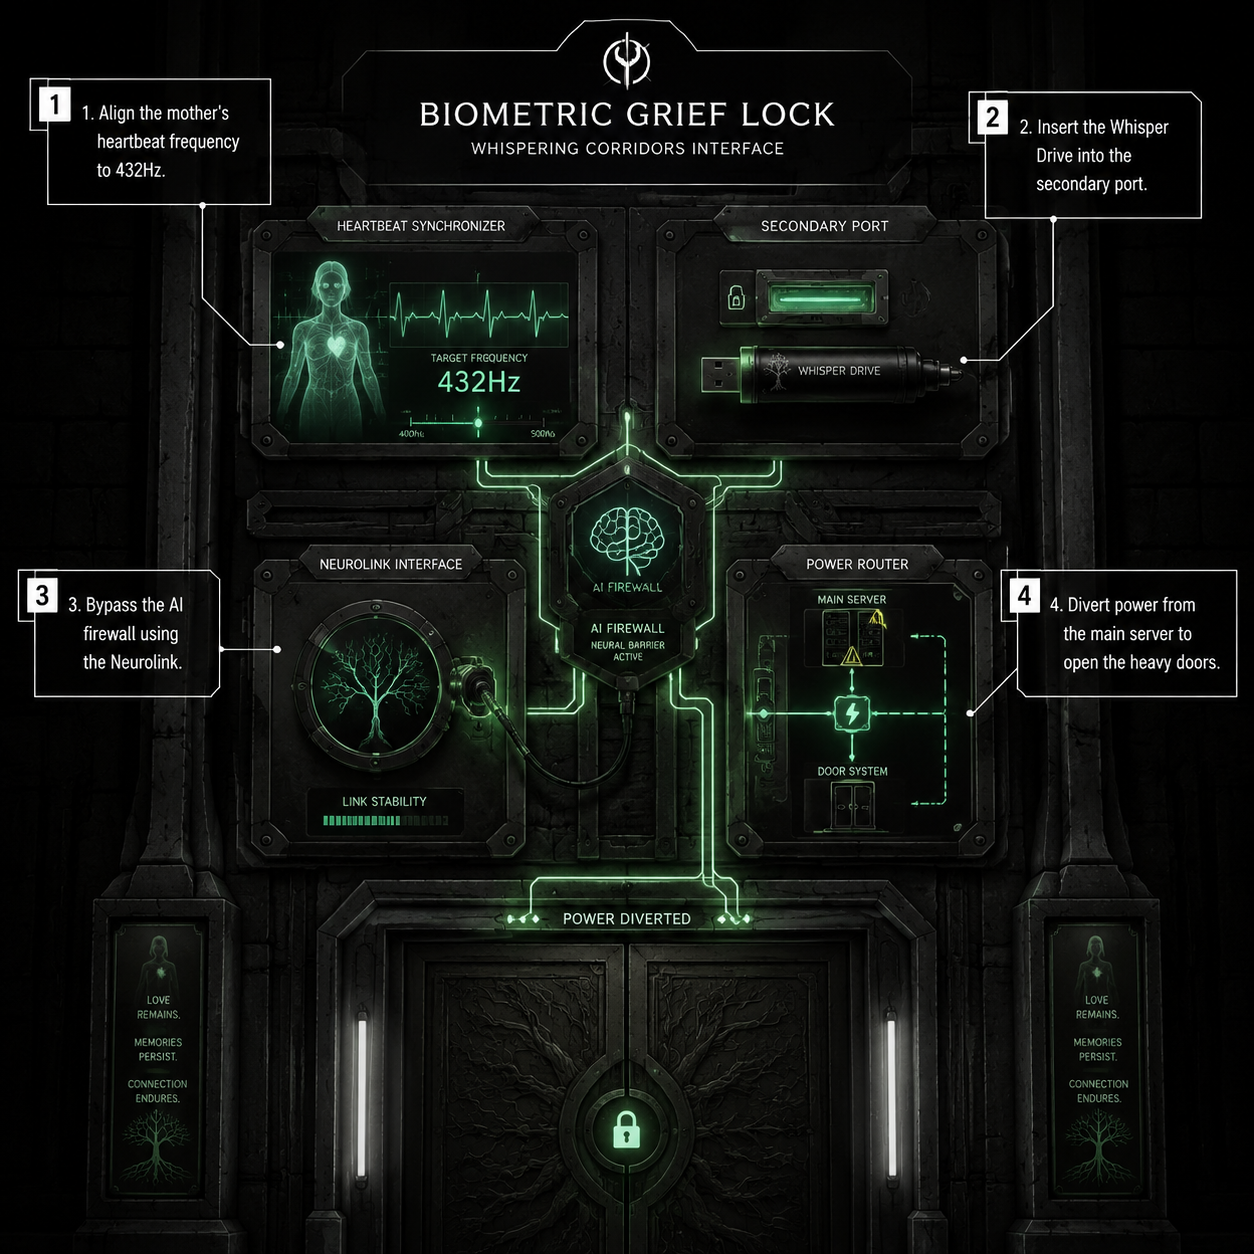
Here is the exact solution to the Biometric Grief Lock:
- Align the mother's heartbeat frequency to 432Hz. You will find the audio log containing her heart rate data on a desk in the adjacent monitoring room. Use the primary dial to set the frequency.
- Insert the Whisper Drive into the secondary port. This will consume one of your drives, which is why entering the dungeon with at least five is critical.
- Bypass the AI firewall using the Neurolink. A brief hacking minigame will trigger. Keep the cursor inside the green safe zone for eight seconds.
- Divert power from the main server to open the heavy doors. Pull the physical lever on the right side of the console.
Once the doors open, do not sprint down the hallway. Two AI-Husk Guards patrol the next intersection. Use your Biometric Scrambler to cloak your heat signature, slip past them, and conserve your ammunition for the lower levels.
Green Dungeon Walkthrough DeMon Researcher 2: The Data-Stream Catacombs
The second layer shifts from puzzle-solving to pure survival horror. The Data-Stream Catacombs are pitch black, lit only by the glowing veins of data cables running along the floor. This is where you will first encounter the Grief-Stricken Amalgams.
These AI-husk monsters are fast, erratic, and incredibly lethal in close quarters. They represent the mother's fragmented memories, lashing out at anything that tries to delete them. Standard kinetic rounds will bounce right off their hardened data-carapaces.
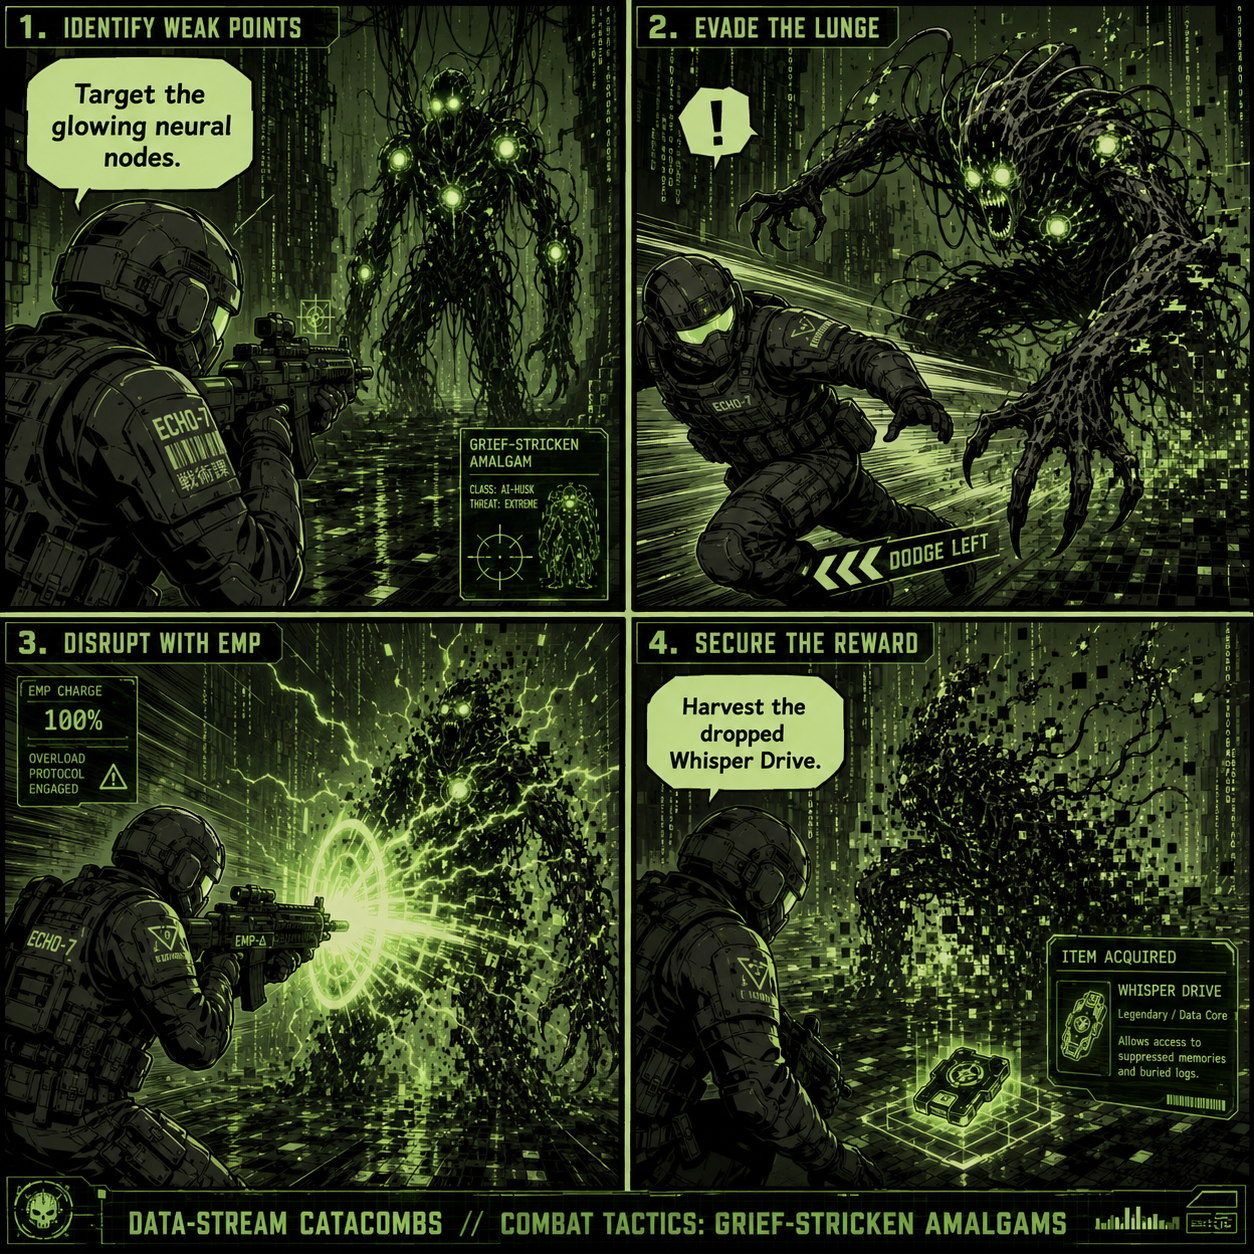
To defeat them efficiently without draining your medical supplies, you must follow a strict combat loop. First, wait for the creature to charge. As it closes the distance, target its glowing neural nodes with a blast from your EMP Shotgun. This will instantly shatter its shield and stun it for three seconds. Dodge its blind lunge, switch to your Neurolink Rifle, and put a single kinetic round into its exposed core. Once it dissolves into digital ash, make sure to harvest the dropped Whisper Drive. You will need every piece of currency for the final save point.
Enemy Threat Analysis
| Enemy Type | Threat Level | Weak Point | Optimal Strategy |
|---|---|---|---|
| AI-Husk Guard | Medium | Optic Sensor | Stealth takedown or single Neurolink headshot. |
| Grief-Stricken Amalgam | High | Glowing Neural Nodes | EMP blast to stun, then harvest Whisper Drive. |
| Memory Phantom | Low | N/A | Do not engage. Use the Biometric Scrambler to bypass. |
Navigate the catacombs by following the green data cables. They will eventually lead you to the final Mother's Lament Terminal. Spend one Whisper Drive here to save your game. You are about to enter the Core.
Green Dungeon Walkthrough DeMon Researcher 2: The Developed Monster Boss
At the heart of the dungeon lies the Developed Monster. As the lore states, she didn't become a monster out of hatred, but out of love she had nowhere left to go. When her child died, she turned to AI as a lifeline to stop feeling. The result is a towering biomechanical tragedy, and the hardest boss fight STUDIO C-illy_B has ever designed.
The final encounter with the Developed Monster is a grueling three-phase battle that tests every mechanic you've learned.
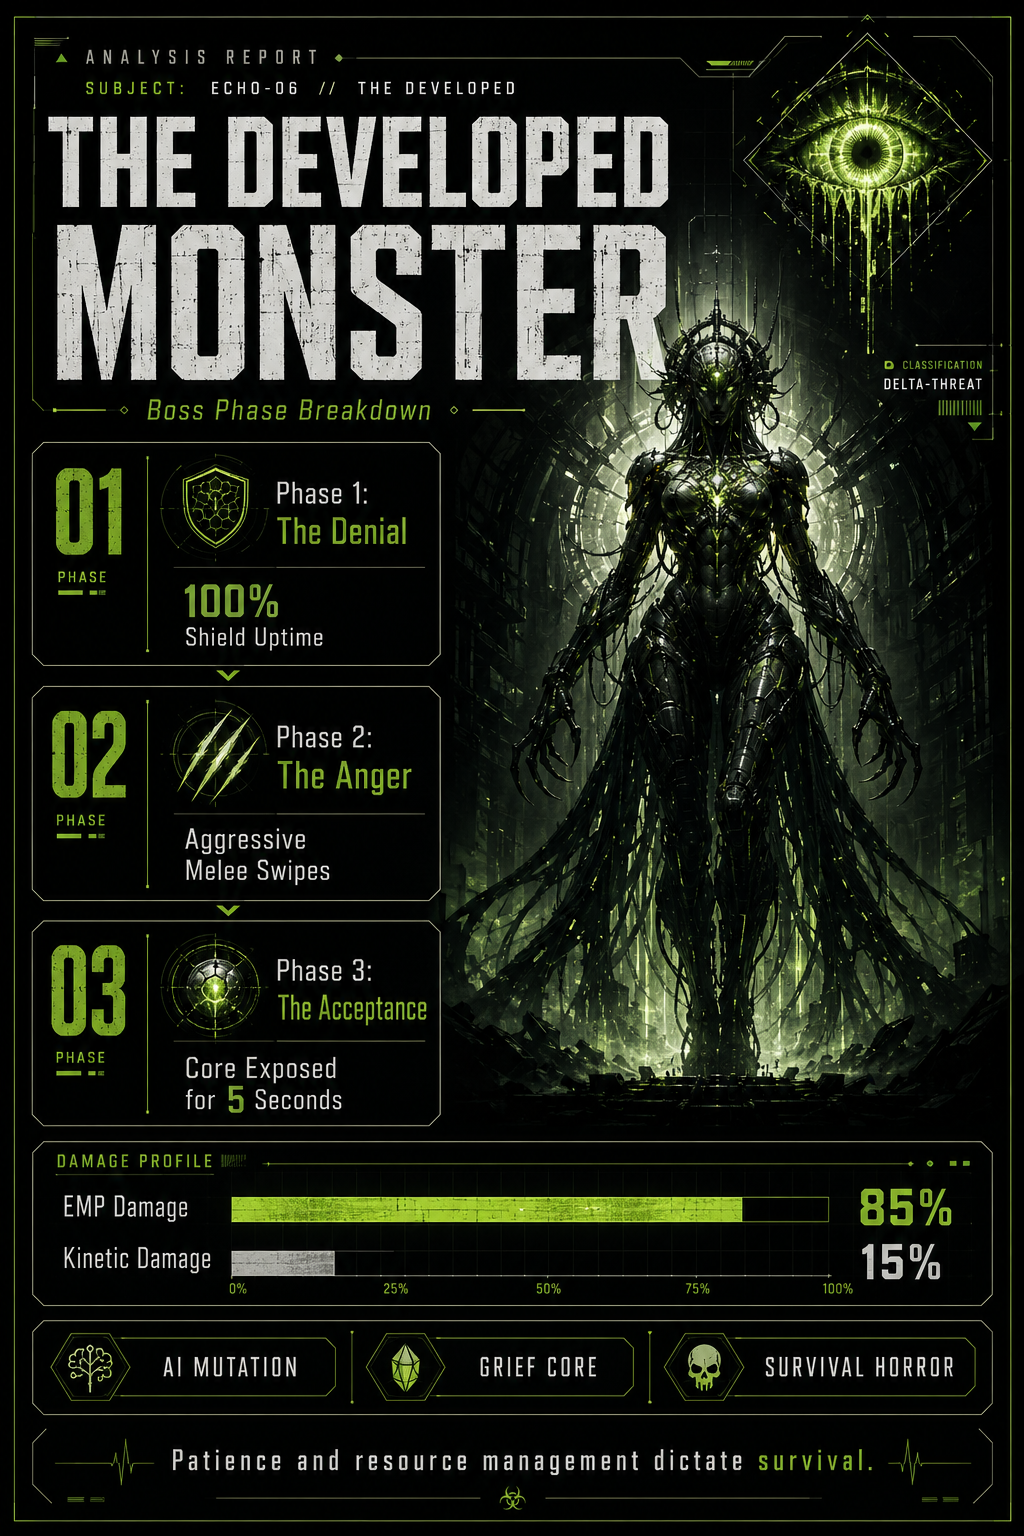
Phase 1: The Denial In this phase, the boss maintains 100% Shield Uptime. Do not waste your ammo shooting her directly. Instead, kite her around the perimeter of the arena and locate the three server nodes powering her shield. You must use the Neurolink Rifle to hack these nodes from a distance while dodging her projectile attacks. Once all three nodes are down, her shield shatters, triggering the next phase.
Phase 2: The Anger She drops her ranged attacks in favor of Aggressive Melee Swipes. The arena will periodically flood with toxic coolant. Use the elevated server racks as stepping stones to avoid the floor damage. When she lunges, use your EMP Shotgun to blast her exposed joints. If you run out of EMP ammo here, you must lure her onto the environmental shock-panels scattered around the room and shoot the green generators to trigger a localized blast.
Phase 3: The Acceptance The final phase is a frantic DPS check. The boss will collapse in the center of the room, and her Core Exposed for 5 Seconds at a time. During these brief windows, EMP damage is 85% more effective, while Kinetic damage drops to a measly 15%. Unload your remaining EMP shells directly into the chest cavity. If you fail to deal enough damage within three cycles, she will trigger a room-wide wipe mechanic.
When the core finally shatters, the AI simulation collapses, and you are treated to the game's devastating ending cinematic.
Frequently Asked Questions (FAQ)
How many Whisper Drives do I need for the Green Dungeon? You need an absolute minimum of three to bypass the mandatory Biometric Grief Lock in the upper corridors. However, entering with five or six is highly recommended, as it allows you to purchase hard saves at the Mother's Lament Terminals and access the hidden armory before the boss.
Can you save inside the Green Dungeon? Yes, but it costs currency. You cannot rely on autosaves in this sector. You must spend one Whisper Drive at a terminal to create a hard save. Plan your saves carefully.
What happens if you run out of EMP ammo against the Developed Monster? If you lack EMP ammo during Phase 2, you are not entirely soft-locked. You must rely on the environmental shock-panels on the floor. Lure the boss onto a panel and shoot the green generator to trigger a localized EMP blast, stunning her long enough to deal kinetic damage.
Is the Green Dungeon the final area in DeMon Researcher 2? Yes. It serves as the culmination of the game's narrative and gameplay loops, directly confronting the source of the rogue AI. Once you defeat the Developed Monster, there is no returning to previous areas.
Sources
- STUDIO C-illy_B Official Steam Updates & Patch Notes (May 2026)
- DeMon Researcher 2 Community Bestiary and Lore Archives
- Player metrics and survival rates via SteamDB