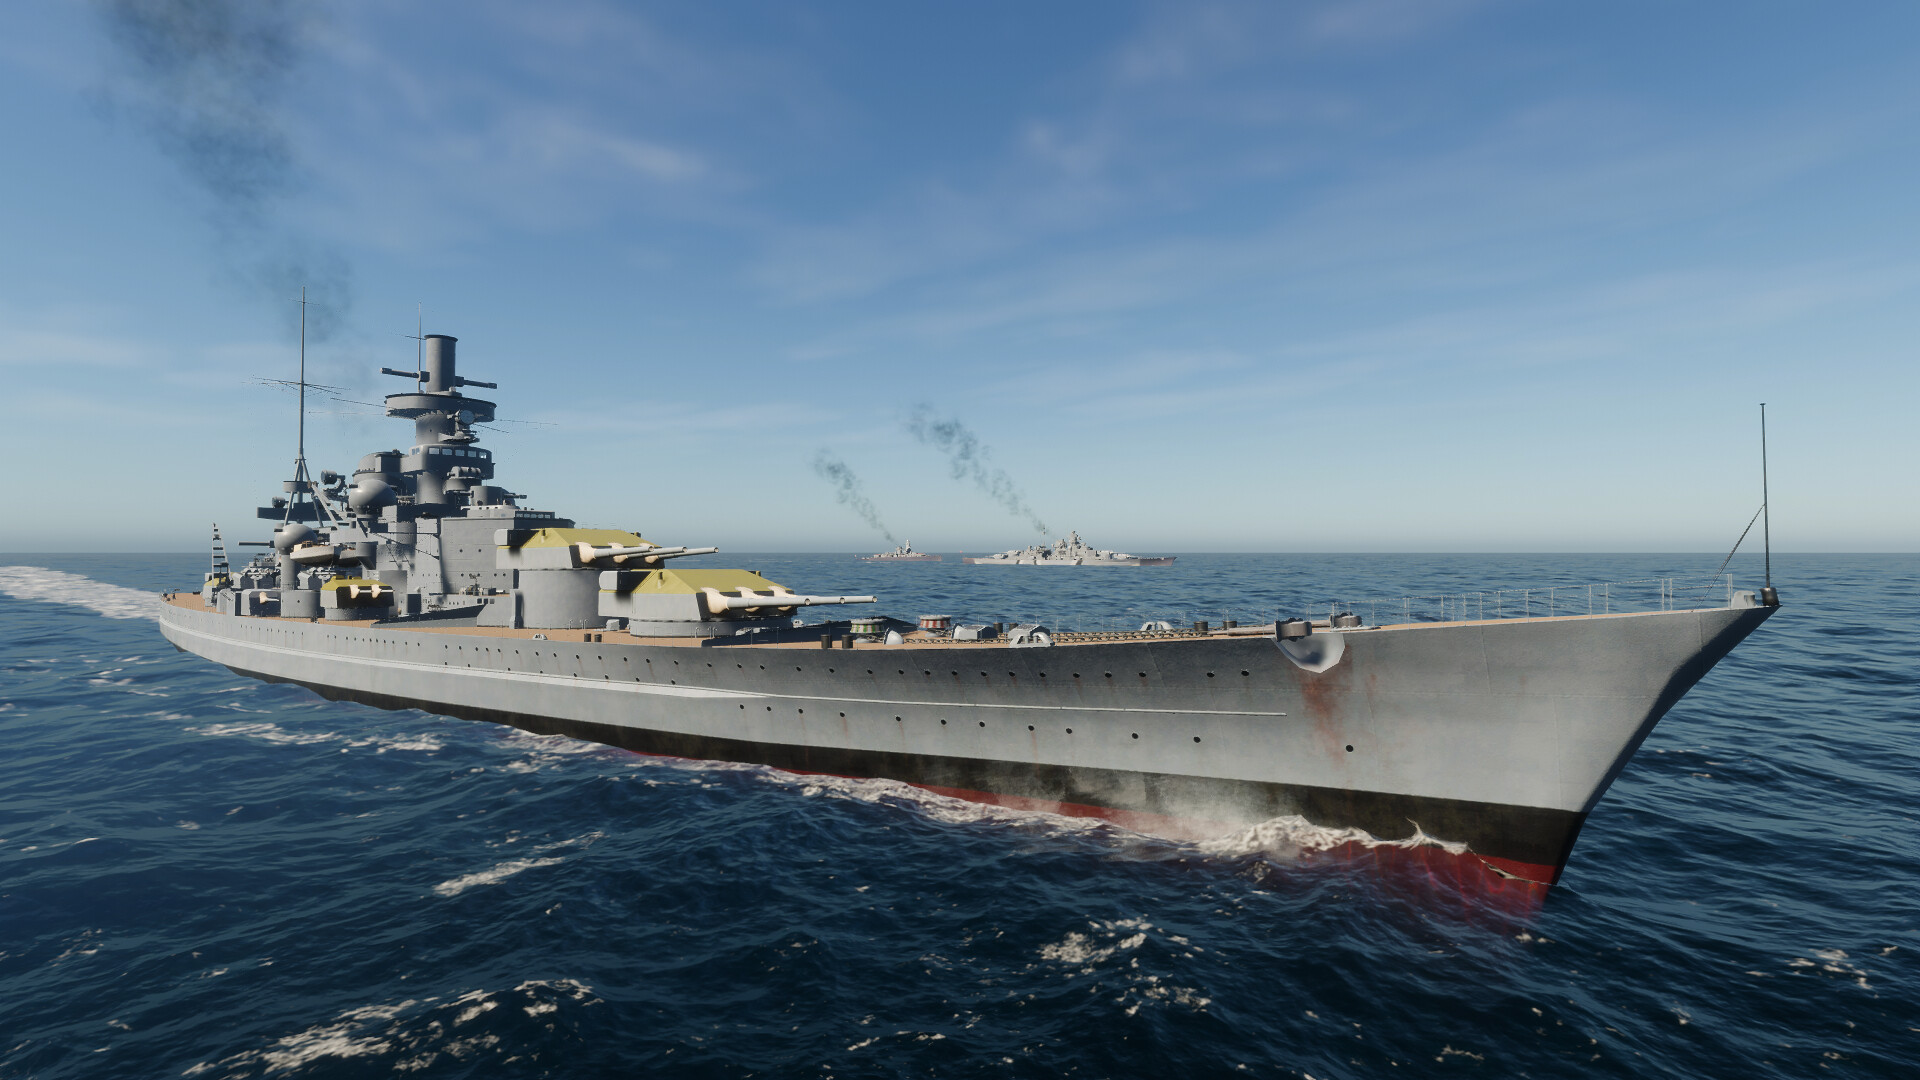
To master how to navigate Battleship Command, you must step away from the primary gunnery stations and take direct control of the Scharnhorst’s tactical map and helm. Effective navigation requires balancing your engine order telegraph settings with your rudder angles while actively plotting intercept courses on the strategic map to hunt convoys and manage your limited fuel. MicroProse and developer Bracer have built a punishingly realistic WWII naval simulator where 30,000 tons of German steel do not turn on a dime. If you treat this like an arcade shooter, you will end up dead in the water.
Unlike casual naval games where steering is tied to simple keyboard inputs from a god's-eye view, Battleship Command forces you to operate from a first-person perspective. You are physically standing on the bridge or in the armored conning tower, shouting orders to your AI crew or manipulating the instruments yourself. This physical disconnect between the strategic map and the ship's actual helm is where most new players fail.
Core Mechanics: How to Navigate Battleship Command
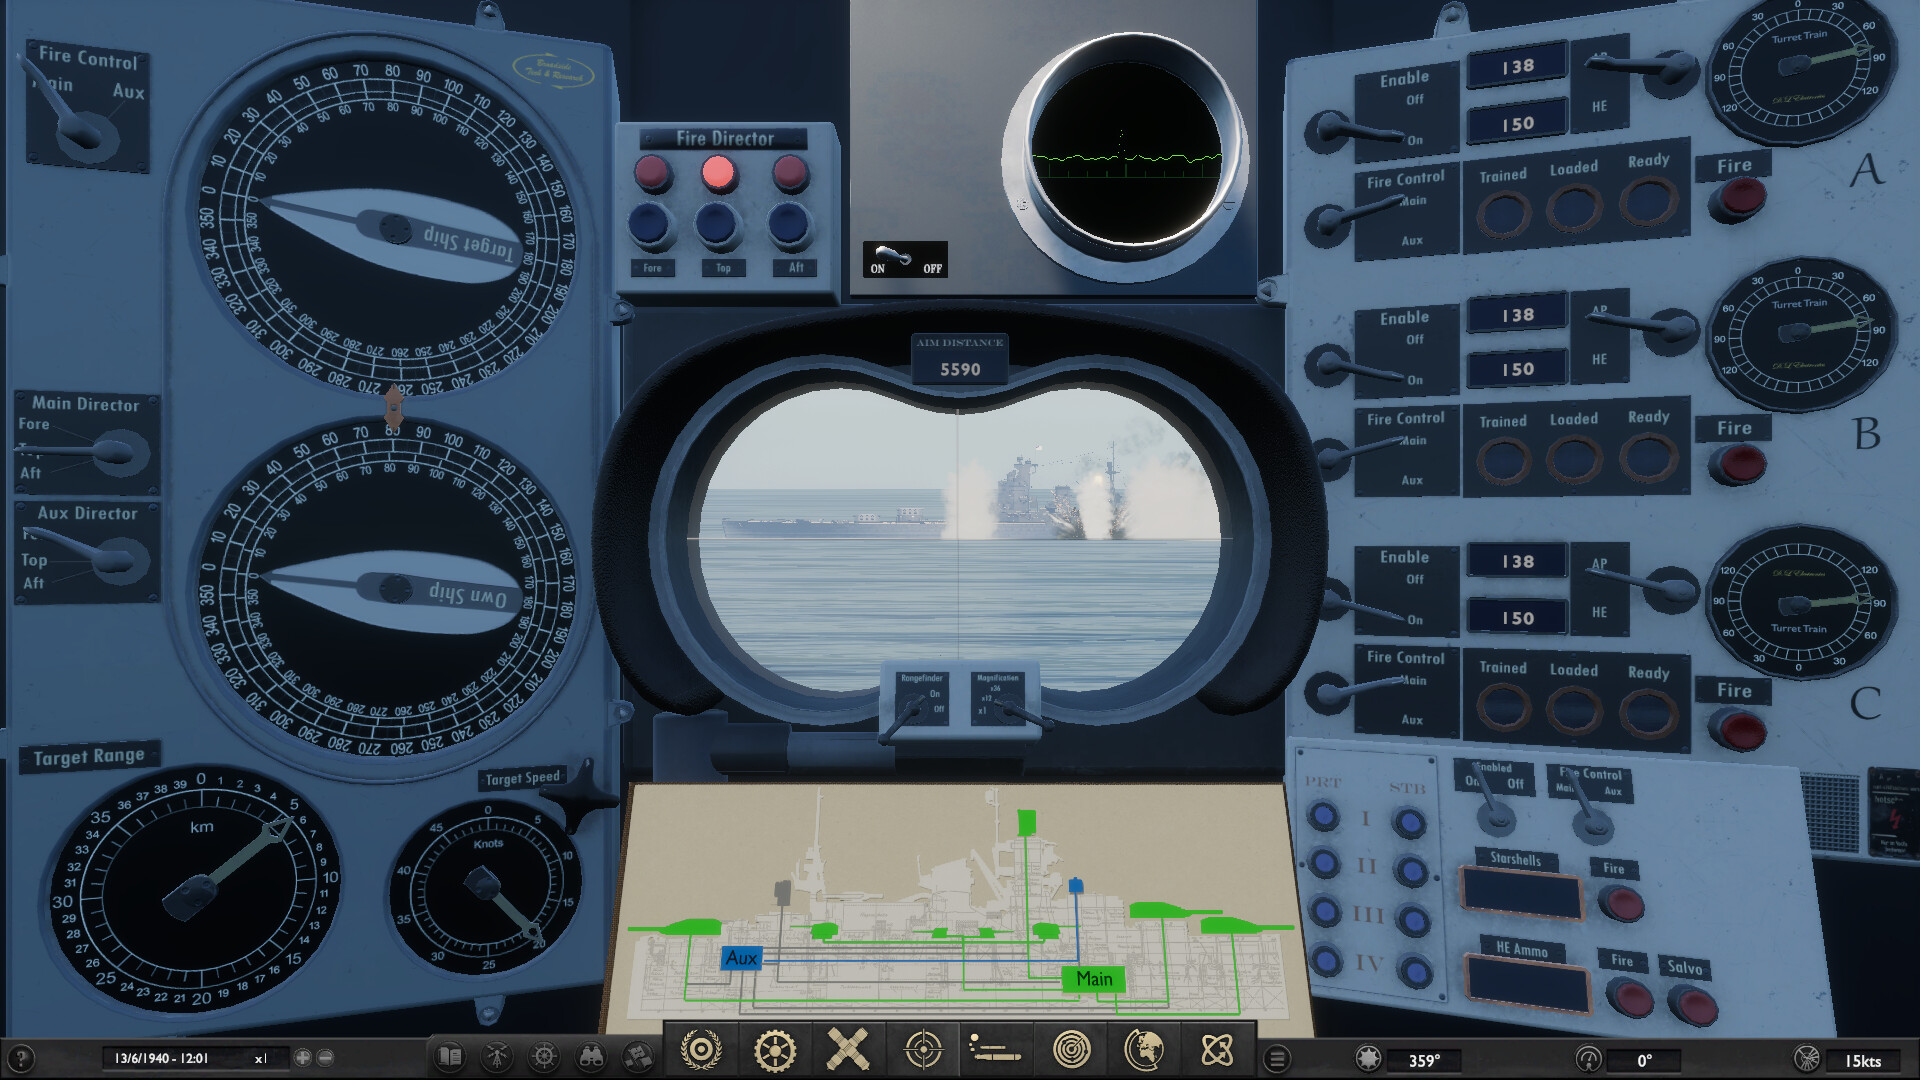
When you walk onto the bridge, the primary helm station dominates the room. To your right, the Engine Order Telegraph dictates the speed from ahead one-third to flank. It takes time for the engine room to answer these bells, meaning you must anticipate your required speed minutes in advance. You cannot simply hit "W" and expect instant acceleration. The inertia of a 30,000-ton warship means that dropping the telegraph to "Stop" will still see you coasting for over a mile.
Directly in front of the wooden ship's wheel, the Rudder Angle Indicator shows your current turning degree—crucial because a heavy warship’s rudder takes agonizing seconds to shift from hard port to hard starboard. If you oversteer, correcting the mistake takes time you do not have. Above that, the Gyrocompass provides your exact heading in degrees, while the RPM Dials reflect the actual engine output versus ordered speed. Understanding the lag between these instruments is the foundation of ship handling.
During combat, you will often need to leave the helm to check the rangefinders or fire-control computers. In these moments, you must issue verbal (menu-driven) helm orders to your AI crew. Giving an order like "Come left to heading 2-7-0" allows the AI helmsman to manage the rudder while you focus on the 283mm main battery. However, relying entirely on the AI during close-quarters torpedo evasion is a fatal mistake. You must know when to take manual control.
Plotting Courses: How to Navigate Battleship Command's Tactical Map
The strategic layer of the game takes place at the map table. You aren't just steering a ship; you are hunting elusive prey across vast expanses of the North Sea, the icy Norwegian Sea, and the Atlantic. When a contact report comes in from command, you cannot simply point the bow at the marker. You must calculate an intercept course.
Drawing a line on the tactical map requires factoring in the convoy's speed and heading. If an Allied convoy is moving at 10 knots northeast, plotting a direct line to their current position means they will be long gone by the time you arrive. You must lead your target, dropping waypoints ahead of their projected path. The map table provides virtual parallel rulers and compass roses to help you calculate these intercepts accurately.
Furthermore, dynamic weather plays a massive role in how you navigate Battleship Command's environments. A sudden fog bank can drop visual range to near zero. In these conditions, you must rely entirely on your radar operators, plotting waypoints blindly on the map based on electronic pings. Storms introduce heavy swells that cause the ship to roll, affecting both your top speed and your gunnery solutions. A smart captain uses the tactical map to route around the worst of a low-pressure system, sacrificing time to maintain combat effectiveness.
Fuel Management: The Strategic Cost of Speed
Your fuel bunkers are finite, and the Scharnhorst is a thirsty vessel. The relationship between speed and fuel consumption is not linear; it is an exponential curve that punishes impatient captains.
| Engine State | Speed (Knots) | Fuel Burn Rate | Tactical Use Case |
|---|---|---|---|
| Ahead One-Third | 10 - 15 | 100% (Baseline) | Optimal cruise range, patrolling. |
| Standard | 20 - 24 | 160% | Closing distance to spotted convoys. |
| Full | 28 | 220% | Fleet maneuvers, positioning for broadside. |
| Flank | 31.5 | 300% | Combat evasion, outrunning pursuers. |
At 15 knots, you achieve your optimal cruise range, establishing a 100% fuel burn rate baseline that allows you to patrol the Atlantic for weeks. Pushing the ship to its maximum 31.5 knots, however, results in a devastating 300% fuel burn rate. Navigating at flank speed depletes fuel reserves exponentially, turning a long-range hunting mission into a desperate limp back to port.
You must also manage the fuel of your escorting destroyers. While the Scharnhorst has massive bunkers, your screen ships do not. If you force your battle group to sail at 28 knots for three days straight, your destroyers will run dry and fall behind, leaving you vulnerable to Allied submarine attacks.
Combat Evasion: How to Navigate Battleship Command Under Fire
When the shells start falling, your navigation strategy shifts from strategic plotting to immediate survival. Executing combat evasion maneuvers requires a deep understanding of the Scharnhorst’s turning circle and armor profile.
If you spot incoming fish from an enemy destroyer or submarine, the golden rule is Bow In: always turn into torpedo tracks to present the smallest possible profile. Trying to outrun a torpedo by turning away exposes your massive broadside and propellers to a crippling strike.
Against heavy surface combatants like the King George V, you must practice armor angling—maintain a 30-degree offset to bounce their AP shells, rather than sailing flat broadside. To execute a tighter turn when outmaneuvered, initiate a speed bleed by dropping your telegraph to half, then order a rudder shift hard over to port. Throughout this chaos, utilize counter-fire to keep your main battery masked until the enemy reloads. Statistically, poor helm control is fatal; late-game data shows that King George V AP shells cause 85% of fatal damage compared to torpedoes at 15% when players fail to angle.
Troubleshooting Common Issues: How to Navigate Battleship Command Effectively
Even experienced captains can find themselves struggling with the simulation's uncompromising physics. If you are running into trouble, check these common navigational pitfalls:
- The ship refuses to turn: Check your speed and damage control board. If you are moving at ahead one-third, less water is flowing over the rudder, drastically increasing your turning radius. Alternatively, a near-miss may have jammed your steering gear, requiring you to dispatch a damage control party immediately.
- Fuel depleted mid-mission: You left the telegraph at flank speed while using time compression. Always drop down to standard or one-third speed before accelerating time on the strategic map.
- The convoy slipped away: You plotted a direct line to their last known position instead of calculating an intercept angle based on their reported speed and heading.
- Running aground in coastal waters: The North Sea is notoriously shallow in places. Keep an eye on your fathometer when navigating near the Norwegian coast, especially in heavy fog.
Frequently Asked Questions (FAQ)
How do I fast travel or speed up time? Battleship Command features time compression, accessible from the tactical map. However, you cannot use it while in active combat or navigating hazardous coastal waters. Ensure your waypoints are plotted safely and your speed is set to an efficient cruise before accelerating time.
Can I auto-navigate in Battleship Command? Yes, by giving orders to your AI helmsman via the tactical map or verbal command menu. You can set waypoints and let the crew steer. However, during combat, delegating evasion maneuvers to the AI often results in taking unnecessary torpedo hits. Manual control is highly recommended under fire.
Where is the navigation map located on the ship? Because the game is a first-person simulation, you must physically walk to the bridge or the armored conning tower. The primary map table is located directly behind the main helm station in the bridge superstructure.
Does weather affect my navigation? Absolutely. Heavy storms in the North Sea increase drag, reducing your top speed and worsening your fuel efficiency. Furthermore, fog renders visual navigation and optical rangefinding impossible, forcing you to rely entirely on your early radar systems to plot your course.