When plunging into the icy waters of the North Atlantic aboard the Scharnhorst, visual spotting will only get you so far. If you want to survive dynamic weather, dense fog, and night engagements, you must learn exactly how to use radar Battleship Command. Knowing how to read the electronic eyes of your warship is the difference between ambushing an Allied convoy and taking a torpedo broadside from an unseen destroyer.
In MicroProse’s ambitious first-person naval simulator, radar isn't a magical minimap toggle. It is a physical, historically grounded system that requires manual operation, spatial awareness, and direct coordination with your fire-control directors. This guide breaks down the Seetakt interface, explains how to track targets through the game's brutal weather systems, and details how to feed that data directly to your main battery.
The Core Interface: How to Use Radar Battleship Command
Unlike arcade naval shooters, Battleship Command forces you to operate your vessel from a first-person perspective. You cannot simply zoom out to a satellite view to spot enemies. When you first step into the radar room of this 30,000-ton behemoth, the interface can feel overwhelming. The game meticulously models the historical Seetakt radar console, eschewing modern top-down displays for a raw A-scope display.
The A-scope does not show a map; it shows a horizontal baseline representing distance, with vertical spikes representing signal returns. A large spike means a large radar cross-section—likely a merchant ship or an enemy capital ship. A small, erratic spike usually indicates a destroyer or a false return from heavy waves.
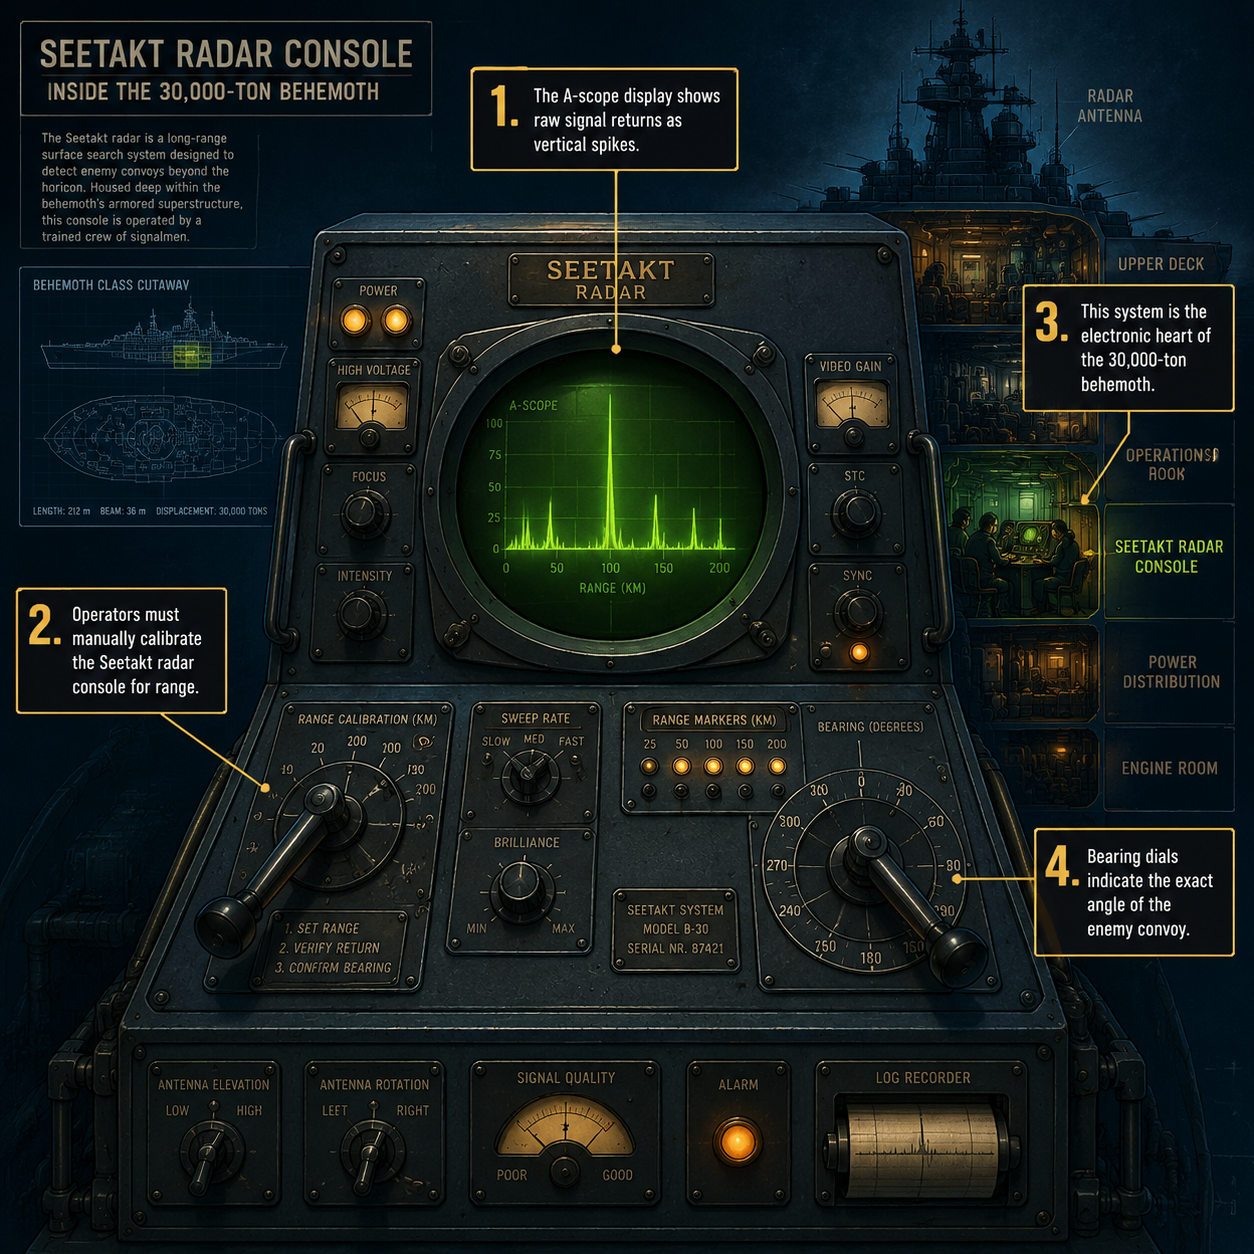
To operate the radar effectively, you must manually rotate the radar director to sweep the horizon. As the director turns, watch the A-scope for spikes. When a spike appears, you must fine-tune the bearing until the spike reaches its maximum vertical height. This confirms that your radar array is pointing dead-center at the target. From there, you adjust the range calibration dial to align with the spike, giving you the exact distance to the contact.
Because the game simulates the physical limitations of WWII technology, the radar cannot look everywhere at once. You must actively hunt for targets, especially when operating under high time compression. If you are sweeping the horizon, remember that the game engine requires you to use higher time compression on map when trying to increase TC in 3d view, ensuring the physics and radar sweeps remain stable.
Weather, Fog, and Night: Why Radar is Mandatory
Weather in the game is not just cosmetic; it fundamentally alters the AI visibility modifier. While a sunny day in the Mediterranean allows your optical rangefinders to spot targets from miles away, a sudden squall in the Arctic will blind your lookouts.
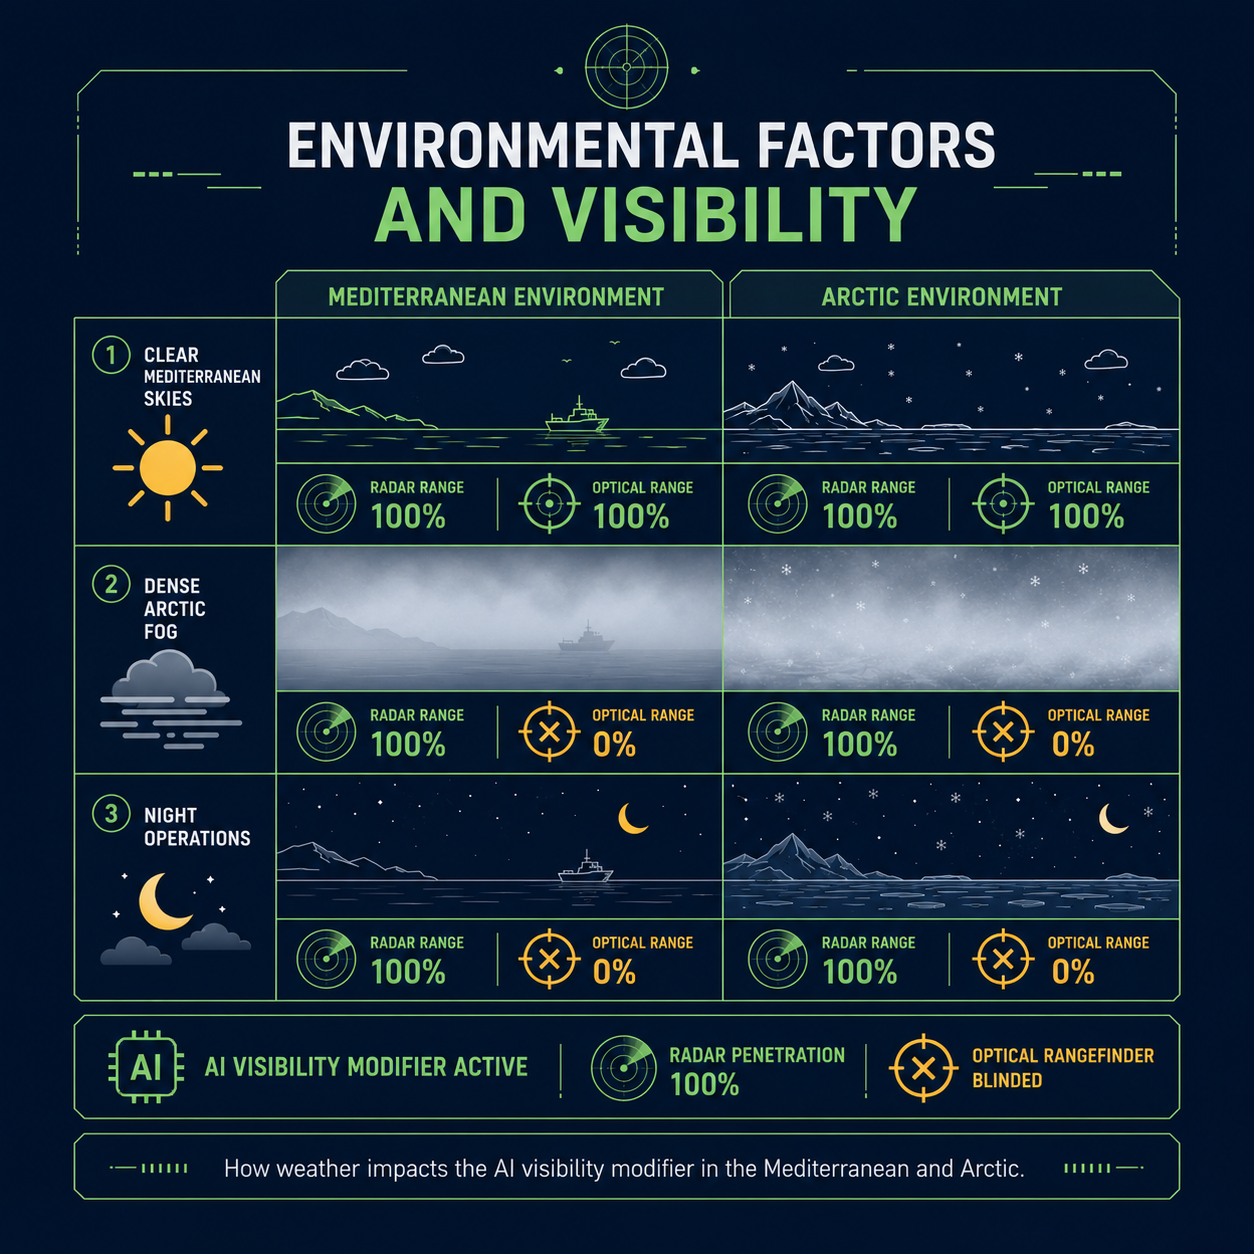
MicroProse has implemented a dynamic weather system that directly impacts combat. In heavy fog, your visual detection range can drop to less than three kilometers—well within the lethal range of enemy torpedoes.
| Environmental Condition | Optical Rangefinder Efficiency | Seetakt Radar Efficiency | Tactical Implication |
|---|---|---|---|
| Clear Day (Mediterranean) | 100% (Up to 25km) | 100% (Up to 28km) | Visual spotting is reliable; radar acts as a supplementary tool for precise range-finding. |
| Heavy Fog (North Atlantic) | 10% (Under 3km) | 95% (Up to 25km) | Radar is mandatory. Visual spotting is useless until point-blank range. |
| Night/Storm (Arctic) | 25% (Under 6km) | 90% (Up to 22km) | Radar is critical for preventing torpedo ambushes from unseen destroyers. |
If you are designing custom missions, you can push these extremes even further. The Quick Scenario editor allows you to increase max fog (visibility) range, creating terrifying blind-fighting scenarios where radar is your only lifeline. In these conditions, trusting your instruments over your eyes is mandatory.
Fire Control Integration: How to Use Radar Battleship Command for Gunnery
Spotting a target is only the first half of the battle; sinking it requires integrating your radar data with the ship's fire-control computers. Once you have a bearing and range, you must feed this data to the fire-control directors.
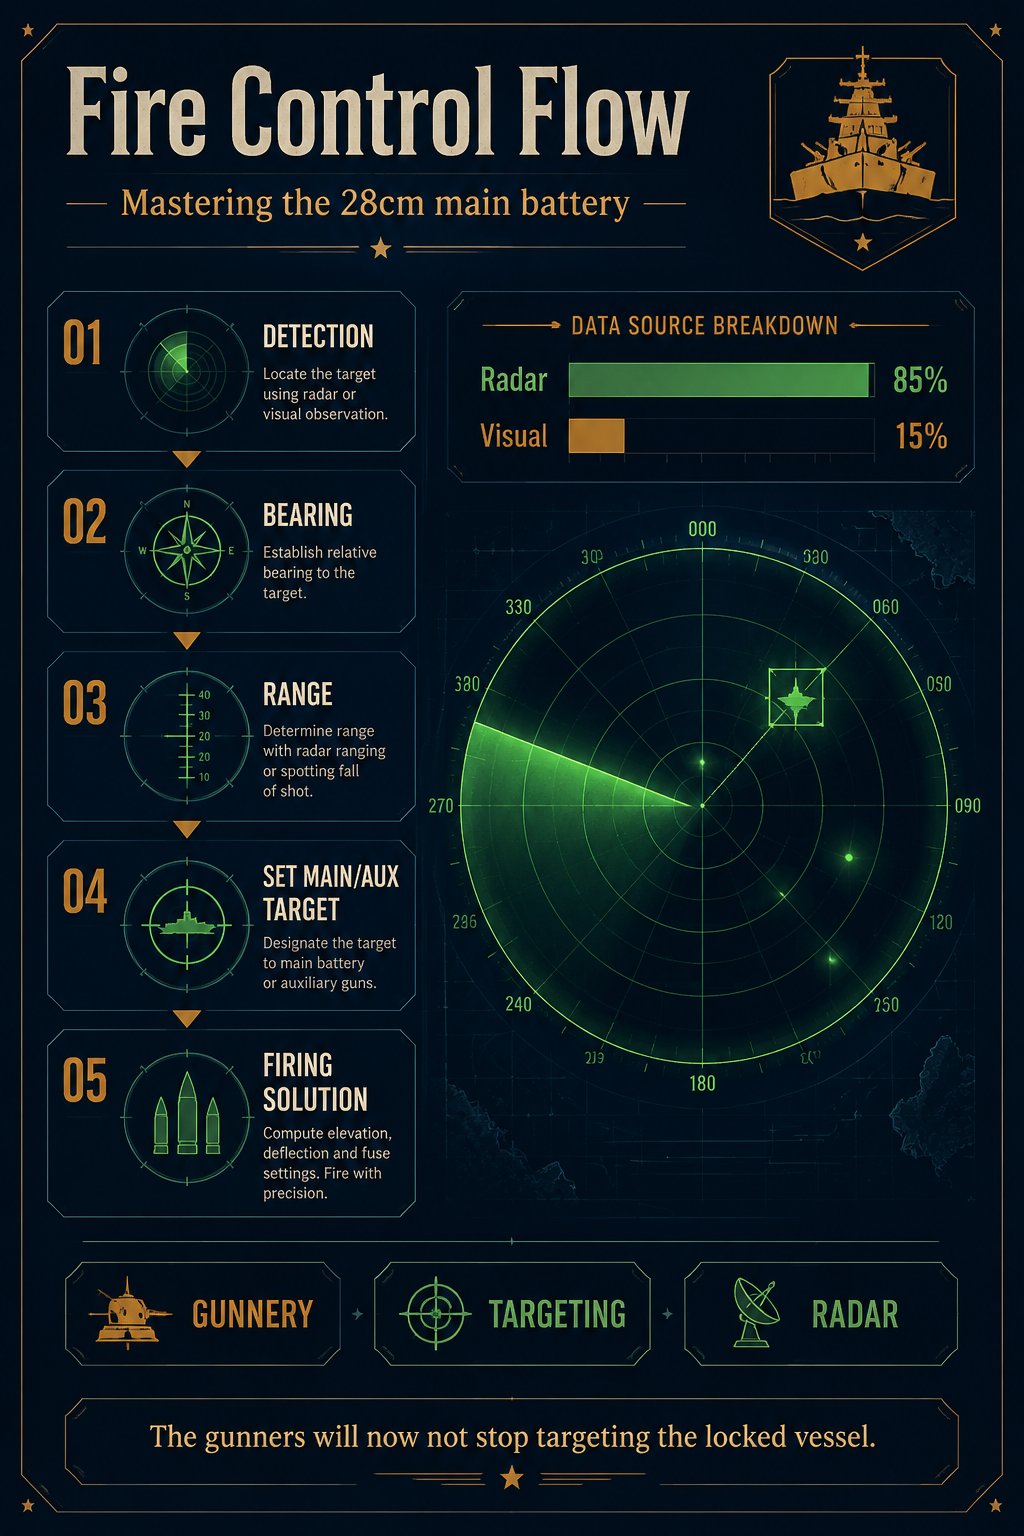
By clicking Set Main/Aux target, the radar room transmits coordinates directly to the plotting room. Thanks to a recent early access patch, when you click this on an already set target, the gunners will now not stop targeting that specific vessel, ensuring your 28cm main battery maintains a continuous firing solution even if the ship temporarily slips behind a wave swell.
Here is the exact step-by-step process to lock and engage a target using radar:
- Locate the target spike: Watch the A-scope for sharp vertical oscillations that break the baseline noise.
- Align the bearing: Rotate the director until the signal strength peaks, indicating your radar array is pointed directly at the target.
- Calibrate the range: Adjust the range dial until the marker aligns with the target spike, giving you a precise distance readout.
- Lock the target: Press the Set Main/Aux target button to designate the contact for your fire-control computers.
- Maintain the track: Keep the director aligned as the ships move, ensuring the plotting room receives a continuous stream of updated coordinates for the 28cm main battery.
If you lose the radar lock, your gunners will revert to estimated tracking, causing their accuracy to plummet. Keep your radar operators on target until the enemy is verified sunk.
Fleet Command and Radar Data Sharing
You aren't just commanding a single ship; you are leading a task force. Using radar data, you can direct your escorting destroyers to intercept or screen your flanks. By adjusting the Rules of Engagement, you dictate how your AI companions react to radar contacts.
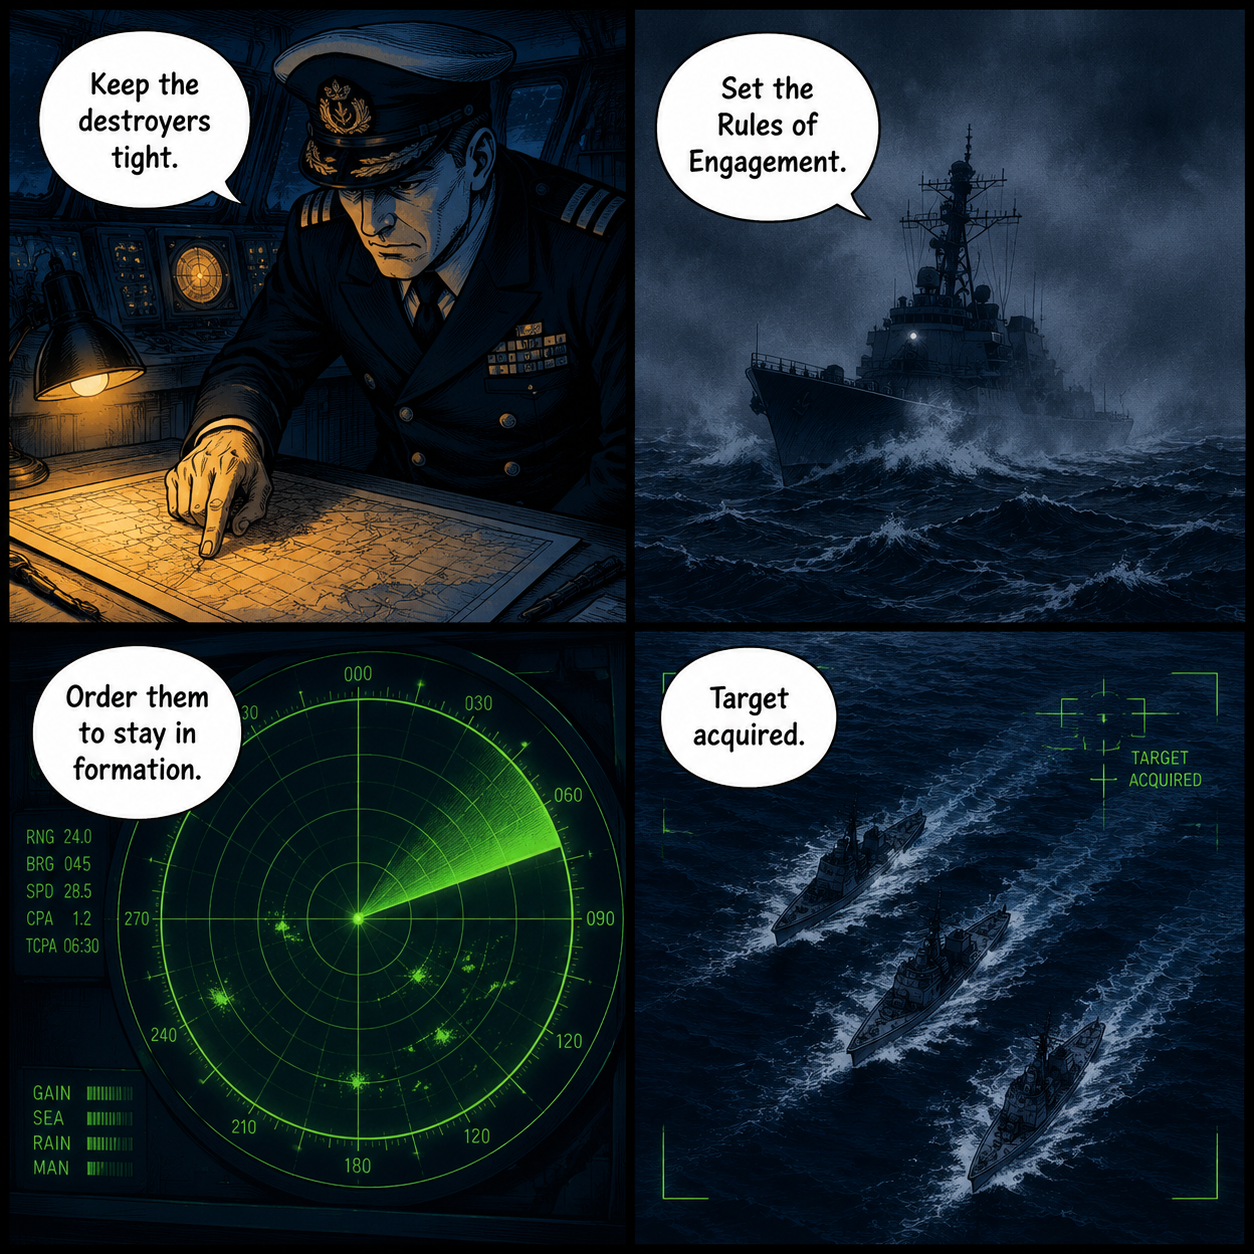
If you want a stealthy approach, order them to stay in formation rather than breaking off to chase a ghost echo. Recent updates have vastly improved fleet AI; ships now rejoin if setting RoE to stay in formation, meaning you can temporarily detach a cruiser to investigate a radar blip, and then seamlessly recall them to your battle line without micromanaging their waypoints.
When managing a fleet, radar becomes a strategic tool. You can use your Scharnhorst as a central command hub, detecting convoys at maximum range and vectoring your destroyers in for a torpedo strike while you provide heavy radar-directed plunging fire from 20 kilometers away.
Advanced Tactics in the Mission Editor
For players looking to test their radar skills, the game's mission editor offers robust tools to create complex electronic warfare scenarios. The addition of the dynamic traffic toggle allows you to populate the ocean with neutral merchant shipping.
This fundamentally changes how you use radar. When dynamic traffic is enabled, your A-scope will be cluttered with civilian contacts. You must carefully track the speed and bearing of each spike to differentiate between a harmless fishing trawler and a Royal Navy heavy cruiser. Learning to read the subtle differences in radar returns is what separates a novice captain from a true master of the Scharnhorst.
FAQ: How to Use Radar Battleship Command
Q: Why does my radar operator suddenly lose the target track during a surface engagement? A: If you are actively firing on a target and the blip vanishes, it doesn't always mean the radar is broken. Following the early access pre-launch patch, the game updated its logic to make spotters report ships sunk, not contact lost. If the blip disappears after a heavy salvo, you likely sent the enemy to the bottom.
Q: Can I speed up the game while waiting for radar contacts? A: Yes, but the game restricts extreme time acceleration while you are physically walking the ship to prevent physics bugs. You must use higher time compression on map when trying to increase TC in 3d view.
Q: Why did my escort ships stop moving when I deleted their patrol route? A: In earlier builds, there was a bug where a ship would order stop if the last waypoint was deleted. This has been fixed. Now, if you want them to resume their screening posture, simply update your Rules of Engagement and they will automatically adapt to your course.
Q: Does the ambient noise affect my ability to use the radar? A: While the ambience ocean sound is incredibly immersive, radar operation is entirely visual. However, the sound design can serve as a secondary cue for incoming shell splashes or torpedo wakes when your eyes are glued to the A-scope.
The Captain's Chair Awaits
Mastering the electronic warfare suite in Battleship Command is a steep climb, but it is deeply rewarding. The game refuses to hold your hand with floating UI markers or omniscient maps. You must trust your instruments, communicate with your fleet, and understand the limits of 1940s technology. Once you learn to read the A-scope like a second language, the fog of war becomes your greatest weapon.
Sources
- MicroProse Software, Battleship Command Pre-Launch Patch Notes (May 2026).
- Steam Community Hub, Battleship Command Early Access Build Documentation.
- Bracer Developer Interviews, "Inside Battleship Command" (March 2026).