To successfully build the Rat car My Garage throws at you, you must completely strip the rusted E36-style chassis, source pristine replacement parts from the catalogue, and paint every individual component before welding it on. Attempting to use rusted junkyard interior parts—especially the bugged floor carpet—will block installation and permanently tank your condition rating.
If you have spent any time in Viking Game Studio’s hyper-realistic mechanic simulator, you already know that the January 2025 update brought a world of pain. The Rat is arguably the most frustrating restoration in the game. Players routinely spend hours tearing the car down to its barest components, only to end up with a measly 3-star color condition and a ruined overall rating because they misunderstood the game’s valuation math. This guide breaks down exactly how to navigate the scrap container, bypass the notorious interior bugs, and turn a worthless junkyard shell into a 1600+ horsepower masterpiece.

The Anatomy of the Rat car My Garage
When you first locate the Rat out in the world—often near the dirt road free car spot, the beach garage, or the abandoned cabin—it looks like a lost cause. Modeled heavily after a clapped-out E36 M3, it arrives as a rusted, mismatched disaster. But beneath the oxidized panels lies one of the highest performance ceilings in the entire game.
The simulator’s physics and valuation engines do not care about your sentimental attachment to "patina" or rat-rod aesthetics. If you want the vehicle to be worth anything near the top-tier $5.2 million garage valuations seen on the Steam forums, you have to play by the game's strict condition rules. The Rat requires a total frame-off restoration. You cannot simply patch the holes, ignore the rust, and slap a turbo on the stock block. Every weld, every bolt, and every coat of paint factors into the final appraisal.
Driving physics in My Garage are punishingly realistic. Because the Rat is a lightweight, rear-wheel-drive chassis, it is incredibly prone to snap oversteer if you fail to balance the suspension tuning. Building this car isn't just about making it look pristine; it's about engineering a chassis that can actually handle the massive power upgrades you will eventually install.
Junkyard Scraps vs. Catalogue Sourcing
The core gameplay loop of My Garage encourages scavenging. You visit the junkyard, find a wrecked shell, and piece it together using whatever you can salvage. However, treating the Rat like a standard salvage job is a massive trap.
The game calculates your overall condition bonus based on the aggregate health of every installed part. Junkyard parts carry a hidden rust penalty. Even if you repair them to the best of your ability, their baseline condition caps out, preventing you from achieving a perfect score. To get 3 stars on overall condition and 3 stars on color condition, you must abandon the junkyard for your primary body panels and mechanical components.
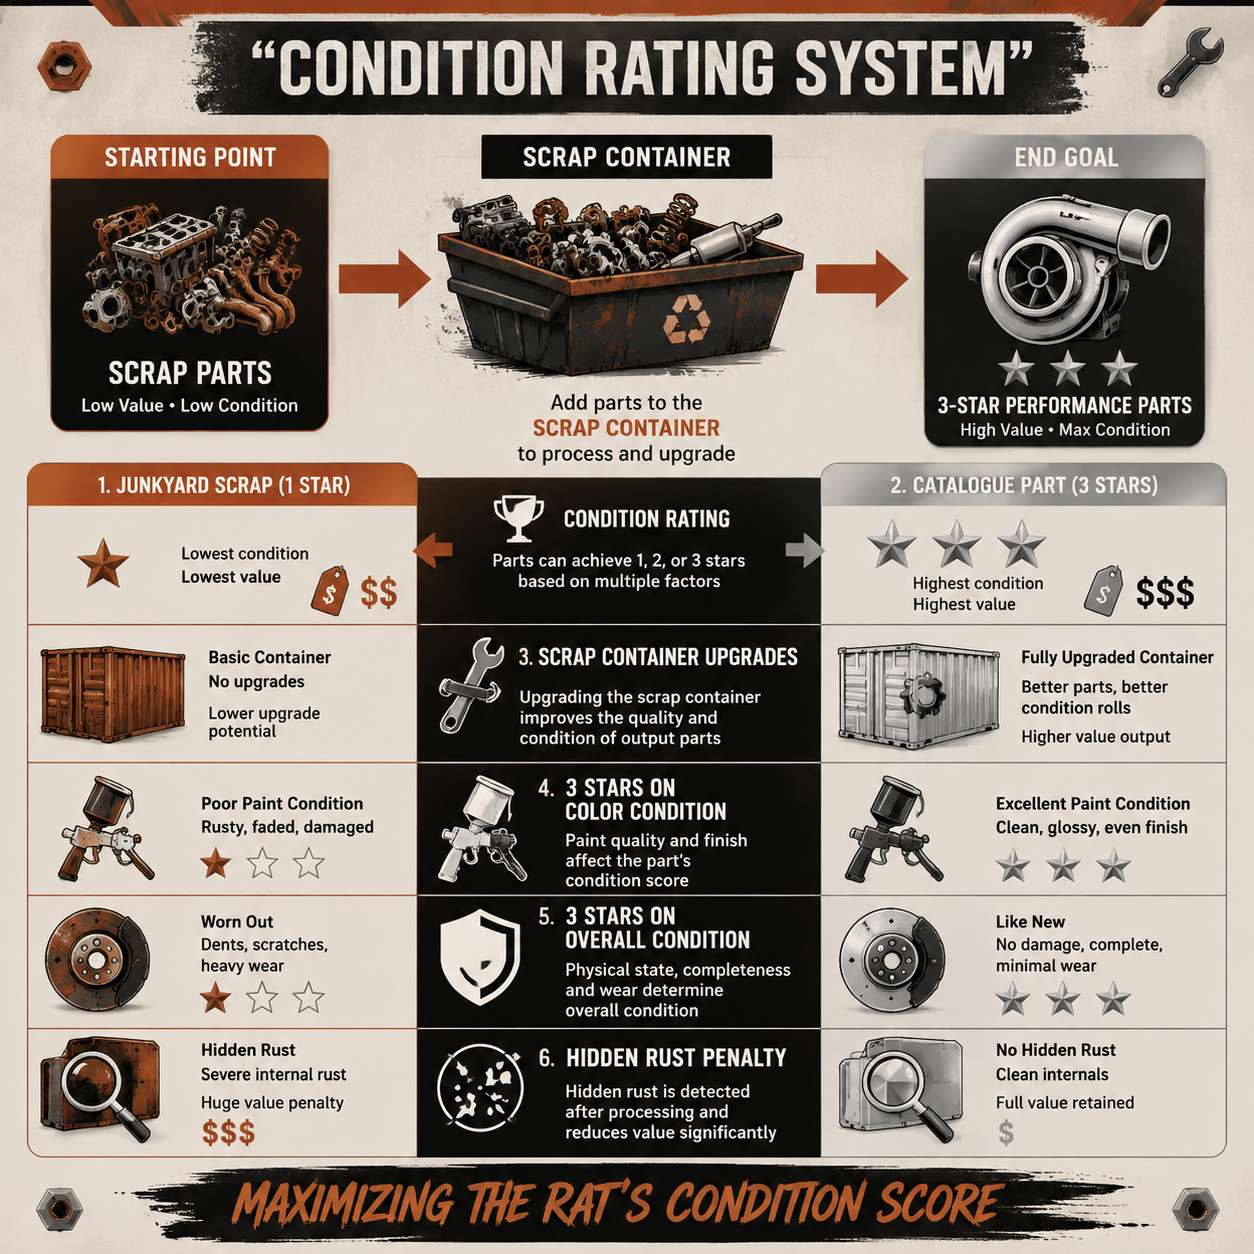
Instead, you need to buy every single part new from the catalogue. You will have to use the in-game computer, navigate the interface, and order parts directly to your garage door. This is a massive financial sink. You need a solid bankroll from doing routine repair requests—like oil changes and brake pad replacements—before you even attempt this build.
But buying new isn't enough. The implementation quality of the Rat update requires you to paint every single part before you weld it onto the car. If you weld a raw catalogue part onto the chassis and attempt to paint it in place, the game's logic frequently fails to register the paint coverage properly, docking your color condition score. You must mix your hex color in the paint booth and spray each bumper, fender, and mirror on the floor before attaching it.
Furthermore, for performance parts, you should exclusively use the scrap container. By feeding junk parts into the scrap container, you can generate 3-star performance upgrades. This is how elite players push standard engines well past their factory limits, achieving unreal horsepower numbers without relying on standard store-bought components.
Step-by-Step Teardown of the Rat car My Garage
Before you can build, you must destroy. The teardown phase for this chassis is meticulous, and skipping steps will cause physics collisions and headache-inducing bugs later in the build.
1. The Outer Shell Assessment Equip your headlamp and OBD scanner to assess the initial damage, but don't bother trying to save the outer panels. Use your cutting tools to break the welds on the rusted fenders, doors, and hood. Toss them directly into the scrap pile to feed your scrap container economy.
2. Powertrain Extraction Drain the fluids to avoid making a mess of your shop floor. Disconnect the driveshaft, unbolt the transmission bell housing, and use the engine hoist to pull the block. If you are going for full immersion, tear the engine down completely until the only things attached to the block are the crankshaft, crank sprocket, camshaft, camshaft sprocket, and timing chain.

3. Suspension and Subframe The E36-style suspension is complex. Remove the control arms, sway bars, and struts. You must strip the car down to the absolute bare metal frame. Any lingering rusted bolt or bracket left on the chassis will infect your overall condition rating.
4. Wiring and Plumbing Strip out the battery, radiator hoses, and brake lines. The engine bay needs to be entirely empty before you even think about ordering replacement parts.
5. Chassis Prep Once the chassis is bare, utilize a vehicle dolly to move the shell into the paint booth. Do not start reassembly until the bare frame has received its base coat of paint.
The Infamous Interior and Carpet Bug
Perhaps the most infuriating aspect of this build is the interior assembly. The Steam forums are littered with players who have completely rebuilt the car's exterior and powertrain, only to find they cannot install the floor carpet, leaving the cabin looking like a stripped-out race car.
The carpet bug stems from two distinct issues in the game's code. First, unlike metal parts which have a clear visual indicator of their health (rust), the interior carpet looks identical whether it is brand new or completely wrecked. If you try to install a carpet salvaged from a junkyard wreck, the game will silently reject it, offering no error message. You must purchase a brand new, store-bought carpet from the catalogue.
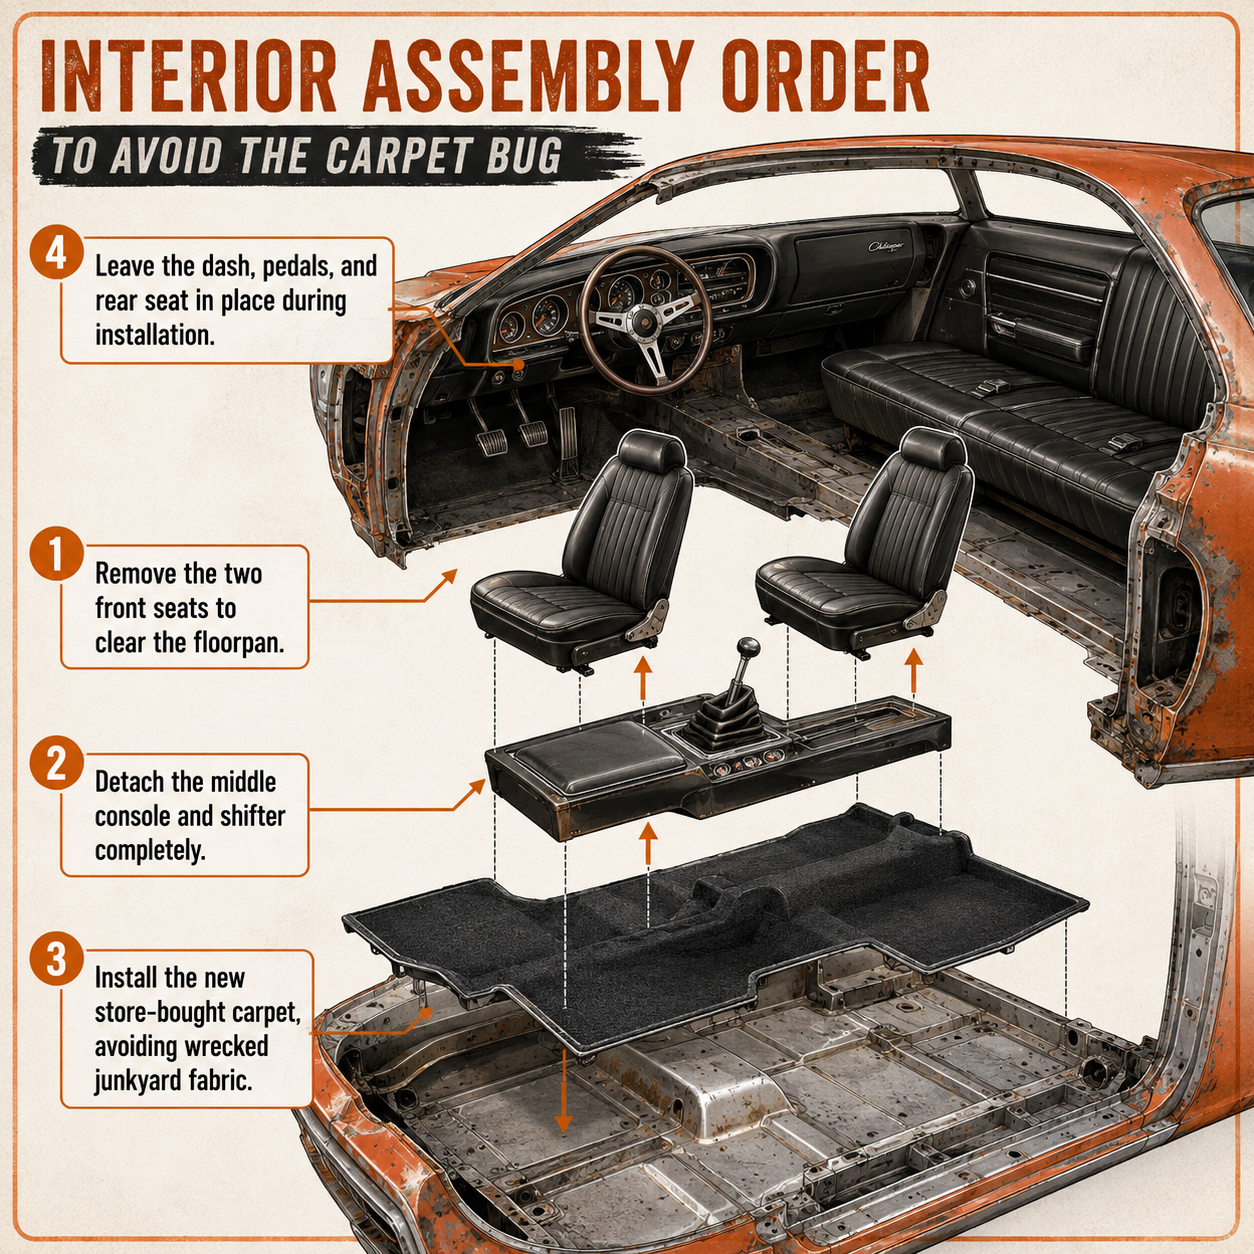
Second, the installation order is hardcoded with very strict collision boxes. To successfully install the carpet, you must completely remove the two front seats, the middle console, and the shifter. Do not attempt to slide the carpet under them; the game's physics engine will not allow it. Interestingly, the dash, pedals, and rear seat can remain installed without causing collision issues. Once the floorpan is clear of the front seats and console, the store-bought carpet will snap into place on the first try.
Engine Swaps for the Rat car My Garage: I6R vs. 2JZ
A flawless chassis demands a flawless powertrain. You have two primary paths when building out the engine bay: maximizing the standard 3.0L I6R or attempting a massive custom swap.
The 3.0L I6R Build The native inline-six is highly capable if built correctly. Use the headlamp to locate any faulty pistons in your salvaged block. Remove them by undoing the two bolts holding the connecting rod to the crankshaft. Once the faulty pistons are replaced and the oil pan is reinstalled, you have a solid baseline. By utilizing the scrap container to upgrade all internals to 3-star performance parts, the I6R can comfortably push 450 to 500 horsepower, making it an absolute menace on the asphalt.
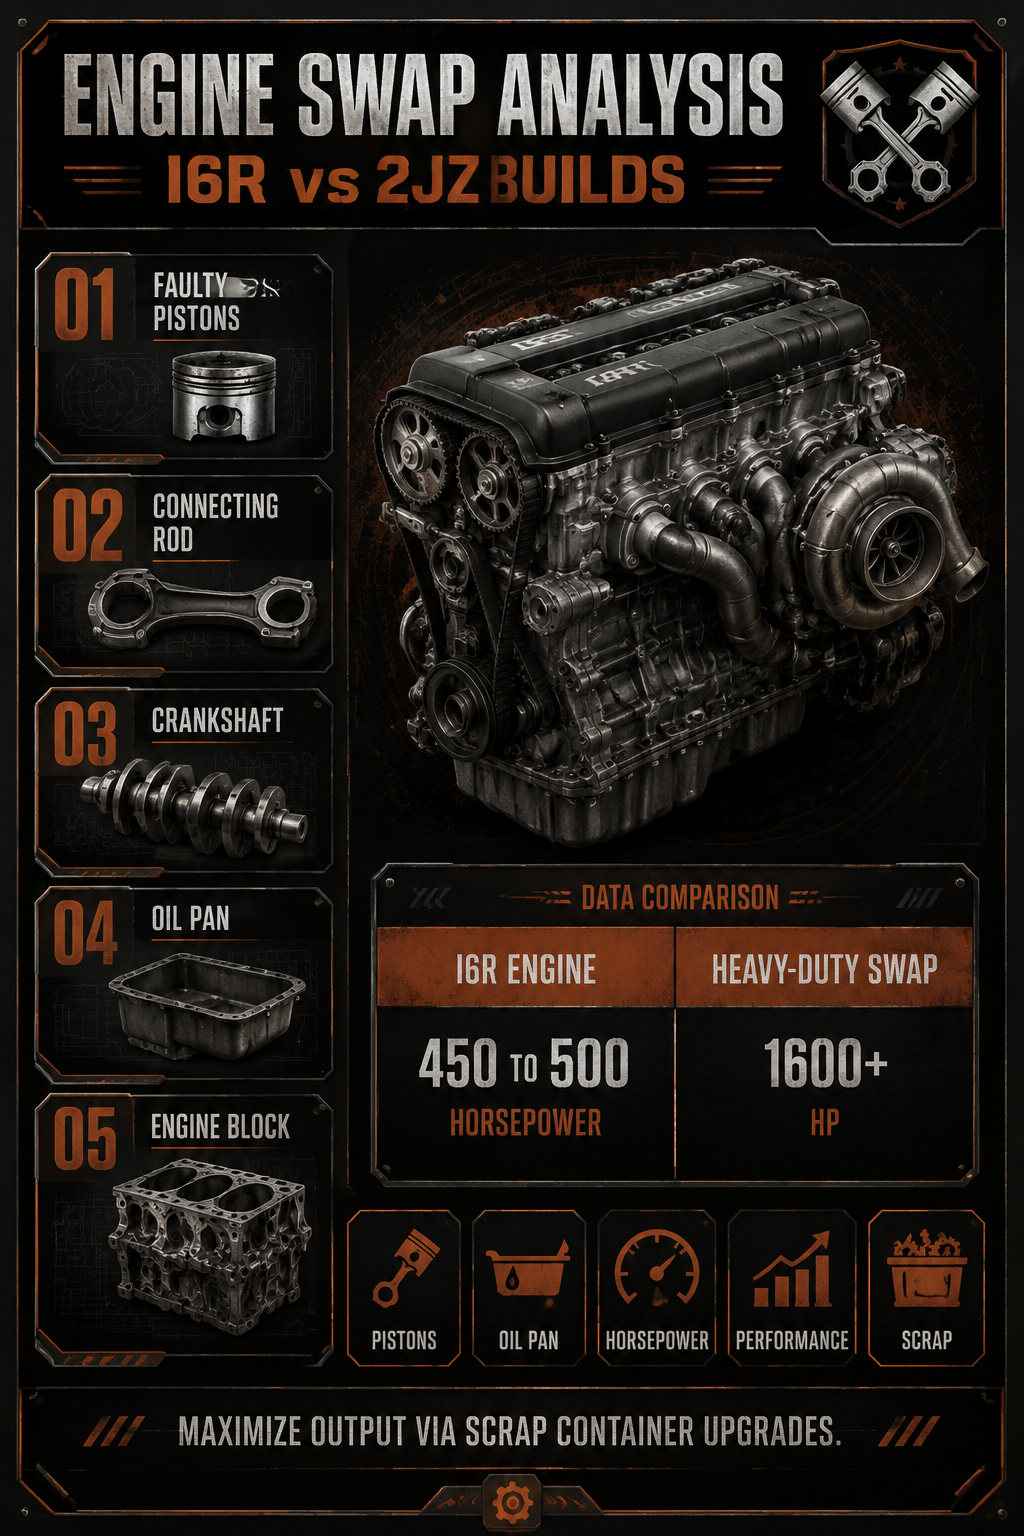
The High-Horsepower Swap For players chasing the 1600+ HP figures seen on Reddit, the standard block won't cut it. You need to look at heavy-duty swaps, such as a 2JZ equivalent or a Turbo Diesel build. When executing a high-horsepower build, the drivetrain becomes the bottleneck. You must upgrade the differential—the Wolf diff is a popular community choice—and swap the transmission to handle the immense torque. Every internal component, from the camshaft sprocket to the timing chain, must be a 3-star performance part sourced via the scrap container. If you leave a standard 1-star part in a 1600 HP engine, it will inevitably grenade under load.
Frequently Asked Questions (FAQ)
Where do I find the Rat chassis in My Garage? The chassis spawns randomly in the open world. High-probability spawn locations include the dirt road free car spot, the abandoned cabin, and behind the empty store.
Why won't the carpet install in my Rat? You are likely using a wrecked junkyard carpet, which has no visual damage but is mechanically rejected by the game. Buy a new carpet from the catalogue, remove the front seats, center console, and shifter, and it will snap right in.
How do I get 3-star performance parts? Do not repair junkyard performance parts. Instead, feed junk into the scrap container to generate 3-star performance upgrades. This is the only way to maximize your vehicle's horsepower and overall valuation.
Do I have to paint parts before welding them on? Yes. To achieve a 3-star color condition rating, you must paint every single catalogue part individually on the floor before welding it onto the chassis. Welding raw parts and painting them later results in a lower score.
The Final Appraisal
Building this E36-style menace is a test of patience, precision, and deep systemic knowledge of Viking Game Studio's mechanics. It punishes corner-cutting and rewards methodical, assembly-line perfection. Master the scrap container economy, respect the strict interior installation order, and meticulously paint before you weld. Do that, and you won't just have a running car—you'll have a multi-million dollar masterpiece sitting in your garage, capable of outrunning anything else on the map.
Sources
- My Garage Official Steam Community Discussions
- My Garage Fandom Wiki: Repair Requests & Build Guides
- r/CarMechanicSimulator & r/MyGarage Subreddits