When your armored train is barreling through the post-apocalyptic wasteland and a roving band of scavengers is raining rockets on your roof, a broken main cannon is a death sentence. Surviving Llamaware Studios’ chaotic action-management roguelike requires more than just shoveling coal into the engine; you need the repair minigame explained Apocalypse Express style to keep your mobile fortress alive. This guide breaks down the exact mechanics of the timing circles and WASD prompts, module triage, and how to fix your train faster during intense combat so the encroaching storm never catches you.
Runs in this game can go perfectly fine until you hit a boss, and suddenly you are stuck running around repairing modules without any time to fight back. If you want to break out of that stressful spiral and master the FTL-style crew management—shrunk down into one frantic little train—you need a flawless repair strategy.
The Mechanics: Repair Minigame Explained Apocalypse Express
At its core, the game is a brutal balancing act of action and management. Modules will inevitably get destroyed or catch fire during a run, rendering them inoperable. To fix them, you cannot simply hold down a button and wait; you must actively engage in a repair minigame that tests your reflexes while enemies continue to fire at you.
There are two primary variants of the minigame you will encounter on the wasteland tracks:
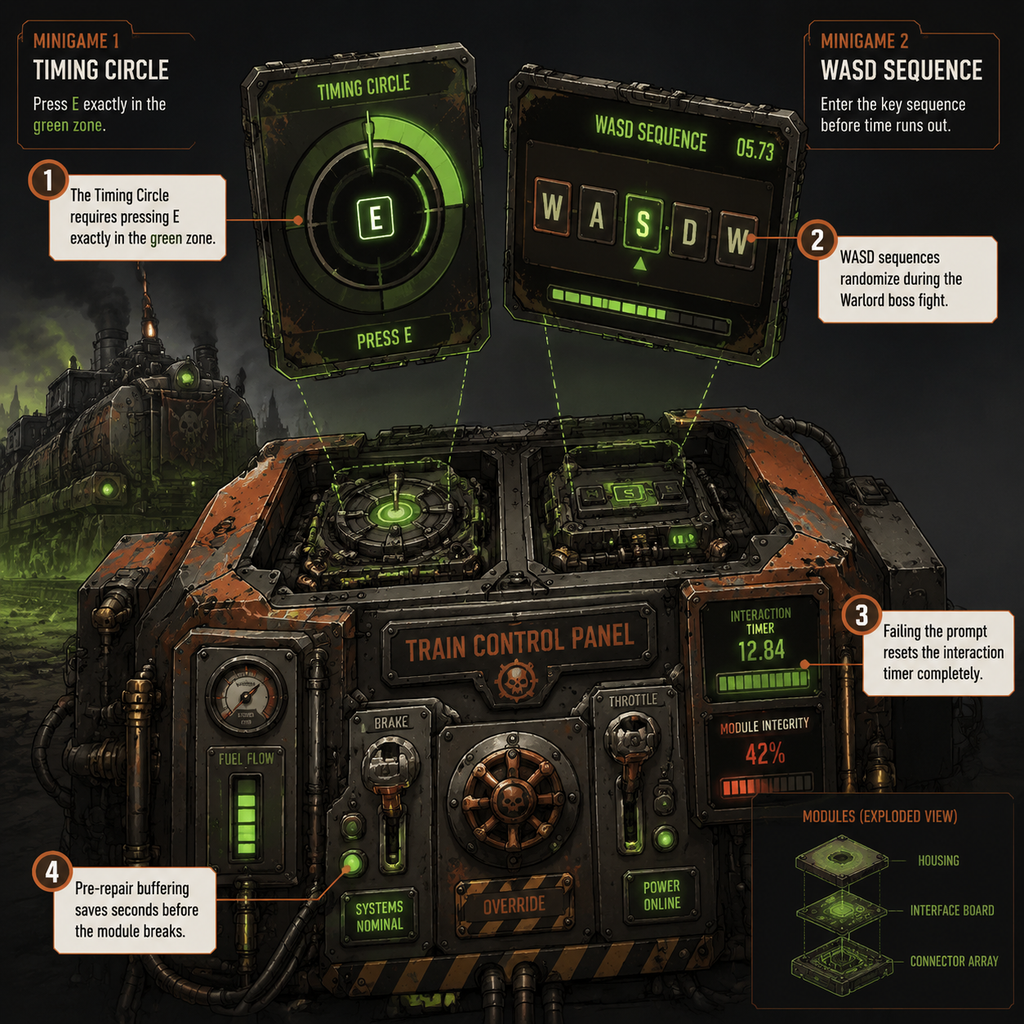
- The Timing Circle: A precision-based skill check where an arrow moves rapidly around a circular dial. You must press the 'E' key (or your designated action button) exactly when the arrow enters the highlighted green zone.
- The WASD Combo: A rapid-fire sequence of directional inputs that must be pressed in the exact order displayed on the screen.
During the Early Access period, a notorious bug caused inputs to drop, leading to frustrated players. However, Llamaware Studios deployed patch 0.6.0.3, which explicitly fixed the broken repair minigame. In the 1.0 release, the inputs are highly responsive, but the timing windows remain incredibly tight.
Failing either of these prompts carries a severe penalty. The interaction timer completely resets, costing you precious seconds. When you are taking sustained hull damage, failing the prompt resets the interaction timer completely, often guaranteeing that the module stays broken while the enemy gets another volley off. Pre-repair buffering saves seconds before the module breaks entirely—smart conductors will start the minigame when a module is smoking, rather than waiting for it to catch fire.
Module Survival Triage: What to Fix First
When multiple systems fail simultaneously, panic sets in. The claw arm breaks. The track-switch lever jams. The engine takes damage, and the coal runs low. This cascading failure is referred to by the community as "The Stressful Spiral." To survive it, you must adhere to a strict module triage hierarchy.
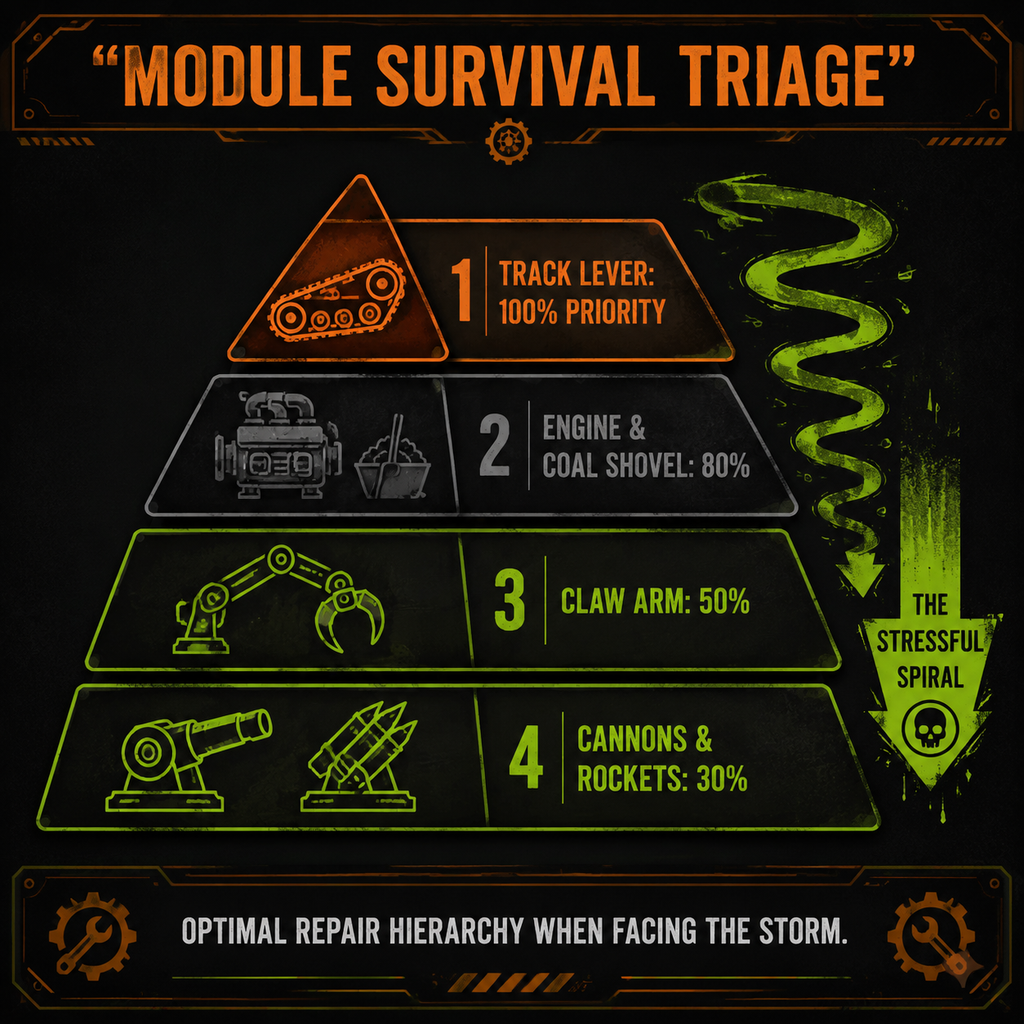
If you try to fix everything at once, you will fix nothing. Here is the optimal repair hierarchy when facing The Storm:
- Track Lever (100% Priority): If you cannot switch tracks, you will hit environmental obstacles and take catastrophic hull damage. In this game, stopping is basically death. The lever must always be operational.
- Engine & Coal Shovel (80% Priority): Locomotion mobility is your lifeblood. If the engine dies, the train stops, and you are swarmed. Keeping the engine repaired and the coal stocked is non-negotiable.
- Claw Arm (50% Priority): You need the claw arm to grab trackside resources, scrap, and ammo. While you can survive a few miles without it, losing it during a long stretch starves you of the materials needed to upgrade your defenses.
- Cannons & Rockets (30% Priority): Surprisingly, offensive modules are the lowest priority during a crisis. You can outrun scavengers if your engine and lever are working, but you cannot out-shoot a broken engine. Only repair your cannons when the locomotion modules are secure.
Surviving the Bosses: The Mechapede and the Warlord
Boss encounters are the ultimate test of your repair efficiency. Many players report that their runs collapse fast during these spikes in difficulty. The difficulty ramps up sharply because bosses output damage faster than a solo player can manage standard repairs.
Take the first major boss: The Mechapede. This huge mechanical centipede is armed with rockets and drones, and it will systematically dismantle your train car by car. When The Mechapede boss lunges at the train, you might hear a co-op partner yell, "Rockets incoming!" Suddenly, your main cannon module catches fire, displaying a broken gear icon. This is when the WASD sequence active! warning flashes on your screen.
During The Mechapede fight, you must abandon the claw arm entirely. There is no time to collect scrap. Your sole focus must be dodging its massive physical lunges via the track lever, and keeping at least one weapon operational to chip away at its health.
Similarly, the Warlord boss introduces a new layer of chaos: WASD sequences randomize during the Warlord boss fight. You cannot rely on muscle memory. You must read the prompts dynamically while dodging incoming fire. The trick here is to utilize the "window of calm"—the brief seconds between the Warlord's barrage phases—to execute your WASD repairs. If you try to repair while actively taking fire, the screen shake will likely cause you to miss the timing circle, resetting your progress.
Train Length vs. Conductor Efficacy
One of the most overlooked aspects of the repair minigame explained Apocalypse Express meta is the physical layout of your train. As you progress, you can extend your train with more wagons to carry more equipment, cannons, and defensive relics.
However, there is a clear trade-off between train length and conductor efficacy. More modules make it harder to find specific OP upgrades, but more importantly, a longer train means more running distance. If your engine is in car 1 and your rear turret is in car 5, running across the entire train to fix a broken cannon takes valuable seconds. By the time you reach the turret, execute the WASD prompt, and run back, your engine might be on fire.
To mitigate this, group your high-priority modules together. Keep the track lever, the coal shovel, and your primary defensive module in the front two cars. Relegate autonomous systems or low-priority weapons to the rear wagons. This minimizes travel time and ensures you can trigger the repair minigames efficiently.
Solo vs. Co-Op: Breaking the Stressful Spiral
Apocalypse Express supports local co-op, and frankly, the later stages of the wasteland feel balanced around having two players. The dynamic shifts drastically when you add a second conductor to the mix.
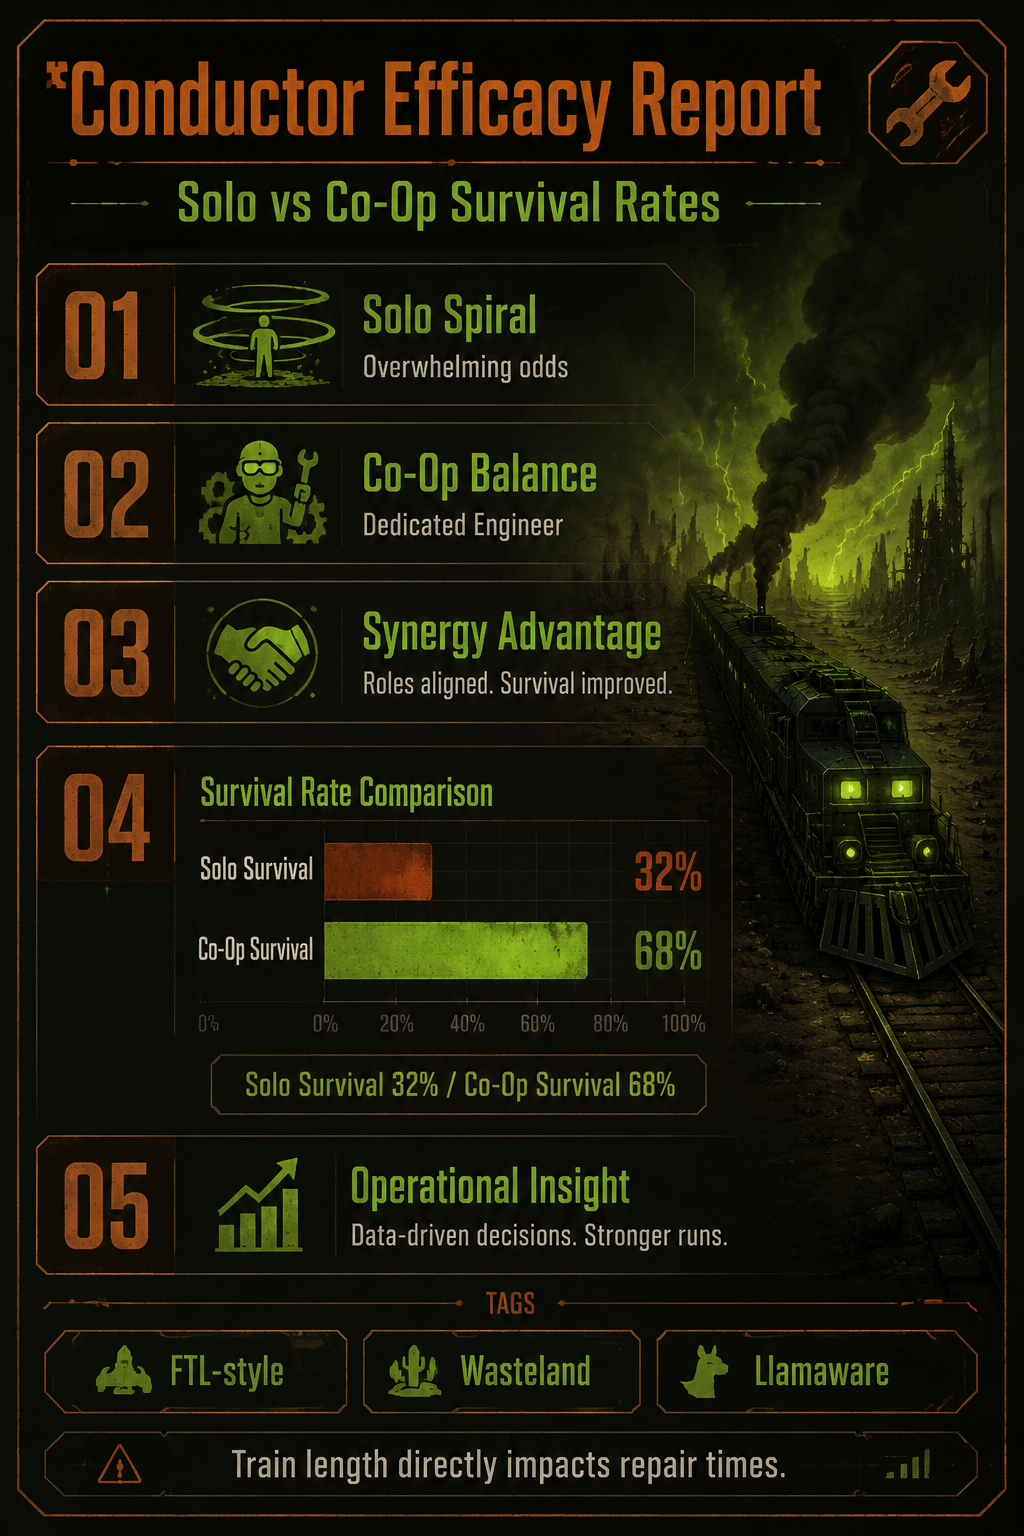
In solo play, you are facing overwhelming odds. You must balance shoveling coal, managing the claw arm, and executing repair minigames entirely on your own. The solo spiral is real; one missed timing circle can end a 40-minute run.
In co-op, the optimal strategy is to assign roles. One player becomes the dedicated Engineer, focusing entirely on monitoring module health, executing the timing circles, and managing the FTL-style crisis control. The other player handles locomotion and offense—shoveling coal, switching tracks, and firing the cannons. This division of labor completely changes the math on repair times. When you look at the community data, the survival rates tell a clear story: Solo Survival 32% / Co-Op Survival 68%. Having a dedicated Engineer who never misses a WASD prompt is the most powerful upgrade in the game.
Advanced Tips for the Repair Minigame Explained Apocalypse Express
If you want to push deep into the late-game biomes and see the remains of the outside world, you need to optimize every single keystroke.
Invest in Repair Relics: Throughout your run, you will be offered various relics and upgrades. Always prioritize relics that reduce interaction timers or widen the green zone on the timing circle. An upgrade that gives +1 DMG to your guns is useless if the gun is constantly broken. An upgrade that cuts repair time by 30% will save your life.
Audio Cues over Visuals: The screen gets incredibly chaotic during waves of enemies. Explosions, fire effects, and flying scrap can obscure the repair UI. Train yourself to listen for the audio "click" that accompanies the timing circle, rather than relying purely on visual tracking.
Strategic Abandonment: Sometimes, a module is not worth saving. If a rear wagon is overwhelmed by fire and the storm is closing in, abandon it. Cut your losses, move to the front of the train, and focus on keeping the engine alive. A train with one working gun and a healthy engine can survive; a fully armed train with a dead engine is just a stationary target.
FAQ: Repair Minigame Explained Apocalypse Express
Why does my repair minigame feel unresponsive or broken? If you are dropping inputs, ensure you are playing on the 1.0 release version. During Early Access, there was a known bug that caused inputs to fail, but patch 0.6.0.3 officially fixed the broken repair minigame. If you are on the current patch, the issue is likely the intentional screen-shake mechanic during boss fights throwing off your timing.
Can I automate the repair process? Partially. As you progress, you can experiment with combinations to create a completely autonomous system. There are late-game modules and relics that slowly auto-repair hull damage or extinguish fires, but the core mechanical repairs (fixing a completely broken cannon or lever) will always require manual execution of the minigame.
What happens if I fail the timing circle or WASD prompt? Your repair progress is instantly reset to zero. The module remains broken, and you must restart the interaction timer from scratch. This is why accuracy is more important than speed; rushing and failing costs more time than waiting for the perfect moment to press 'E'.
Does adding more wagons make repairs harder? Yes. Train length directly impacts repair times. More wagons mean a longer physical distance your character must run to reach broken modules. Keep your most vital systems (engine, track lever) clustered near the front to minimize travel time during a crisis.
Sources
- Llamaware Studios: Apocalypse Express 1.0 Patch Notes & Release Documentation.
- Steam Community Forums: Apocalypse Express Player Strategy & Bug Report Threads (Patch 0.6.0.3).
- r/ApocalypseExpress: Community discussions on Solo vs. Co-Op balancing and the "Stressful Spiral" mechanic.
- Independent reviews and gameplay analyses of FTL-inspired train management roguelikes.