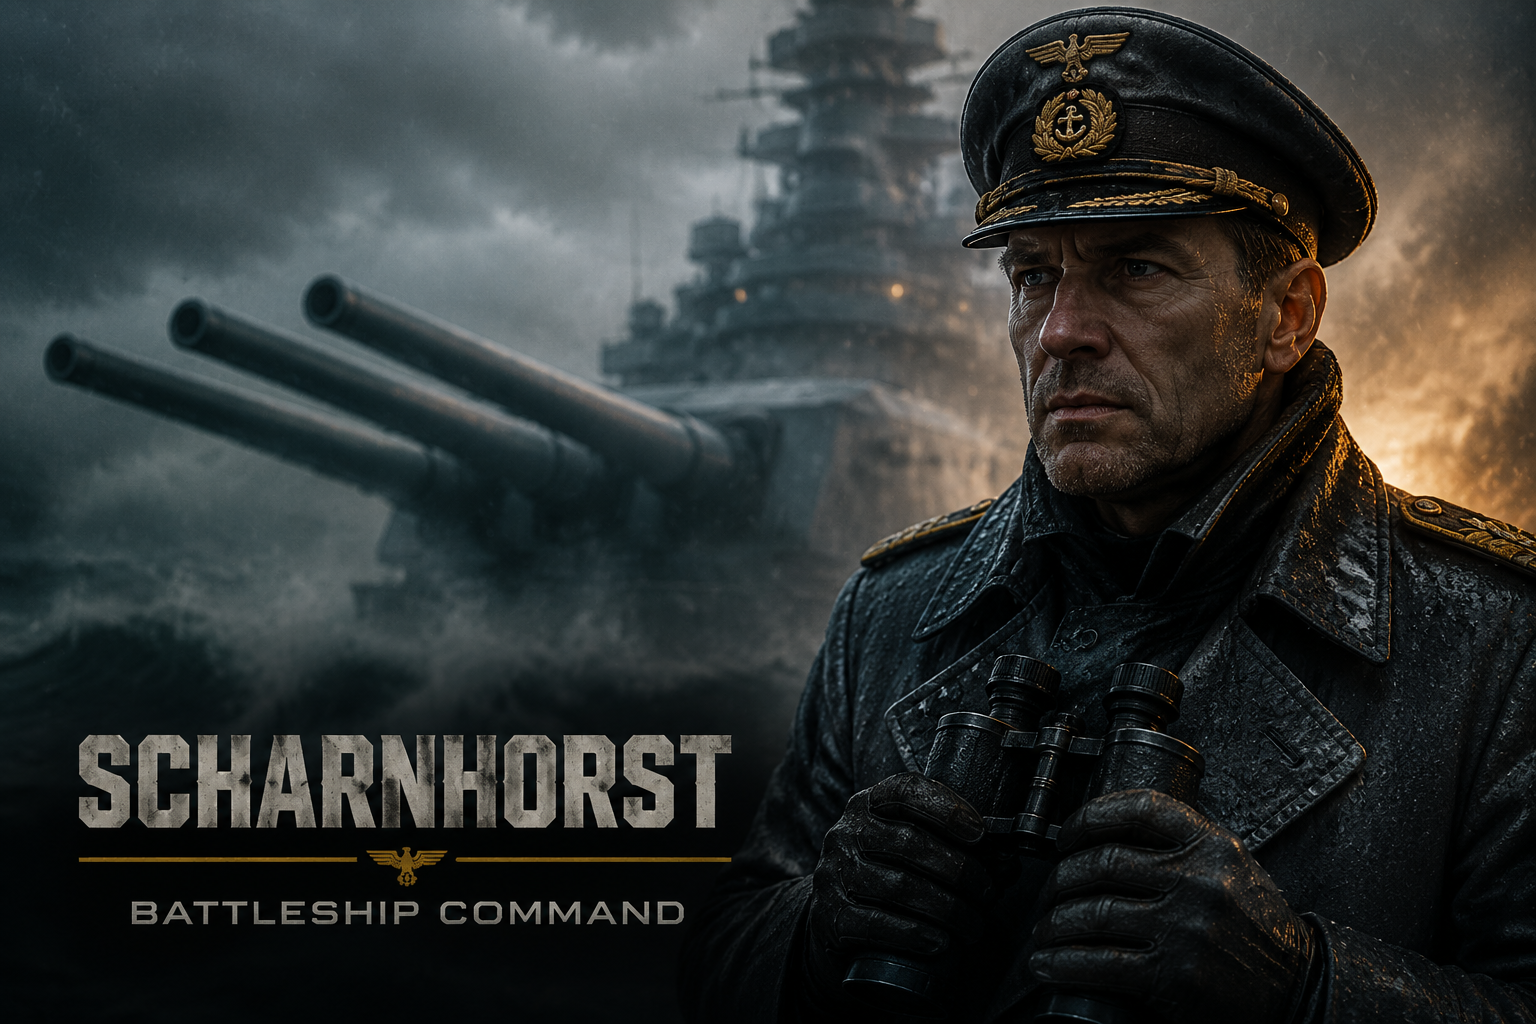
Landing a 28cm shell on a moving cruiser at 24 kilometers requires more than just pointing and clicking. If you want to master MicroProse’s latest first-person naval simulator, this definitive Scharnhorst gunnery guide Battleship Command players have been waiting for breaks down everything from optical ranging to trajectory calculation. Stop trusting the AI to win your fleet engagements. MicroProse didn’t build a 30,000-ton simulator just for you to auto-resolve combat. Stop missing your salvos and learn how to leverage the Kriegsmarine's most feared fire-control systems.
Unlike arcade shooters, Battleship Command forces you to walk the decks, man the directors, and understand the physics of naval artillery. Whether you are hunting merchant convoys in the GIUK gap or trading broadsides with the HMS Hood, your survival depends entirely on your mastery of the ship's gunnery systems.
Core Mechanics for Our Scharnhorst Gunnery Guide: Battleship Command Basics
Before you can land a record-breaking hit—like the historical 24.2 km strike on the HMS Glorious—you must understand the hardware at your disposal. You are not an omniscient camera floating in the sky; you are a commander who must utilize the ship's physical layout to project power.
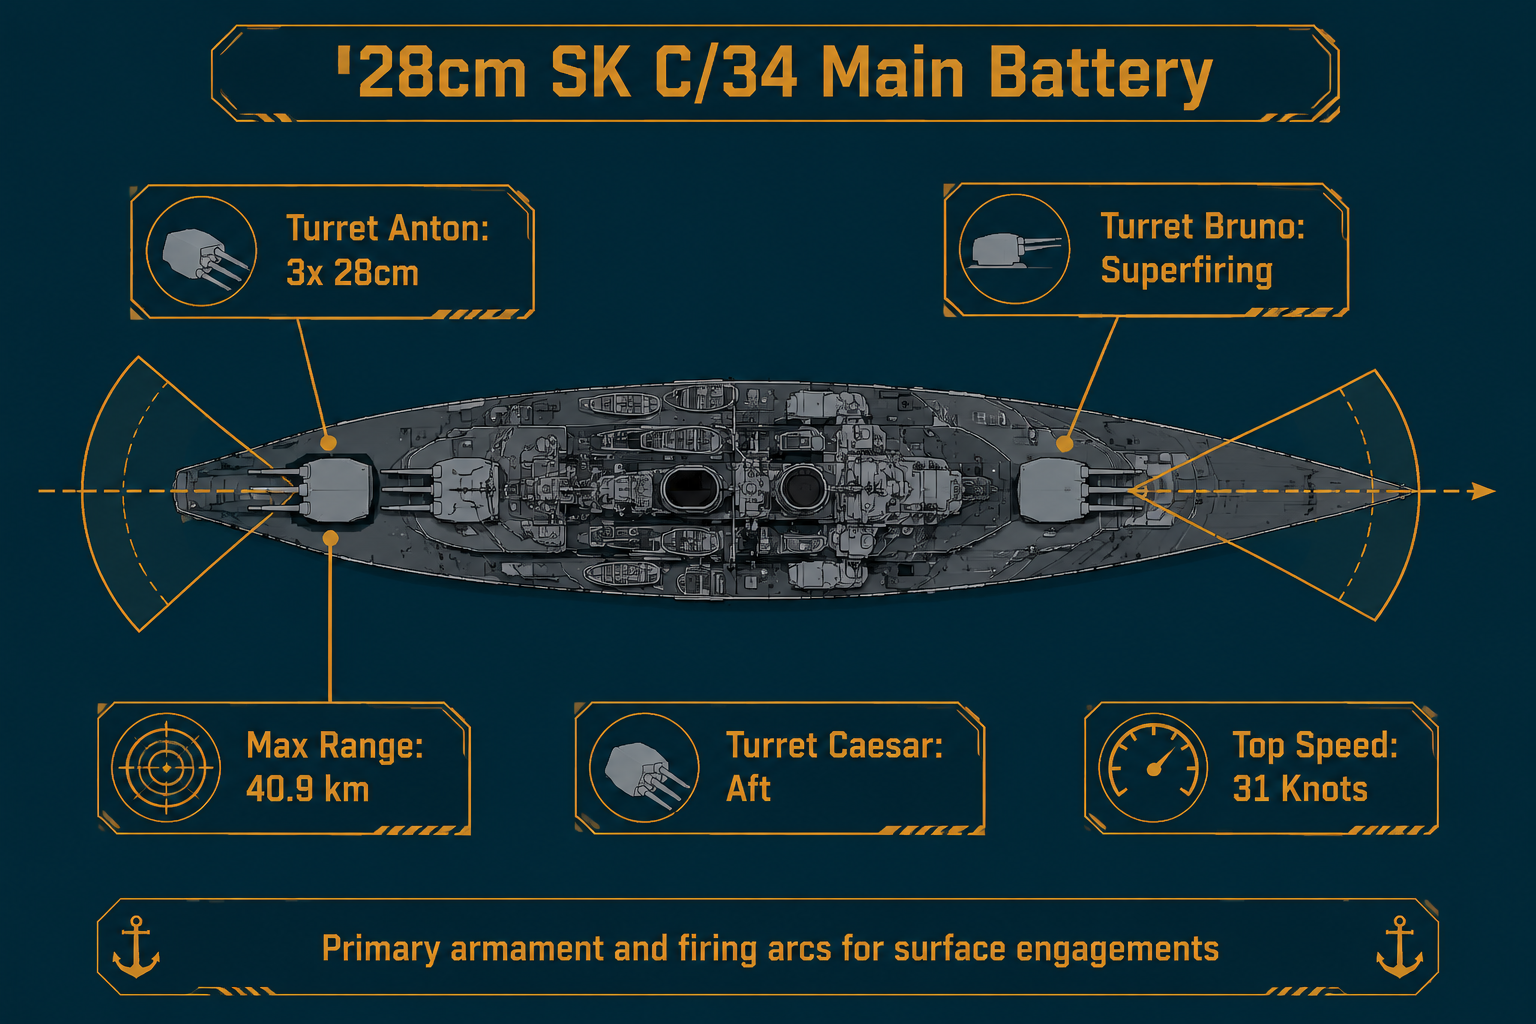
Your primary tools of destruction are the nine 28cm SK C/34 guns, distributed across three massive triple turrets. Forward of the superstructure sit Turret Anton and the superfiring Turret Bruno, while Turret Caesar guards the aft. To maximize your broadside weight, you must unmask all three turrets, which requires angling the ship. However, exposing your broadside makes you a massive target. The key is utilizing the Scharnhorst’s blistering 31 knots top speed to dictate the engagement angle, firing a full nine-gun salvo and immediately angling back in before the enemy’s return fire lands. The maximum theoretical range is an astonishing 40.9 km, though hitting anything at that distance requires flawless fire control.
The First-Person Command Experience
Because the game features a fully realized 1:1 interior, you cannot simply press a hotkey to magically fix a broken turret. If your forward fire-control director takes shrapnel damage, you must physically navigate the bridge or use the command UI to switch to local turret control.
Furthermore, the game's dynamic weather systems heavily impact your baseline mechanics. Rolling fog banks and brutal North Sea squalls will obscure your optics. When the visibility drops, the AI visibility modifier plummets, forcing you to rely on your Seetakt radar rather than optical rangefinders.
The Fire Control System: Ranging and Radar
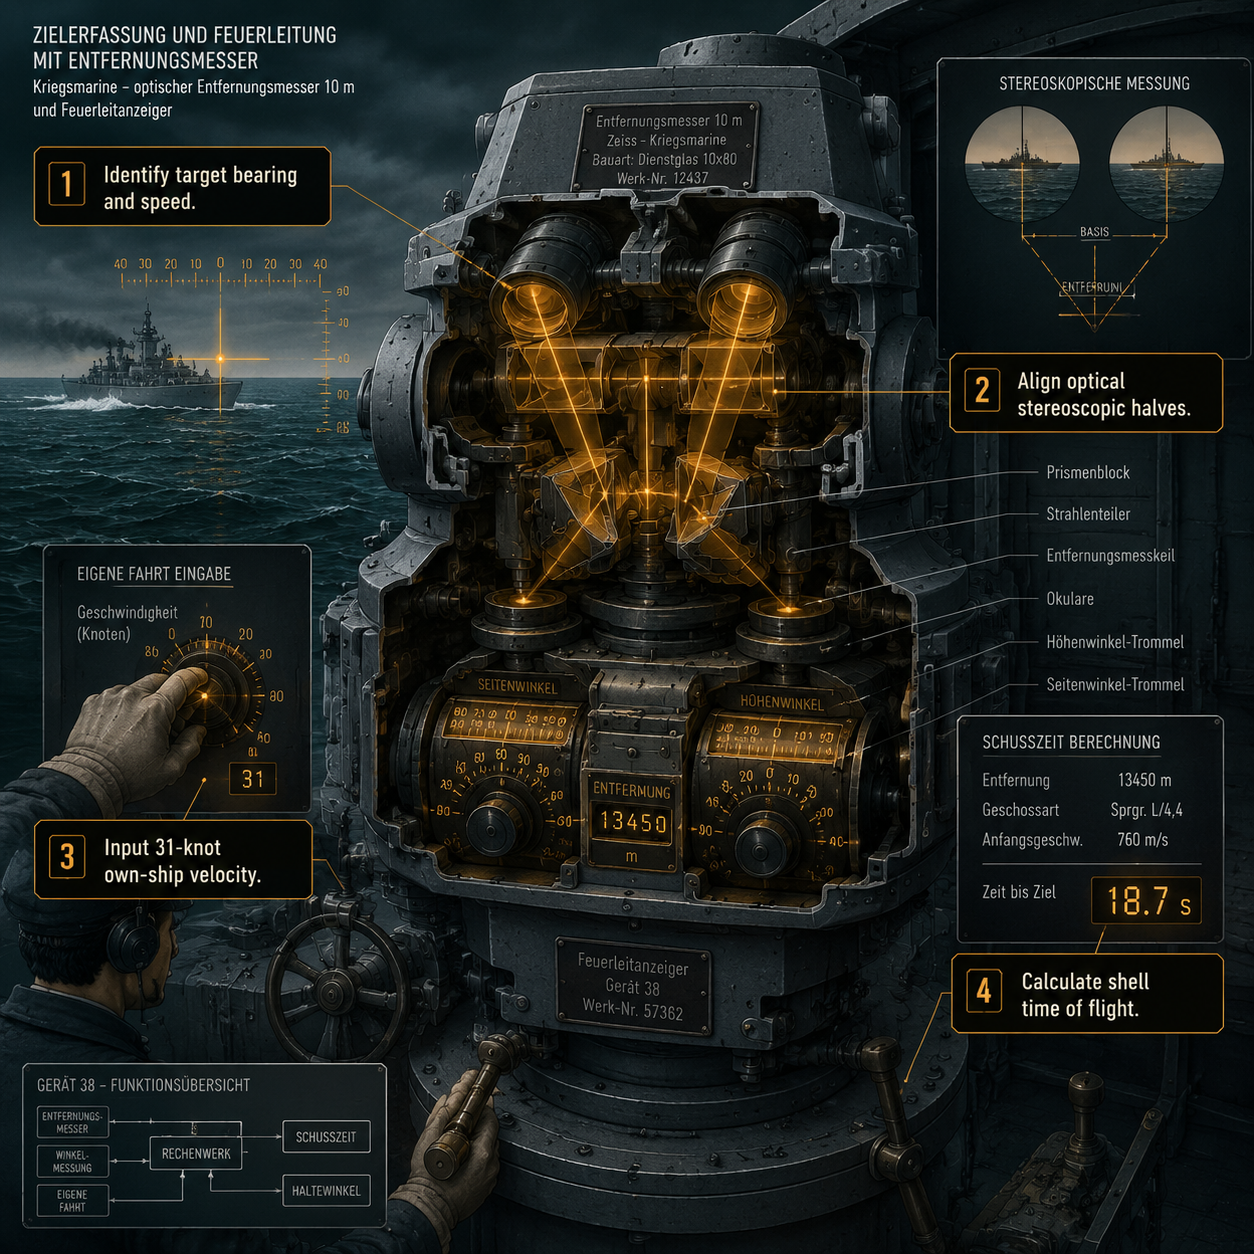
MicroProse demands you understand the actual mechanics of WW2 fire direction. You cannot rely on a magical red reticle. First, you must identify target bearing and speed using the ship's observation optics. Once locked, the director crew must align optical stereoscopic halves to generate a raw range figure. But a raw range isn't enough. You must input 31-knot own-ship velocity into the mechanical fire control computer to compensate for your own movement, and finally calculate shell time of flight to establish the proper lead angle. If you skip any of these steps, your shells will harmlessly water the Atlantic.
Step-by-Step Firing Sequence
- Spotting: Assign lookouts. Wait for spotters to call out contacts. Remember, recent patches ensure spotters report ships sunk, not just "contact lost," which helps you confirm kills through the fog.
- Ranging: Man the optical director. Adjust the stereoscopic lenses until the two halves of the enemy ship align perfectly.
- Solution Generation: Feed the target's estimated speed and heading into the computer.
- Firing: Choose between ripple fire (firing barrels sequentially to walk your shots onto the target) or a full broadside.
- Correction: Watch the splash plumes. If the water spouts are behind the target, you are firing long. Drop your range by 500 meters and fire again.
Advanced Trajectories in the Scharnhorst Gunnery Guide Battleship Command Edition
Understanding the ballistic arc of your shells is what separates a novice from an admiral. The 28cm guns on the Scharnhorst have an exceptionally high muzzle velocity. This means at short to medium ranges (under 15 km), your shells travel on a very flat trajectory.
Flat Trajectory vs. Plunging Fire
Because of this flat trajectory, aiming for the deck armor of an enemy battleship at 12 km is a waste of ammunition; the shells will simply skip off the hardened steel. Instead, at medium ranges, aim directly for the vertical main belt or the upper superstructure.
Conversely, if you are engaging at extreme ranges (20 km+), the shells will fall from the sky in what is known as "plunging fire." This is how the Scharnhorst historically scored its most devastating hits. Plunging fire bypasses the thick vertical belt armor and crashes through the thinner, unsloped deck armor, detonating deep inside the enemy's magazines.
Managing Time Compression
At 24 kilometers, the shell time of flight can exceed a full minute. While the game offers Time Compression to speed up long transit times, be cautious using it while waiting for salvos to land. High time compression during active gunnery can cause you to miss the crucial splash-spotting phase, ruining your ability to correct your next salvo.
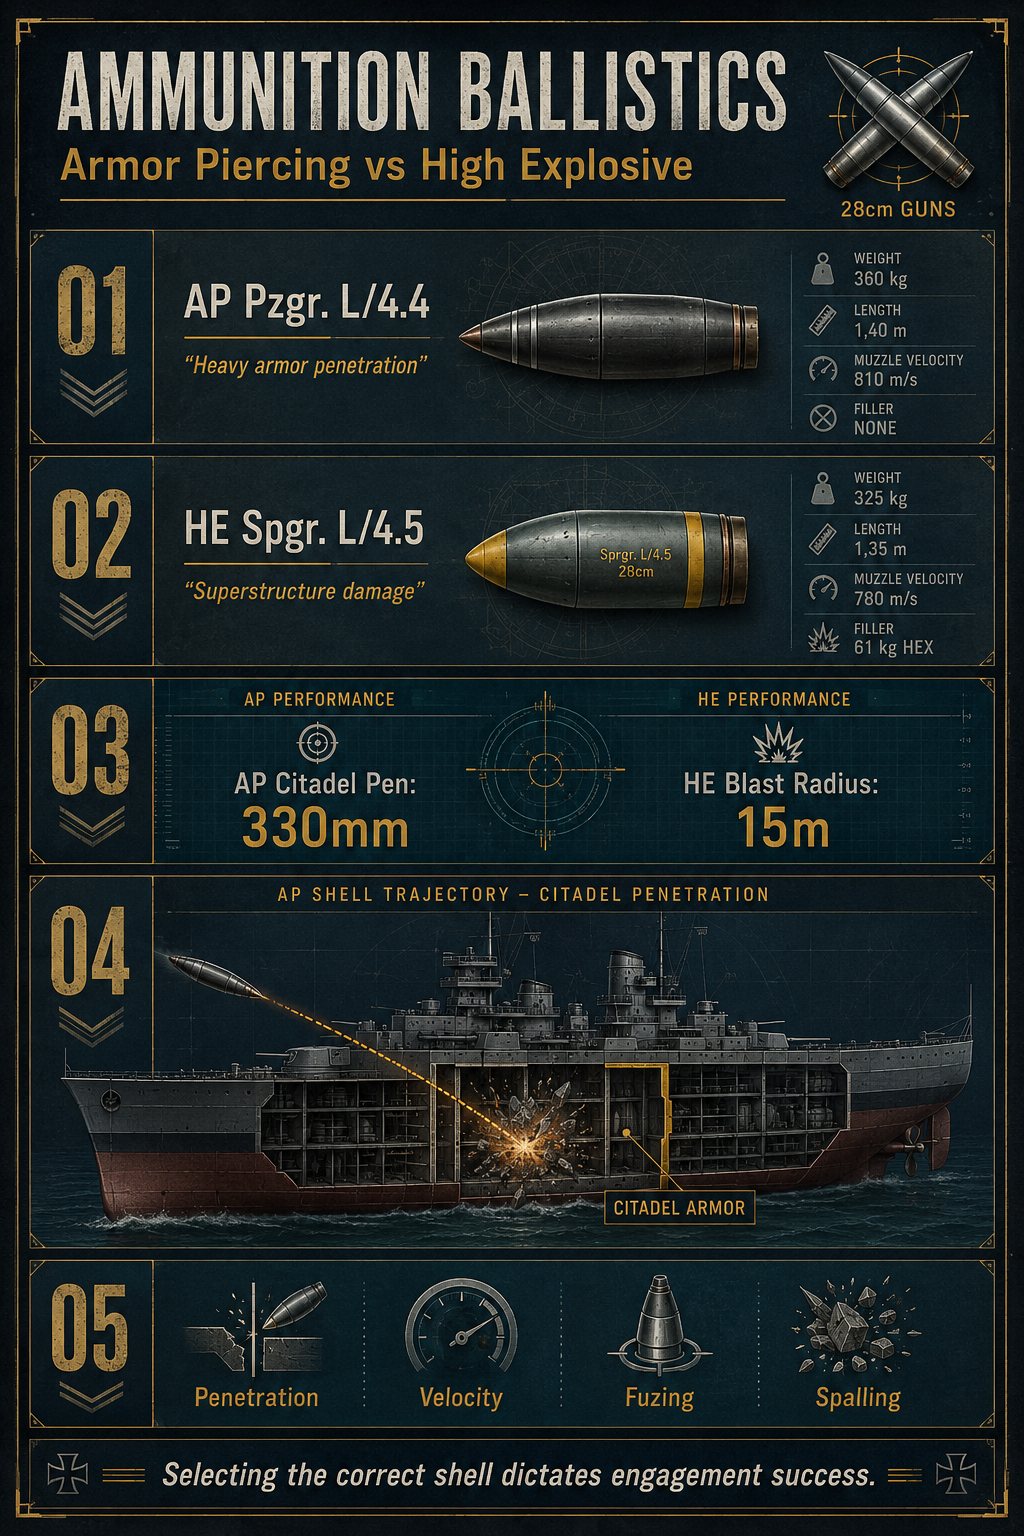
Ammunition Selection: Armor Piercing vs. High Explosive
Selecting the right shell type is the difference between a devastating magazine detonation and a superficial scratch. The AP Pzgr. L/4.4 (Armor Piercing) shell is your primary ship-killer against heavily armored targets like the HMS Hood or King George V. It is designed for heavy armor penetration, capable of punching through over 330mm of vertical steel at closer ranges to reach the citadel. Conversely, the HE Spgr. L/4.5 (High Explosive) shell detonates on impact, causing massive superstructure damage and starting fires. With a lethal 15m blast radius, HE is the mandatory choice when hunting unarmored merchant ships in convoys or stripping the torpedo tubes off rushing destroyers.
Quick Reference Ammunition Table
| Shell Type | Designation | Primary Target | Optimal Range | Desired Effect |
|---|---|---|---|---|
| Armor Piercing | Pzgr. L/4.4 | Battleships, Heavy Cruisers | 10km - 24km | Citadel Penetration, Magazine Detonation |
| High Explosive | Spgr. L/4.5 | Destroyers, Merchants, Light Cruisers | Any Range | Superstructure Fires, Module Destruction |
Fleet Control and AI Gunners
While this guide focuses heavily on manual gunnery, you are also a fleet commander. You will often be accompanied by the Bismarck, Tirpitz, or Prinz Eugen.
To manage your escorts and your own secondary batteries, utilize the game's target designation UI. By clicking "Set Main/Aux target", you instruct your AI gunners to prioritize specific threats. A critical mechanic to remember: once you set a Main target, your secondary 15cm guns will relentlessly track that ship. If a destroyer ambushes you from the opposite side, you must manually clear the target or set a new Aux target, otherwise your secondary batteries will remain locked on the original threat while torpedoes enter the water.
FAQ: Scharnhorst Gunnery Guide Battleship Command
How do I manually fire the main guns? You must enter the fire control station from the first-person view or select the director via the tactical UI. From there, input the range and lead, select your turret groups, and execute the firing command.
Why are my shells consistently falling short? You are likely failing to update the target's speed in the fire control computer, or your own ship's velocity is throwing off the solution. Ensure you are updating the rangefinder data every 15 seconds during a turn.
Can the 28cm guns sink a heavy battleship like the King George V? Yes, but not through brute force against the main armor belt. You must use your 31-knot speed to maintain distance and rely on plunging fire at ranges exceeding 18 km to punch through the weaker deck armor.
How does weather affect gunnery in Battleship Command? Fog and heavy rain drastically reduce the AI visibility modifier and your own optical range. In these conditions, you must switch to the Seetakt radar to establish target bearing, though radar ranging is slightly less precise than a clear optical lock.
Mastering the Scharnhorst requires patience, mathematical precision, and a deep understanding of naval physics. By applying these fire control principles, you can transform the Kriegsmarine's most beautiful ship into the deadliest predator in the Atlantic.