Wondering how to survive the endgame guardians in SMAR Studio's latest physics-based survival game? The shield ability BeaconBound offers is your primary defensive cooldown, absorbing one direct guardian impact while giving your rolling sphere a brief speed retention window. To get it to survive runs on Hard Mode, you must time its activation during harsh weather events and avoid wasting it on low-level threats before beacon 10. In a game where every route is shaped by procedurally generated hills, rivers, and unpredictable storms, mastering your defensive toolkit is the only way to reach the final light.
This comprehensive guide breaks down the exact frame data, physics interactions, and late-game strategies needed to own the shield mechanic. Whether you are struggling with the slick mud of a rainstorm or the relentless pursuit of late-run guardians, understanding how to deploy this ability will transform your win rate and help you outsmart the game's adaptive AI.
Core Mechanics of the Shield Ability BeaconBound
At its core, BeaconBound is a game about momentum. You control a rolling sphere navigating a 3D procedural world, and gravity is both your greatest ally and your worst enemy. The shield ability BeaconBound players unlock early in the game acts as a kinetic dampener and a literal lifesaver when the terrain turns against you.
When you press the activation key, the shield deploys instantly, providing a strict 2.5-second invulnerability window. During this brief period, your sphere is encased in a hard-light barrier. If a guardian strikes you, the barrier shatters, but you take zero damage. More importantly, you retain your current physics momentum. In a physics-based action-adventure, losing your speed at the base of a steep hill because of an enemy collision is an absolute death sentence. The shield ensures that your kinetic energy remains uninterrupted, allowing you to power through an ambush and crest the hill without slowing down.
However, the cooldown is a punishing 15 seconds. In the fast-paced ecosystem of BeaconBound, 15 seconds without a defensive option is an eternity. This forces a high-skill risk/reward calculation: do you pop the shield to maintain terminal velocity through a dangerous rocky chokepoint, or do you save it for the inevitable guardian lunge that you know is coming? Understanding this timing is the foundation of high-level play.

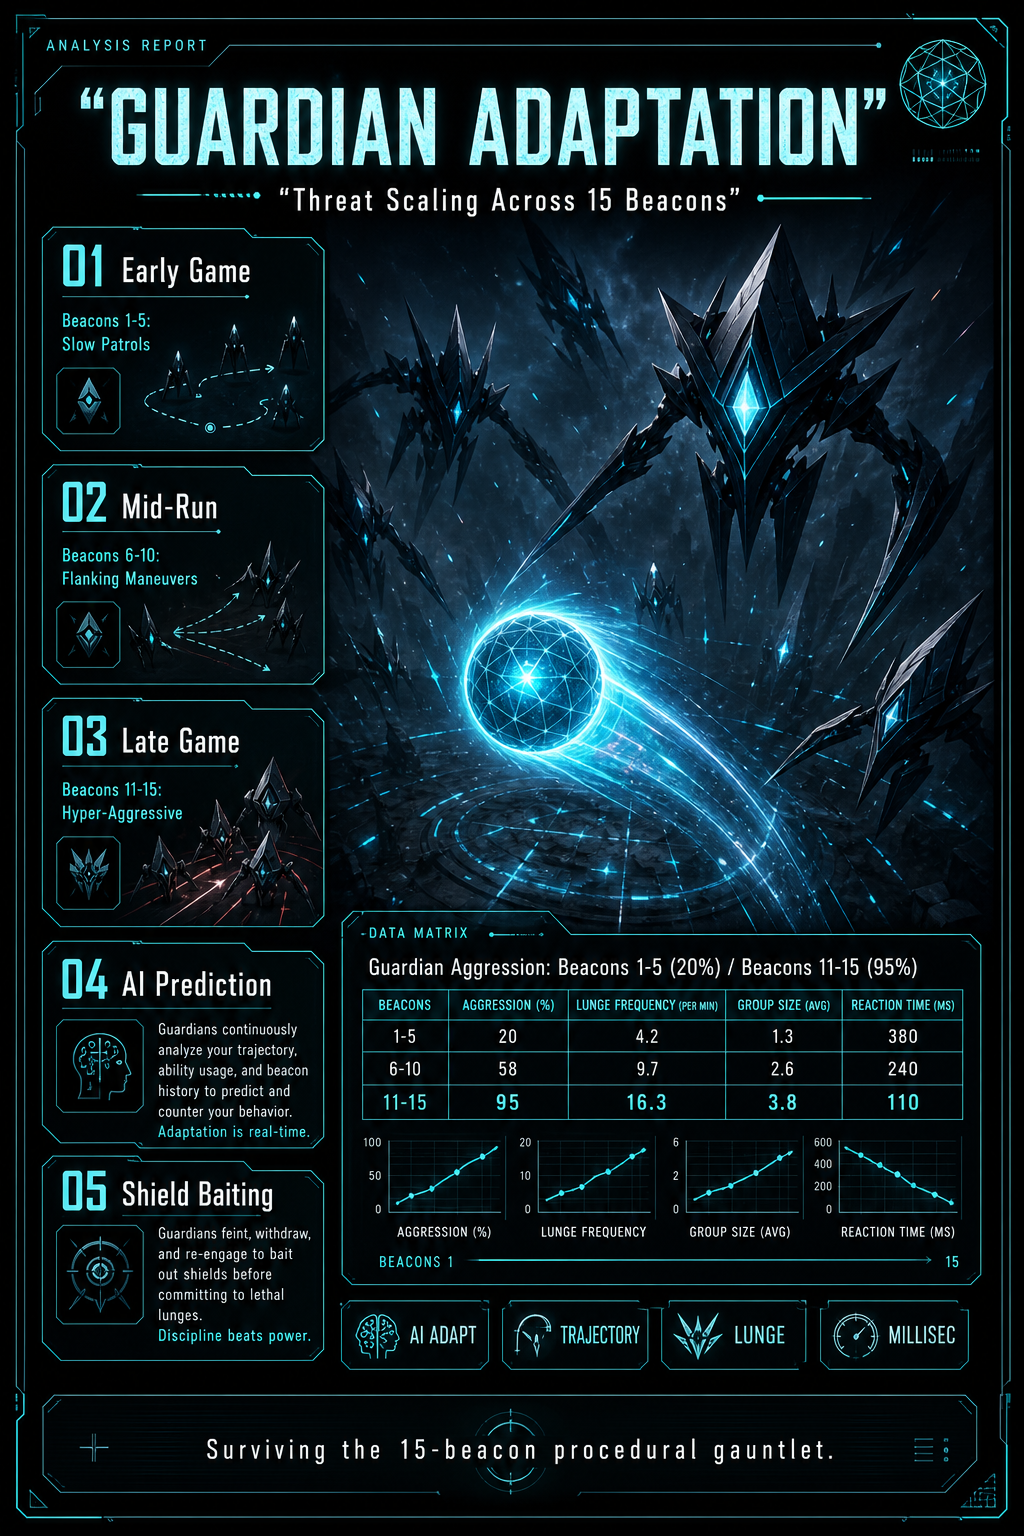
Surviving 15 Beacons: When to Trigger the Shield Ability BeaconBound Guardians Hate
The ultimate objective of every run is to collect 15 guarded beacons before the world wears you down. The game’s procedural generation ensures that no two routes are ever the same, but the difficulty curve scales predictably based on your current beacon count. Adapting your shield usage to this scaling threat is critical.
During the early game (Beacons 1-5), the guardians protecting the light are slow, lumbering entities. They rely on predictable patrol routes and heavily telegraphed movements. Here, using the shield is largely unnecessary; basic terrain reading and steering will keep you safe. Wasting your cooldown here is a sign of panic rather than strategy.
The mid-run (Beacons 6-10) is where the AI begins to adapt. Guardians become smarter, employing flanking maneuvers and attempting to cut off your trajectory before you can reach the light. This is the phase where the shield ability BeaconBound features transitions from a luxury to an absolute necessity. You will often find yourself cornered between a procedural river and a pursuing enemy, forcing you to tank a hit to escape the pincer movement.
The late game (Beacons 11-15) is a brutal test of reflexes and spatial awareness. Guardians in this phase are hyper-aggressive and will actively predict your rolling path based on your current velocity. Popping the shield too early in this phase leaves you entirely exposed during the critical final approach to the beacon. The elite strategy is to actively bait the guardian's lunge. You must roll directly toward a hazard, wait for the AI to commit to a strike animation, and trigger the shield at the last possible millisecond. This causes the guardian to bounce off your barrier, often sending them tumbling down a hill while you safely secure the beacon.
Weather Hazards and the Shield Ability in BeaconBound
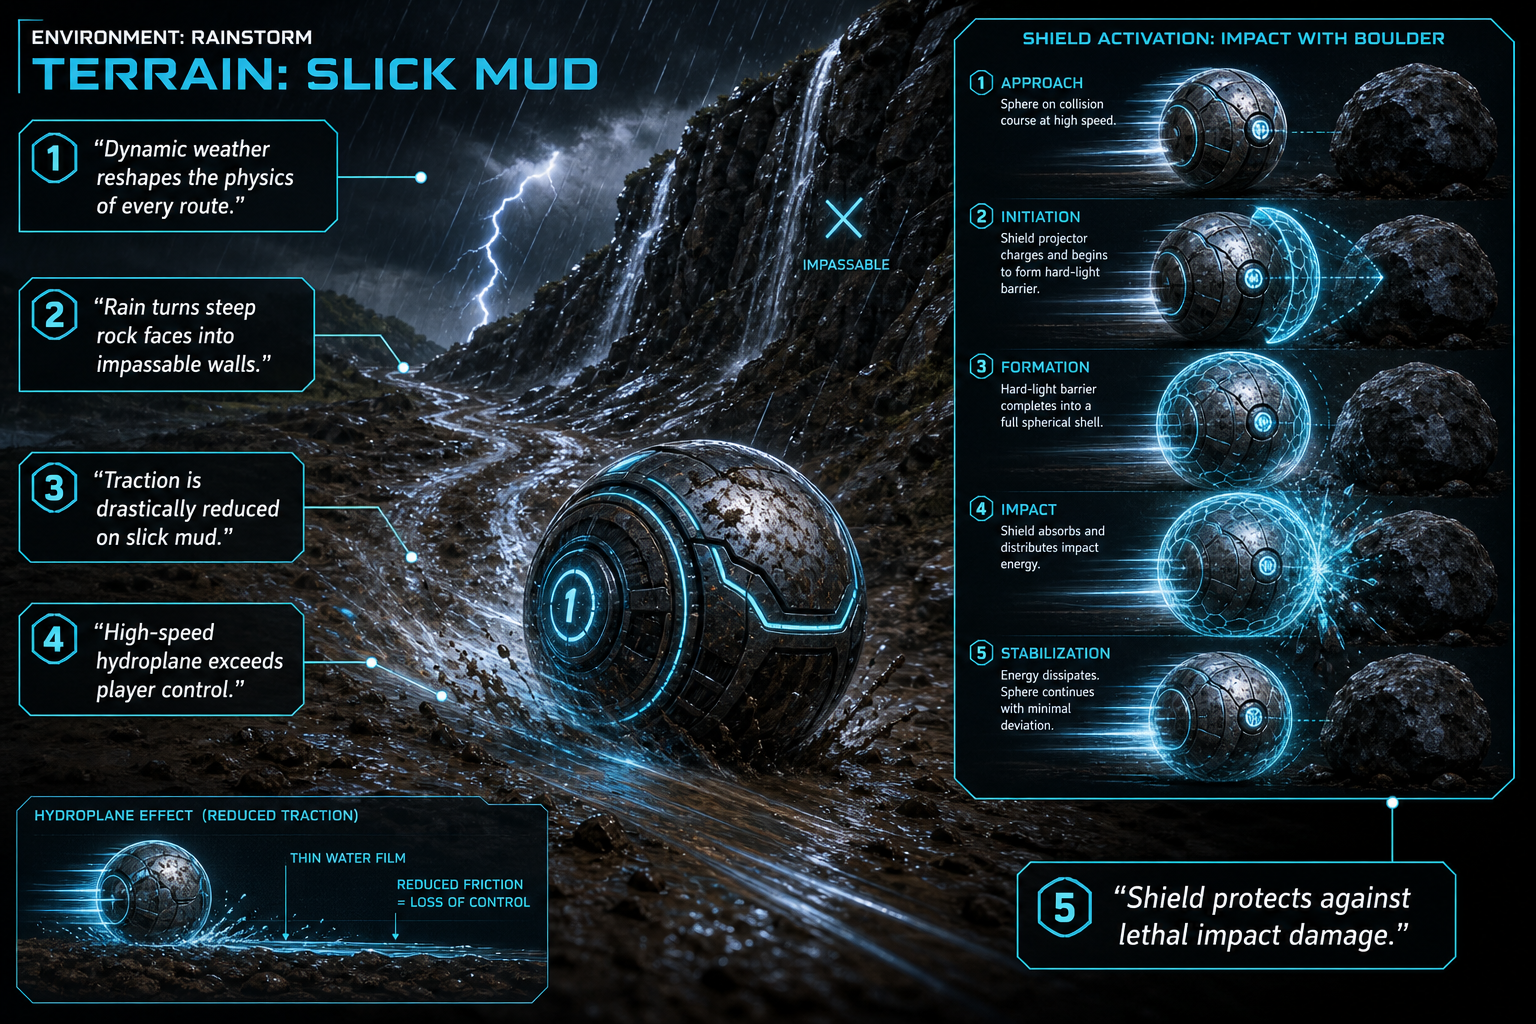
BeaconBound isn't just about dodging enemies; the environment itself is a hostile, living force. Dynamic weather—specifically fog, rain, wind, and night phases—fundamentally reshapes the physics of every route. Understanding how the shield interacts with these weather states is what separates novice players from Hard Mode veterans.
Rain is arguably the most dangerous weather event in the game. It turns lush grass into slick mud and steep rock faces into impassable walls, drastically reducing your sphere's traction. When rolling downhill in the rain, your speed can easily exceed your control, leading to a high-speed hydroplane. Activating the shield during a hydroplane won't magically restore your grip on the terrain, but it will protect you from the lethal impact damage of hitting a boulder at terminal velocity.
Wind alters your trajectory, actively pushing your sphere off narrow ridges or precarious bridges. When caught in a severe crosswind, the shield ability BeaconBound provides can actually be used offensively. By popping the shield just as you are blown into a solid object, you can ricochet off the surface, using the game's physics engine to redirect your momentum toward the beacon rather than falling into the abyss.
Night and fog reduce visibility to a few in-game meters. When you can't read the terrain or spot guardians from a distance, the shield becomes your ultimate panic button. If you hear the distinct audio cue of a guardian aggroing in the fog, triggering the shield gives you a 2.5-second window to assess the threat, absorb the unseen impact, and plan an escape route into clearer terrain.
Combining Dash, Stasis, and the Shield Ability BeaconBound
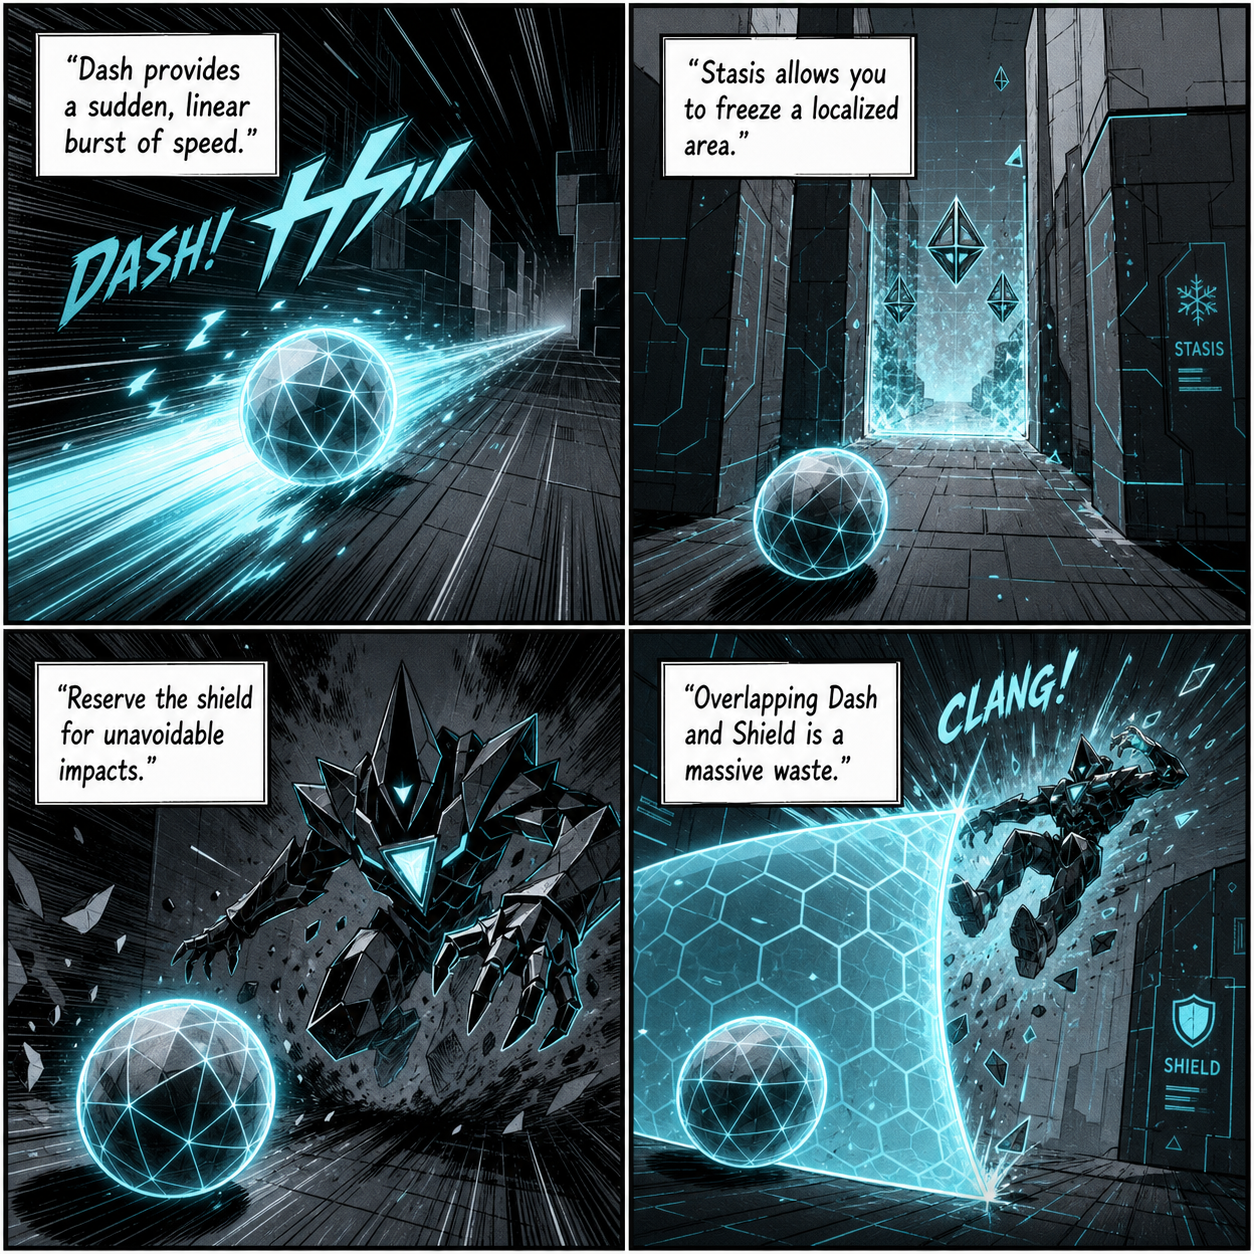
To survive the full 15-beacon run, you cannot rely on the shield alone. SMAR Studio provides a tactical triad of active abilities: Dash, Stasis, and Shield (alongside the passive Pointer ability to find your way). Mastering the interplay between these cooldowns is essential for late-game survival.
Stasis allows you to freeze a localized area of the map. This is incredibly versatile—you can freeze a guardian mid-lunge, or halt a rolling log that is blocking your path down a mountain. Dash provides a sudden, linear burst of speed, perfect for clearing open ground or escaping the blast radius of an environmental hazard.
The optimal survival loop involves constantly juggling these three cooldowns. Use Dash to quickly cross dangerous, open terrain where guardians have the line-of-sight advantage. Use Stasis to lock down a narrow chokepoint, allowing you to roll past safely without taking a hit. Reserve the shield ability BeaconBound provides strictly for unavoidable impacts or catastrophic physics failures.
A common mistake among new players is overlapping abilities. Using Dash and Shield simultaneously is a massive waste of resources. If you are dashing, you are already moving too fast for most guardians to track, making the shield redundant. Save the shield for when your Dash is on cooldown, your Stasis is depleted, and you are genuinely vulnerable to a direct hit.
Normal Mode vs. Hard Mode Shield Strategies
The way you manage your defensive cooldowns changes drastically depending on your chosen difficulty setting. Normal Mode allows for saves, meaning a wasted shield and a subsequent death only costs you a few minutes of progress. In this forgiving environment, you can afford to use the shield aggressively to speedrun through tricky sections or purposefully bounce off hazards to save time.
Hard Mode is a completely different beast. It demands one clean run for all 15 beacons with zero saves. In Hard Mode, guardian tracking speed is increased by roughly 40%, and weather events like storms and fog last twice as long. Here, the shield ability is less about absorbing random guardian hits and more about surviving catastrophic physics failures. If you misjudge a jump over a roaring river in Hard Mode, popping the shield before you hit the opposite bank can prevent a run-ending shatter. It becomes a tool for mitigating your own platforming mistakes rather than just an anti-enemy barrier.
Common Mistakes to Avoid with the Shield
Even veteran players make critical errors when managing their defensive toolkit under pressure. Avoid these common pitfalls to dramatically increase your win rate:
- Panic Popping: Triggering the shield the moment you see a guardian on the horizon, rather than waiting for their attack animation. This wastes the 2.5-second window and leaves you exposed when they actually close the distance.
- Ignoring Terrain Physics: Using the shield to block an attack, but forgetting that the kinetic impact will still push your sphere backward. If you are balancing on a cliff edge, you will survive the hit but still fall to your death.
- Holding it Too Long: Dying with your shield off cooldown because you were "saving it for a worse situation." If a hit is going to kill your momentum entirely on a steep incline, use the ability. Momentum is life in BeaconBound.
FAQ: Shield Ability BeaconBound
How long does the shield last in BeaconBound? The shield provides exactly 2.5 seconds of invulnerability. This tight window requires precise timing, forcing players to activate it just before a guardian strike rather than preemptively.
Can you upgrade the shield ability? Currently, SMAR Studio has balanced the core abilities to remain static. There are no skill trees to increase the duration; the difficulty curve relies entirely on the player's mastery of physics, timing, and terrain reading.
Does the shield protect against weather effects? It does not stop the wind from pushing you or the rain from making the ground slippery. However, it does prevent momentum loss and shatter damage if a weather event forces you into a high-speed collision with the environment.
How do I unlock the shield? The shield is unlocked naturally during the early progression of the game, typically after collecting your first few beacons and surviving your first major guardian encounter.
Sources
- BeaconBound Official Steam Page and Developer Updates
- SMAR Studio Gameplay Previews (June 2026)
- Community Frame Data and Physics Testing