Getting your status effects explained Nomia style is the fastest way to survive the shattered dream. In Magnesium Ninja’s 1.0 release of NOMIA, buffs and debuffs stack exponentially, meaning a single misread icon can instantly wipe your roguelike run. The core difference between victory and defeat lies in the nuances: buffs like Buffer absorb flat hits, while elemental debuffs like Cascade and Ardor trigger massive combo reactions based on your grid positioning. This guide breaks down every status effect in the game, comparing similarly-named modifiers so you can master Butterfly and Seagull’s tactical synergies without getting overwhelmed by the codex.
Why You Need Status Effects Explained Nomia Style
The sheer volume of terminology introduced in the early game is the most common critique of this otherwise brilliant tactical RPG. As one Steam reviewer noted upon the May 2026 launch, the "pure number of status effects with similar names that are introduced very quickly" makes the learning curve incredibly steep. When you are coordinating two heroes—Butterfly with her martial Action cards and Seagull with his magical Gambit cards—you cannot afford to confuse Fear with Hesitation, or Block with Buffer.
Make no mistake: if you treat NOMIA like a standard deckbuilder where you just play your highest-damage card, you will die. Quickly. The game demands spatial awareness. A buff is not just a statistical increase; it is a mechanical rule change. A debuff is not just a damage penalty; it is a spatial restriction.
The game's UI does provide hover-over text (a feature heavily refined between Alpha v0.2.1 and the 1.0 release), but in the heat of a run, parsing the exact difference between a DoT (Damage over Time) preview and a hard crowd-control lockdown is tough. You need to memorize how these effects interact with your deck before you commit to a turn.
Elemental Status Effects Explained Nomia: Enemy Debuffs
The shattered dream is divided into distinct biomes, each guarded by enemies that manipulate the elements. Understanding these elemental debuffs is the foundation of advanced play.
Fire Biome: The Double-Edged Sword of Ardor
Enemies like the Soot Sweeper and the Eternal Pyre rely on pressure. Their signature debuff is Ardor. Ardor increases your outgoing damage by 25%, which sounds like a buff until you read the fine print: the afflicted unit takes 2 damage per tile moved. If Butterfly gets hit with Ardor, her signature Joust card—which relies on moving as far as possible in a straight line to scale its damage—becomes a suicide tactic. She will take massive damage from the movement penalty before her spear even connects.
Water Biome: Positioning is Everything
Guarded by the Ink Well and Mirrorscale, the Water biome introduces Cascade. When a unit afflicted with Cascade is struck by an Action card, the damage splashes to all adjacent grid tiles. While enemies use this to punish you for grouping Butterfly and Seagull together, you can also weaponize it. By pushing a Cascade-afflicted enemy into a cluster of its allies, Butterfly's single-target strikes suddenly become devastating AoE (Area of Effect) attacks.
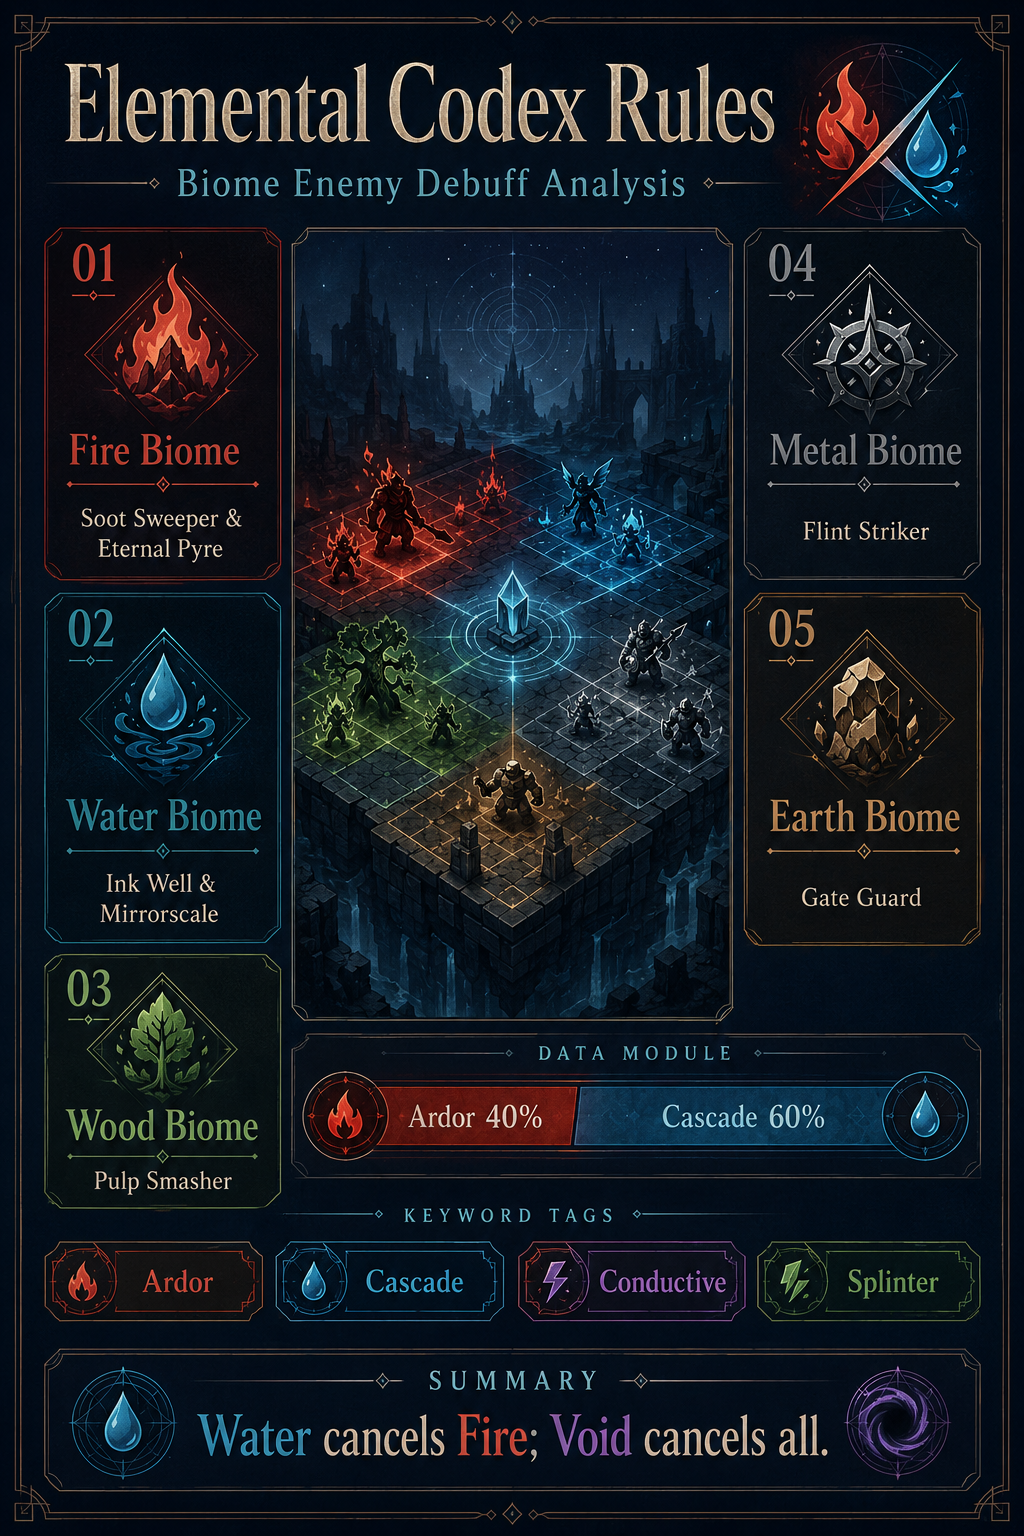
Wood Biome: The Gambit Trap
The Pulp Smasher and Pedant utilize Splinter. Splinter punishes magical greed. A unit with this debuff takes +1 additional damage from every subsequent Gambit card played that turn. If Seagull is holding a hand full of cheap, low-damage Gambits, Splinter will turn a minor annoyance into a lethal threat.
Metal Biome: The Chain Reaction
The Flint Striker and Ingot apply Conductive. Conductive causes lightning and energy attacks to bounce to the nearest unit within three tiles. Seagull’s Fulmination is a high-cost Gambit that naturally chains between enemies. When you strike an enemy afflicted with Conductive, the chain radius increases exponentially, effectively allowing you to wipe a scattered board from a safe distance.
Earth Biome: Spatial Disruption
The Gate Guard inflicts Stagger. Stagger forces your unit one tile backward upon taking a hit. In a game where positional advantage dictates everything, being staggered out of a chokepoint or pushed off a cliff is a death sentence. It completely ruins the setup for Seagull’s AoE Gambits, which require precise clustering of targets.
Psychological Status Effects Explained Nomia: Crowd Control
Beyond the elements, NOMIA employs psychological status effects that directly attack your ability to play the game. These are the most dangerous debuffs because they alter your deck's fundamental mechanics.
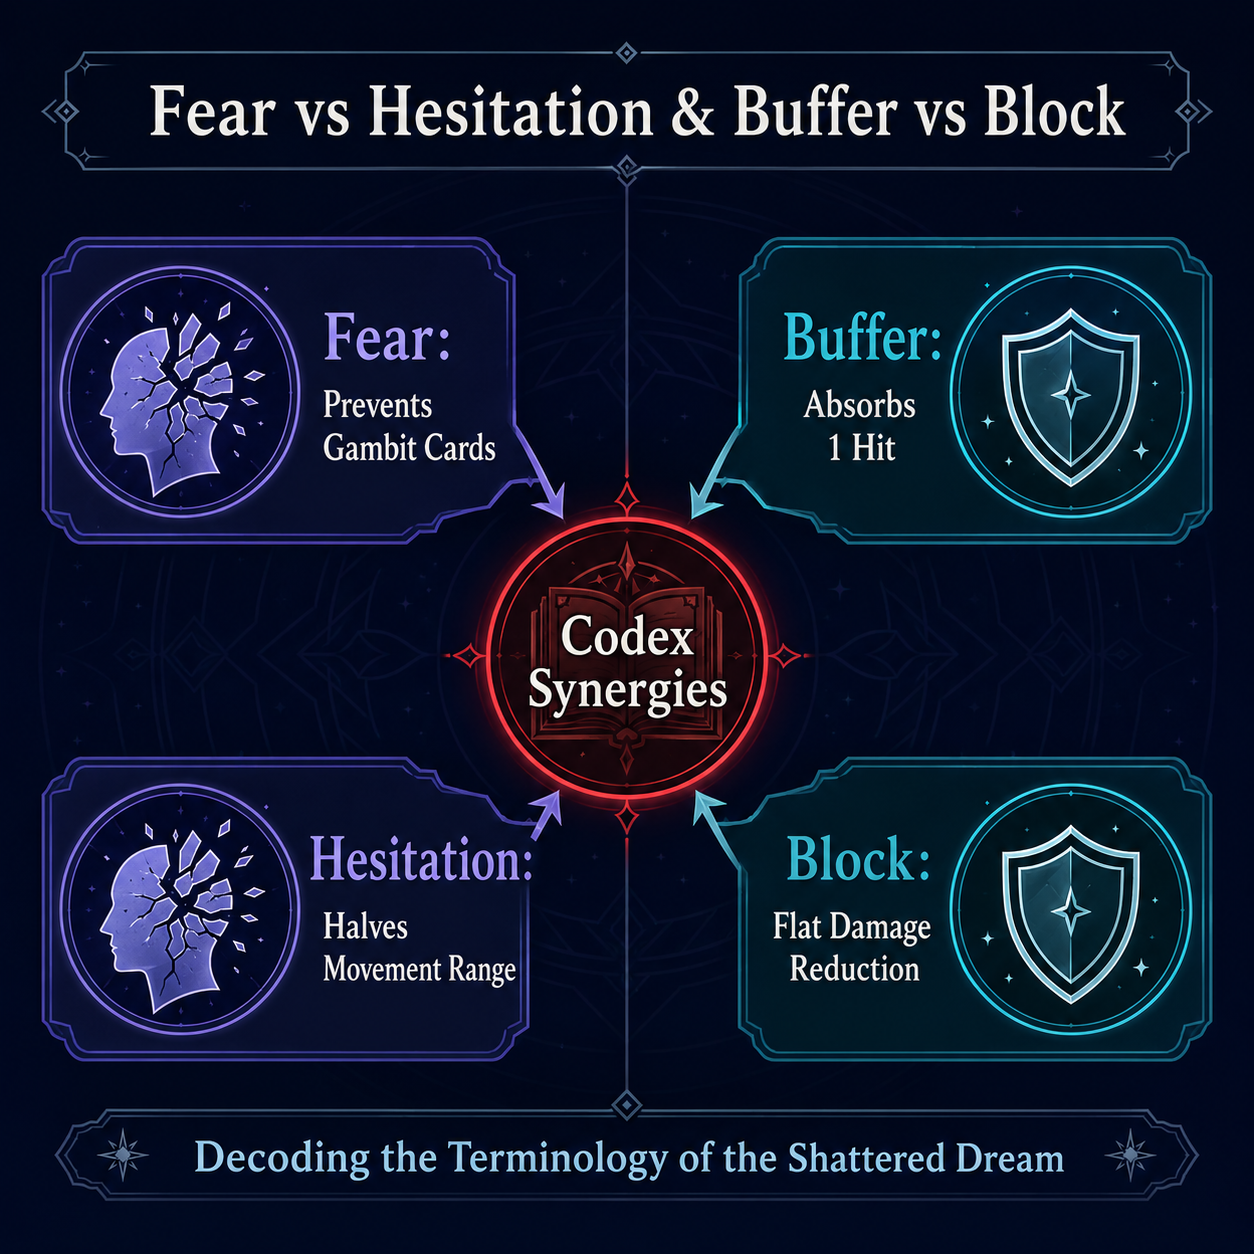
Fear is inflicted by the Nightmare enemy. It specifically locks out Gambit cards. Since Seagull's deck is heavily reliant on Gambits to execute masterstrokes, getting hit with Fear effectively silences him, forcing him to rely on basic Actions. If your deck leans too heavily into magical might, a single Nightmare can end your run.
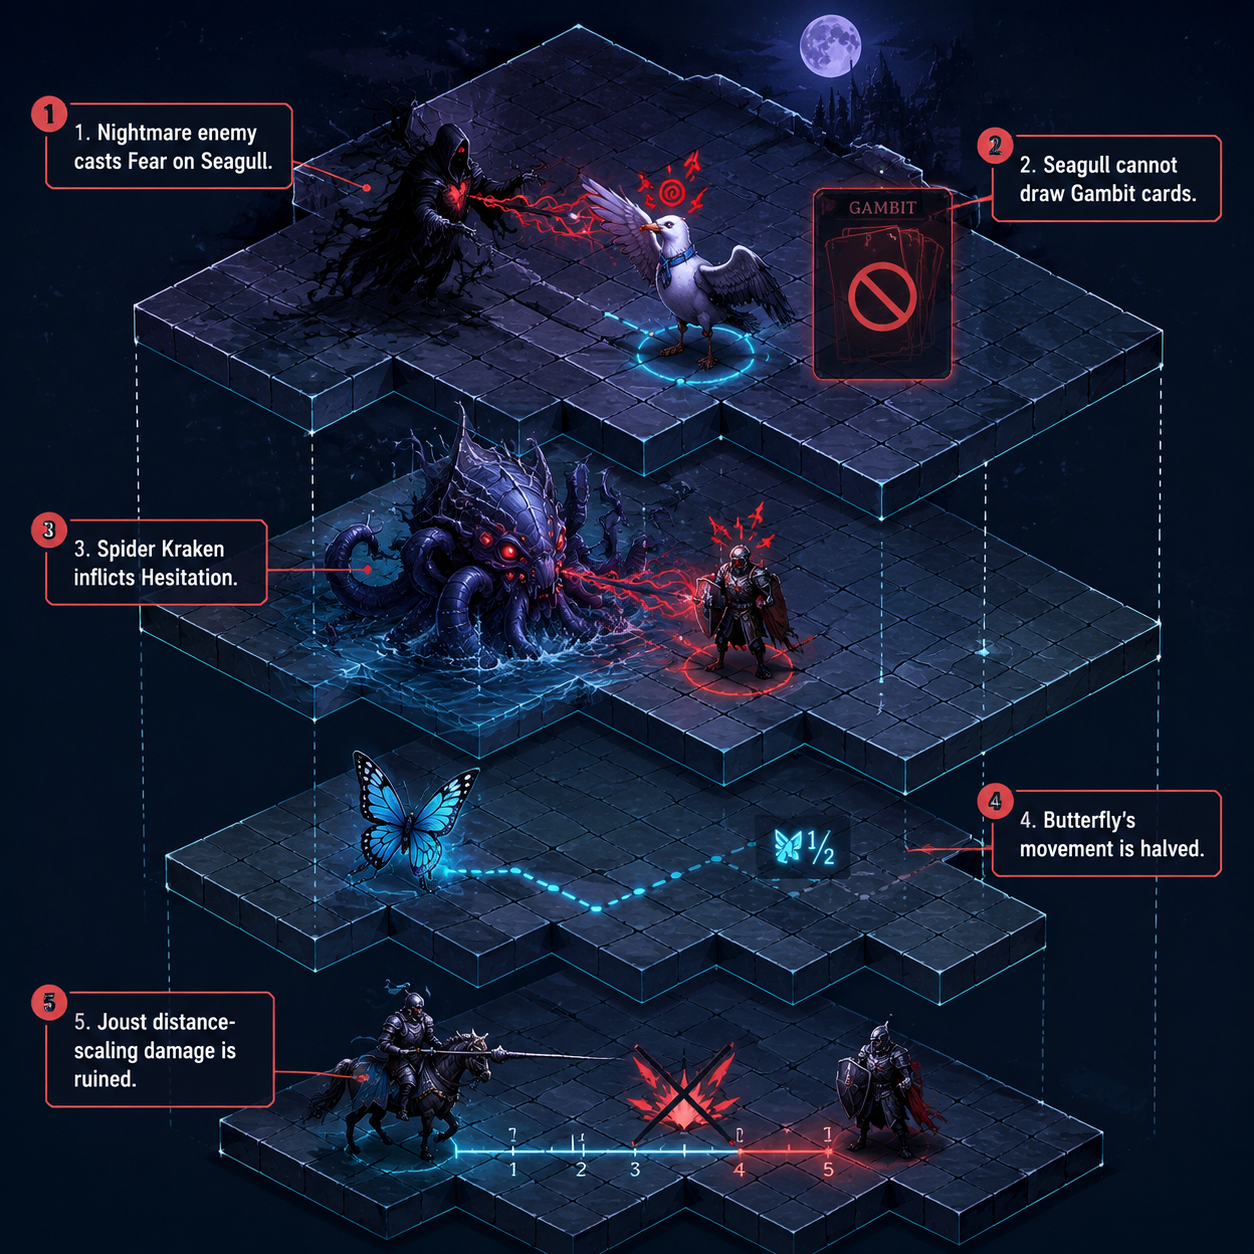
Hesitation is the signature tool of the Spider Kraken. It halves the afflicted unit's movement range. For Butterfly, movement is life. As mentioned earlier, her Joust requires distance to scale its damage. Hesitation doesn't just limit her mobility—it mathematically castrates her primary damage output. The Spider Kraken doesn't just want to hurt you; it wants to ruin your math.
Defensive Status Effects Explained Nomia: Buffs & Items
Survival requires mastering the defensive buffs provided by your deck and the Shop's consumable items.
Buffer is the most misunderstood mechanic in the game. Granted by items like the Mote of Dampening, Buffer does not reduce damage by a flat number (that is what Block does). Instead, Buffer negates an entire instance of damage, regardless of its size. If a boss winds up an attack that deals 50 damage, one stack of Buffer absorbs all 50. However, if a weak enemy hits you for 1 damage first, it strips the Buffer, leaving you completely exposed to the boss's attack. Managing aggro to protect your Buffer stacks is a high-level skill.
Void is granted by the Mote of Emptiness. It is the ultimate tactical cleanse, nullifying the very next status effect applied to the unit. Popping a Mote of Emptiness right before a Nightmare casts Fear is a massive tempo swing.
Finally, there is Obstinacy, a rare Shop item. It fully heals the selected unit but strips away all current buffs and locks them in place for a turn. It is a panic button that demands a heavy positional sacrifice.

Status Effect Synergies and The Cancellation Codex
Introduced in Alpha v0.3.4, the Codex explicitly outlines which status effects cancel each other out. You do not always need a Mote of Emptiness to cleanse a debuff; you can use the game's elemental logic against it.
Water cancels Fire. If Butterfly is suffering from Ardor, deliberately stepping into a Cascade hazard will extinguish the Ardor, trading a movement penalty for a splash-damage vulnerability.
Similarly, Buffer and Stagger interact uniquely. If a unit with Buffer is hit by a Stagger attack, the damage is negated, but the physical pushback still occurs. You cannot shield your way out of bad positioning.
Mastering NOMIA means viewing your deck not as a collection of attacks, but as a toolkit for manipulating these overlapping systems.
FAQ: Status Effects Explained Nomia
What is the difference between Fear and Hesitation in Nomia? Fear prevents the afflicted unit from drawing or playing Gambit cards, heavily nerfing magic-users like Seagull. Hesitation halves the unit's movement range on the grid, severely limiting martial fighters like Butterfly who rely on distance-scaling Action cards.
How do I cure Ardor from Butterfly? You can cure Ardor by applying a Water-based status effect like Cascade to her, which cancels the Fire element. Alternatively, using a Mote of Emptiness to gain Void will nullify the next debuff, though it won't retroactively cure an existing one.
Does Buffer block DoT (Damage over Time) in Nomia? No. Buffer absorbs direct instances of strike damage. DoT effects like Burn will bypass Buffer entirely, ticking away at your health pool while leaving the Buffer stack intact for the next physical hit.
Where can I find the Mote of Emptiness? The Mote of Emptiness, which grants the Void status effect, can be purchased in the Shop or rarely looted from elite encounters in the Metal and Earth biomes.